Reverse Engineering an IP Camera
by Evan Shaw
Table of Contents
In February of 2025, I decided that I wanted to reverse engineer an embedded device, for fun and experience. After going through some old devices, I found a pair of 1080p IP cameras that we had bought in 2019. In 2020, we replaced them with 4k cameras because we thought they were destroyed by a lightning strike, but it turns out, the PoE switch was destroyed instead (only the PoE capability, the normal ethernet traffic of the switch still works). The goal of this project is to find at least one critical security vulnerability. As far as I know, the firmware has never been updated, and no date that I saw in the dumped firmware references any date past 2018.
The device in question is a generic IP camera sold under the brand name “SV3C”. In Figure 1, you can see that the device has its default username (admin) and password (123456) written on the sticker. For this project, I’m just going to assume that the target has changed the username and password. Figure 1 also shows the overall construction of the device: 3 printed circuit boards held together with standoffs. The top board is the power and ethernet board.
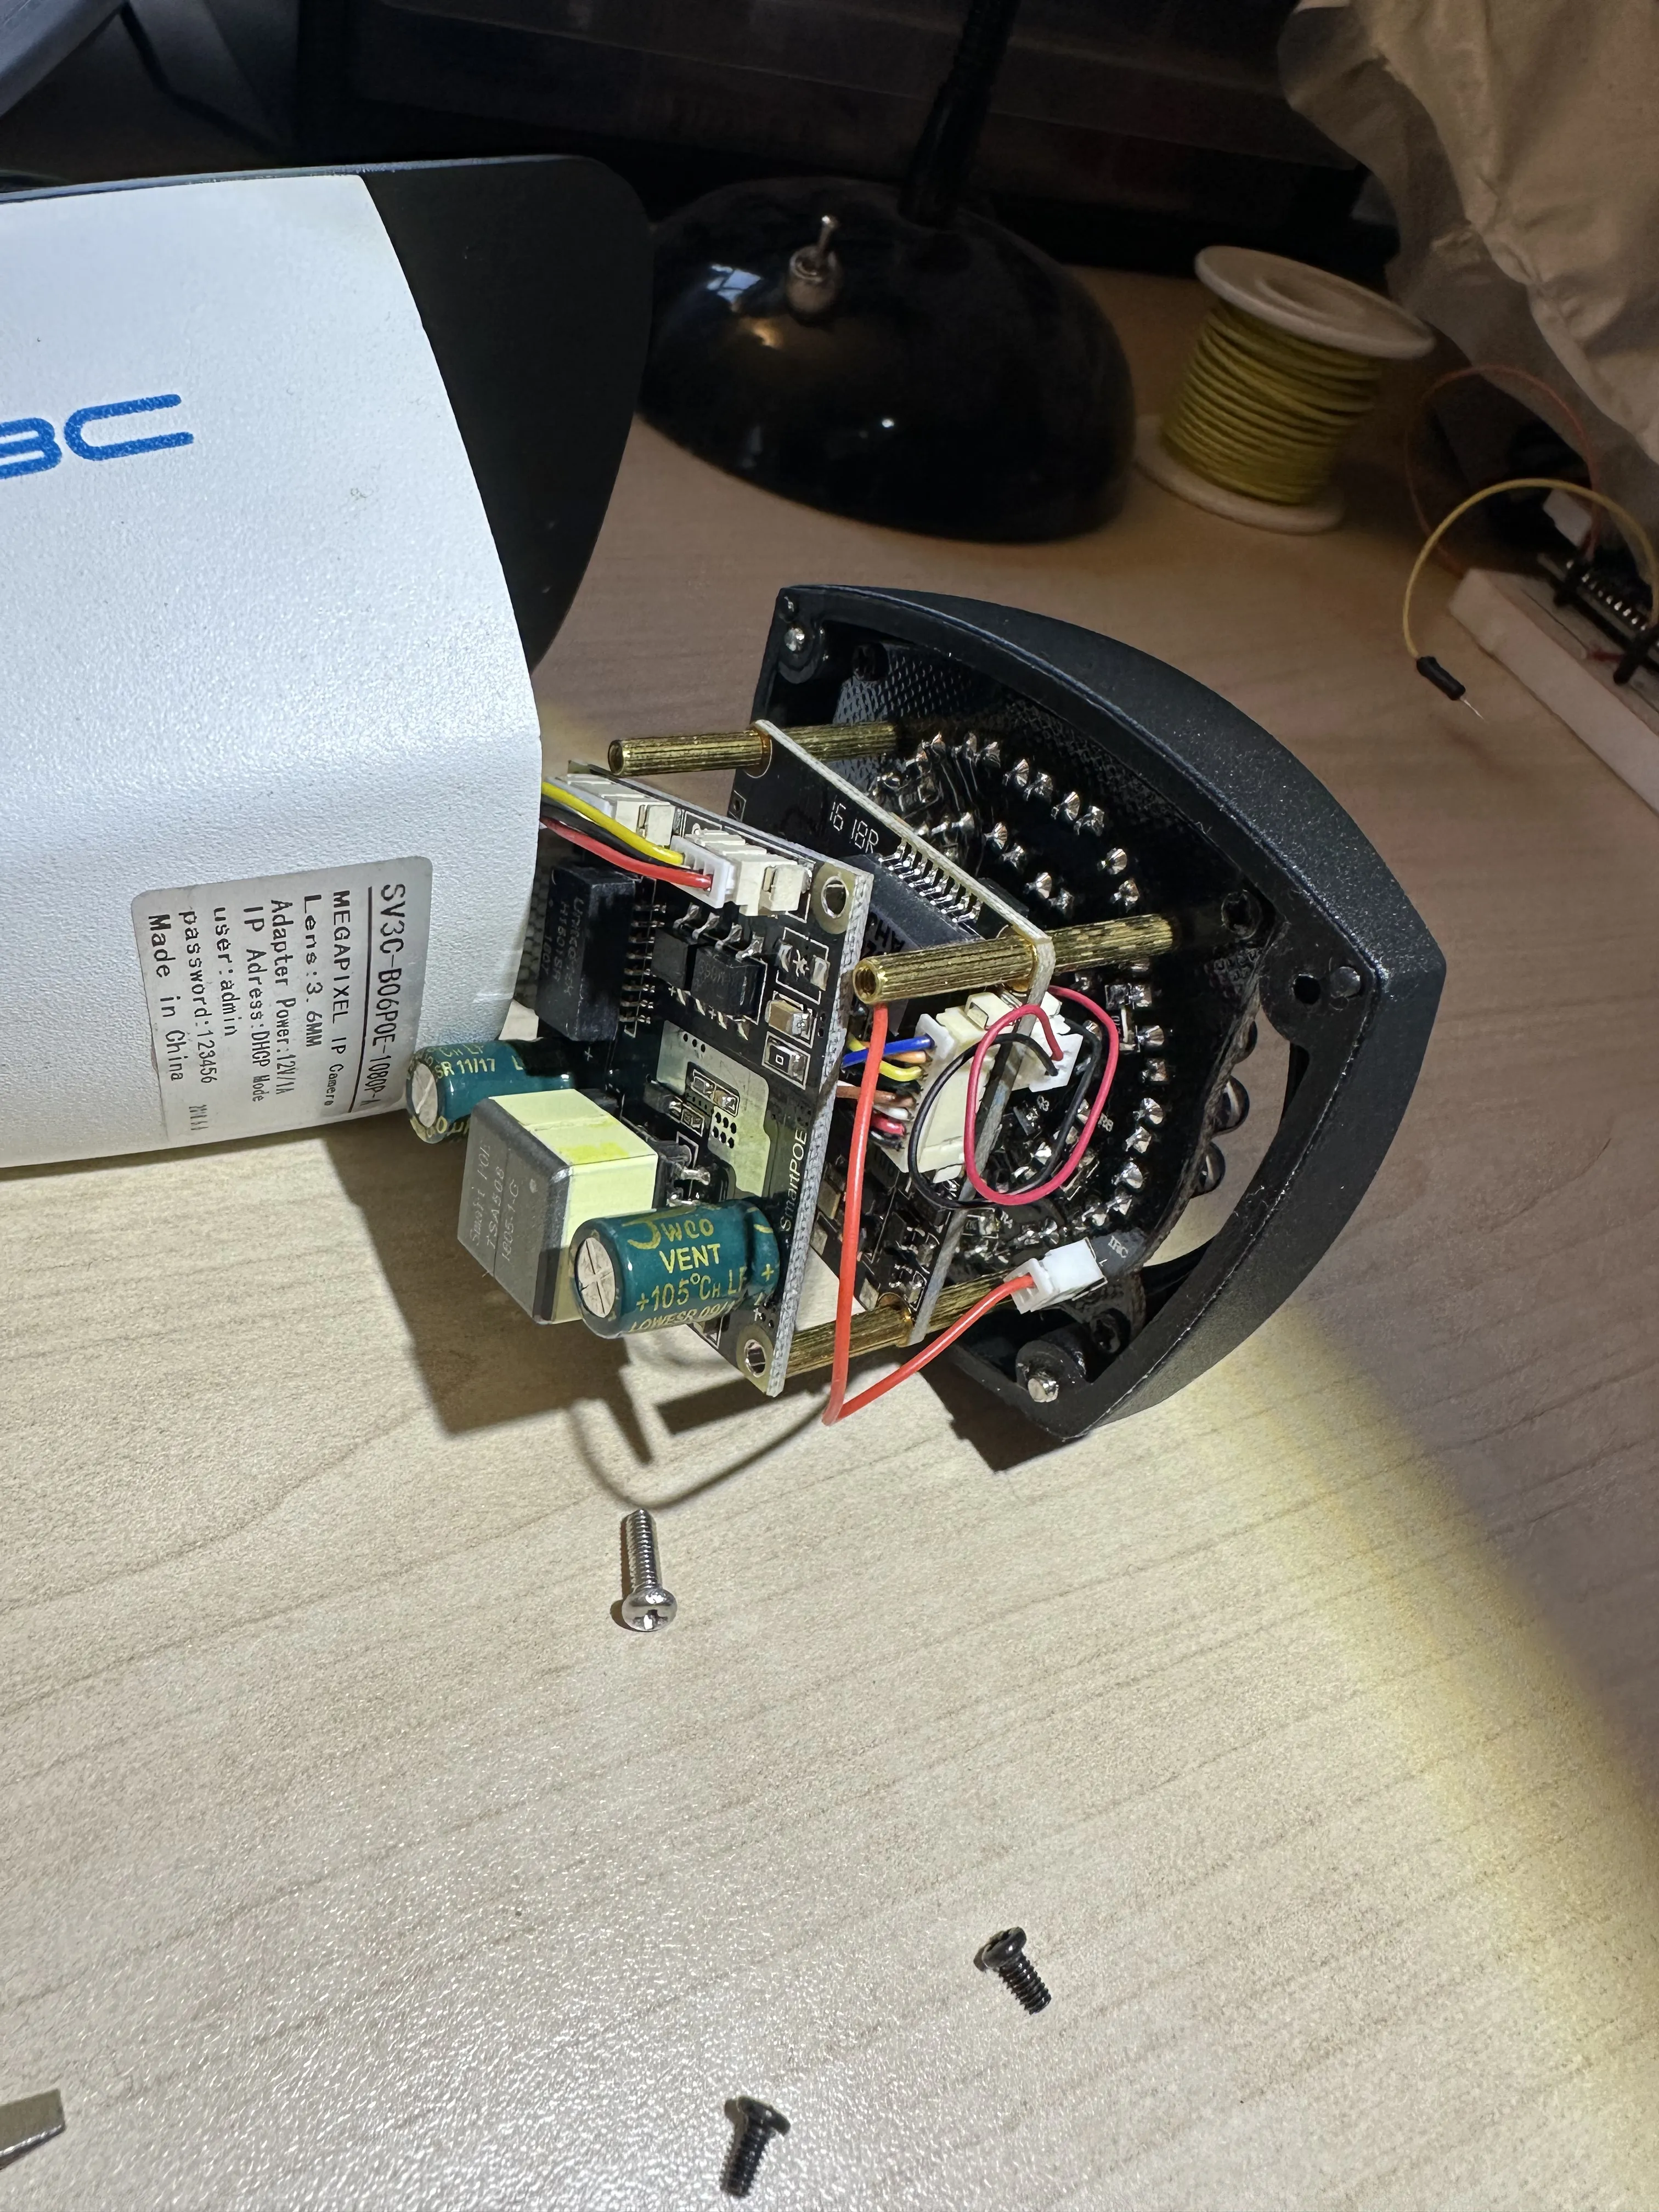
Figure 1
Figure 2 shows a top shot of the middle board, which presumably contains the processor and flash. According to the laser print, we are working with the MSC313E ARM processor.
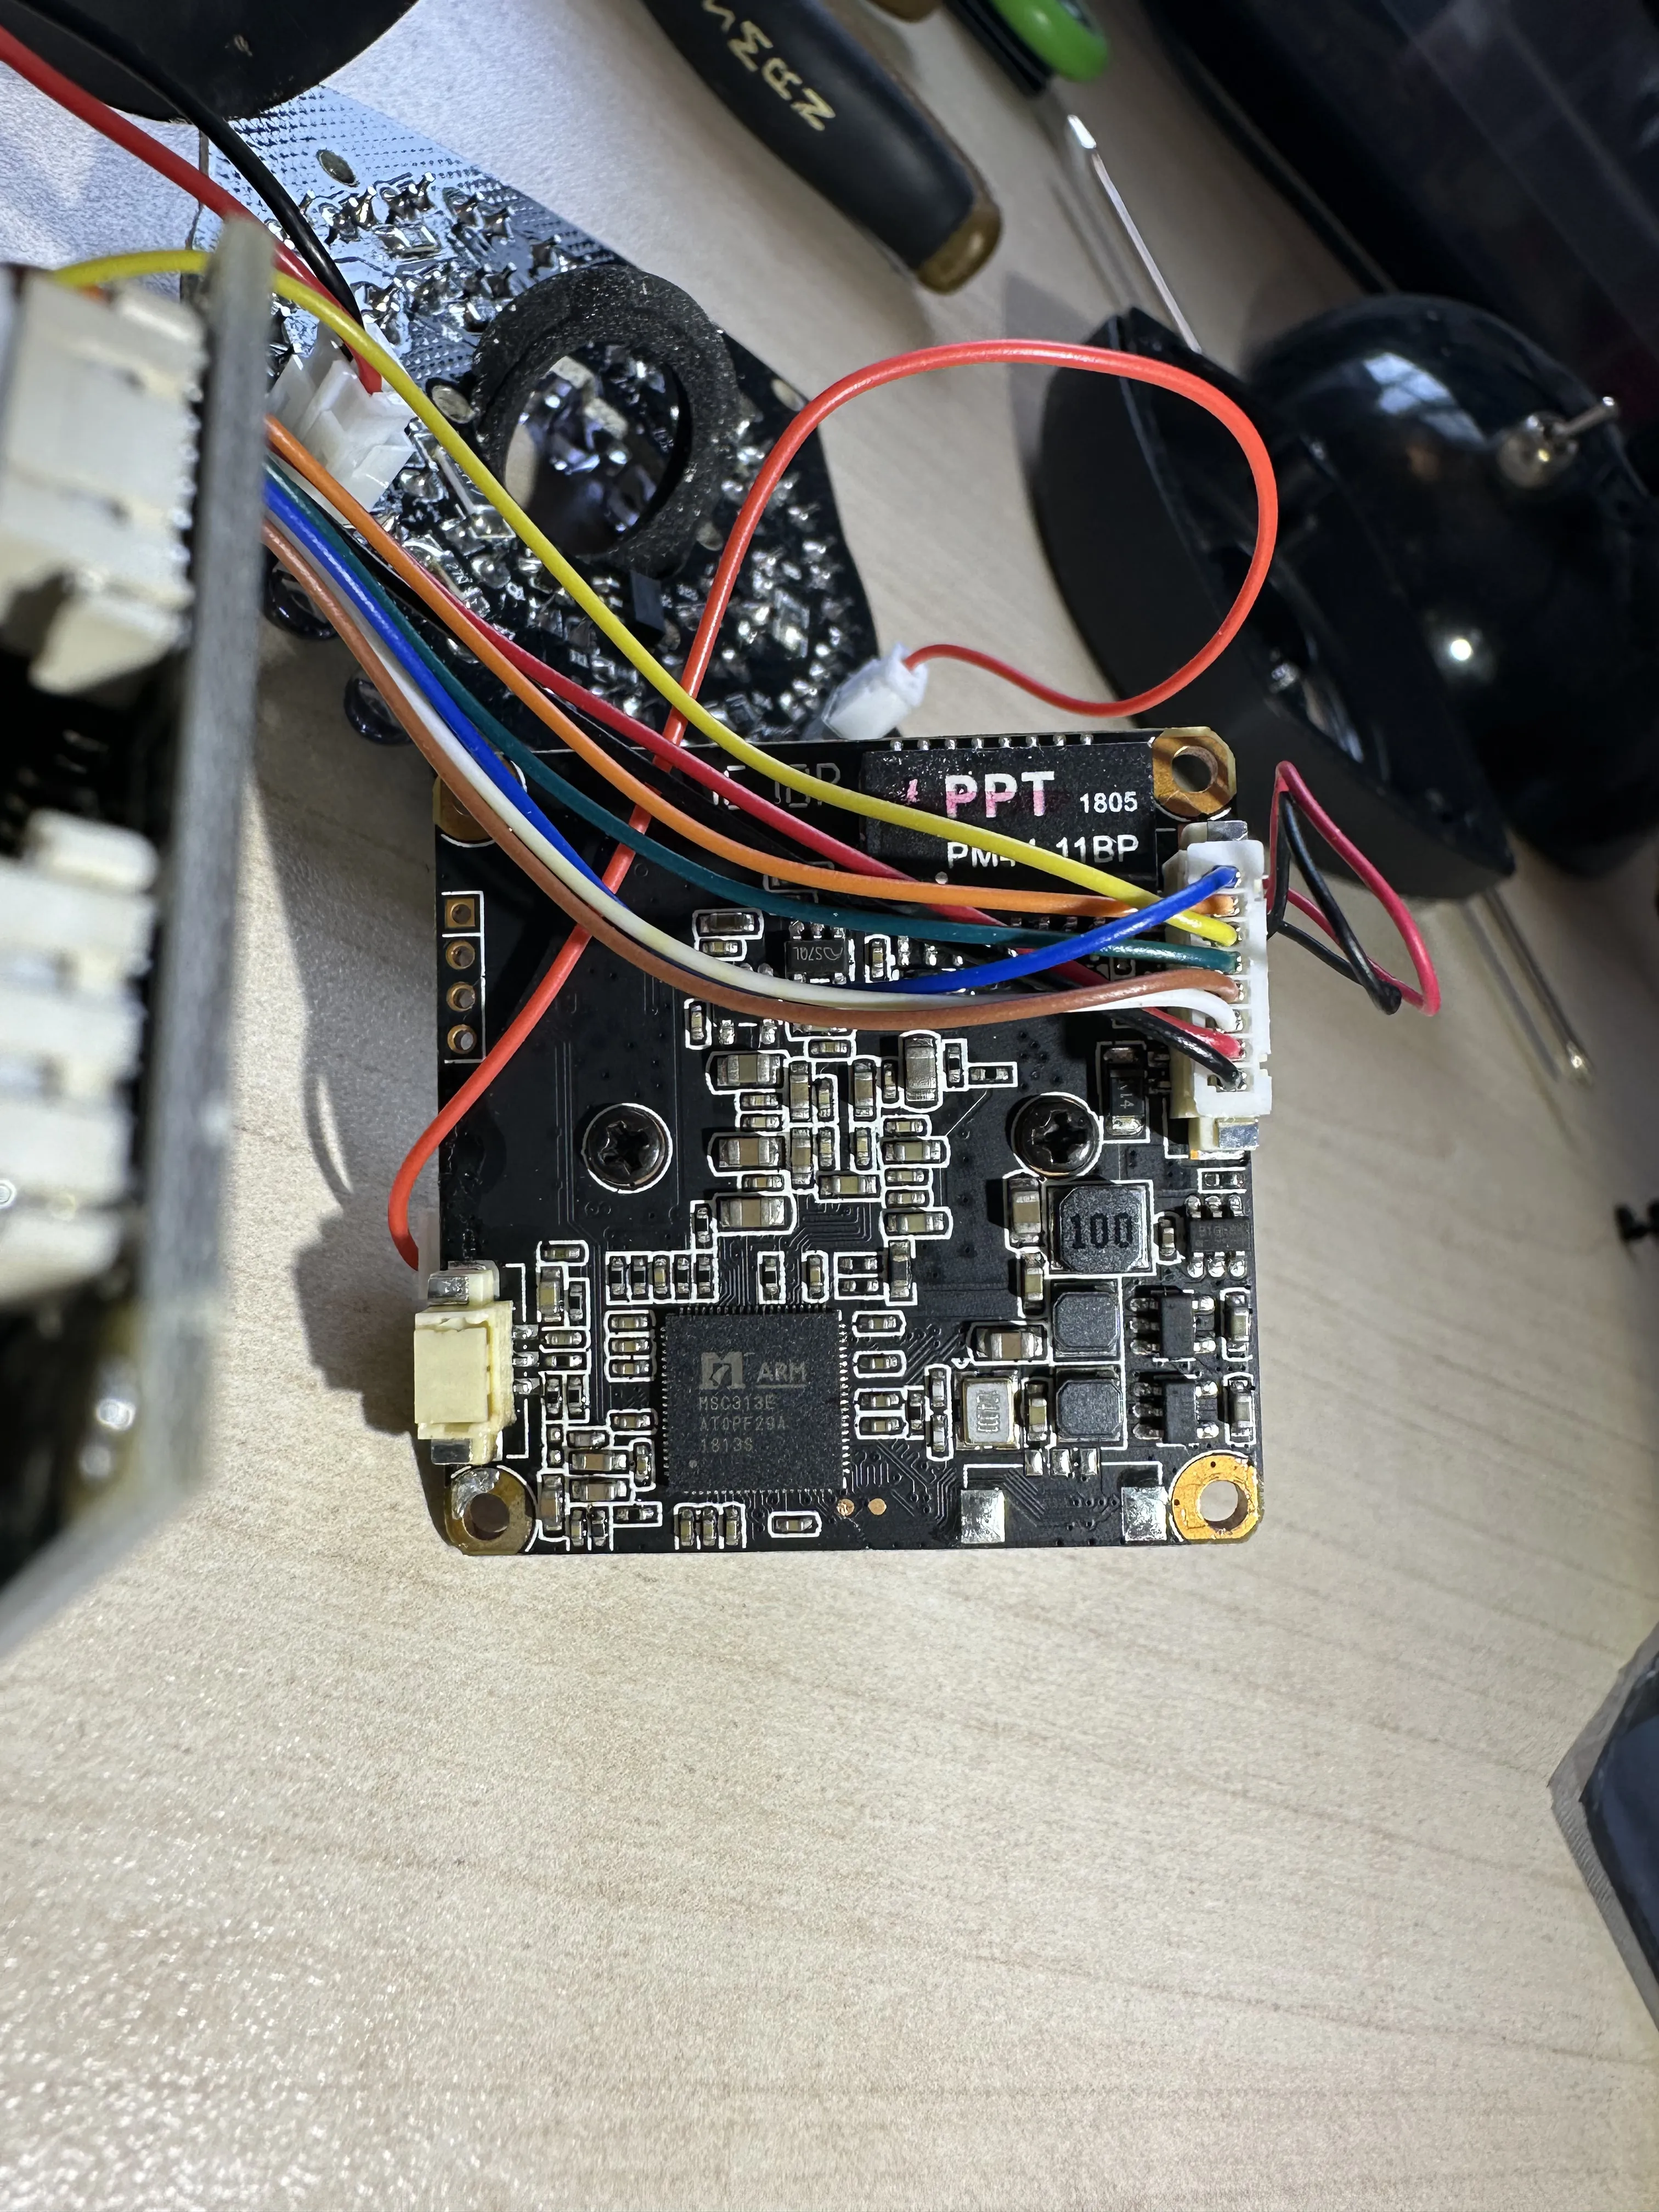
Figure 2
A quick online search yields some details about the chip. It was designed by a company called MStar Semiconductor, a fabless semiconductor company that apparently merged with MediaTek a while back. According to an online summary sheet, it is a custom ARM cortex A7 chip designed for use in IP cameras with dedicated video encoding hardware. It has an MMU, and is advertised to work with Linux. The summary sheet also tells us that it supports dual SPI flash components, so if worst comes to worst, we can desolder that chip and read it directly.
After taking a cursory look at the board and researching its components, the next step is to dump the firmware. The most straightforward way of doing this would be to simply desolder the flash chip, but this could damage the chip or the system, so it’s usually better to find another way. Typically this would be to get some sort of debug console left over from testing the device. I probed a few seemingly unused pin headers with my oscilloscope before I finally found some activity on one of the two pads right next to the processor. You can see the pads in Figure 3; I am probing the Tx pad.

Figure 3
Figure 4 shows a capture of the Tx line, and the period is 17.2µs. This corresponds to the common baud rate of 57600 b/s, although I belive baud rate is calculated on each edge, so the actual baud is 115200 b/s. You can also see that the output is clearly open-drain because the signal is pulled down extremely fast, but then left to rise slowly through a pull up resistor.
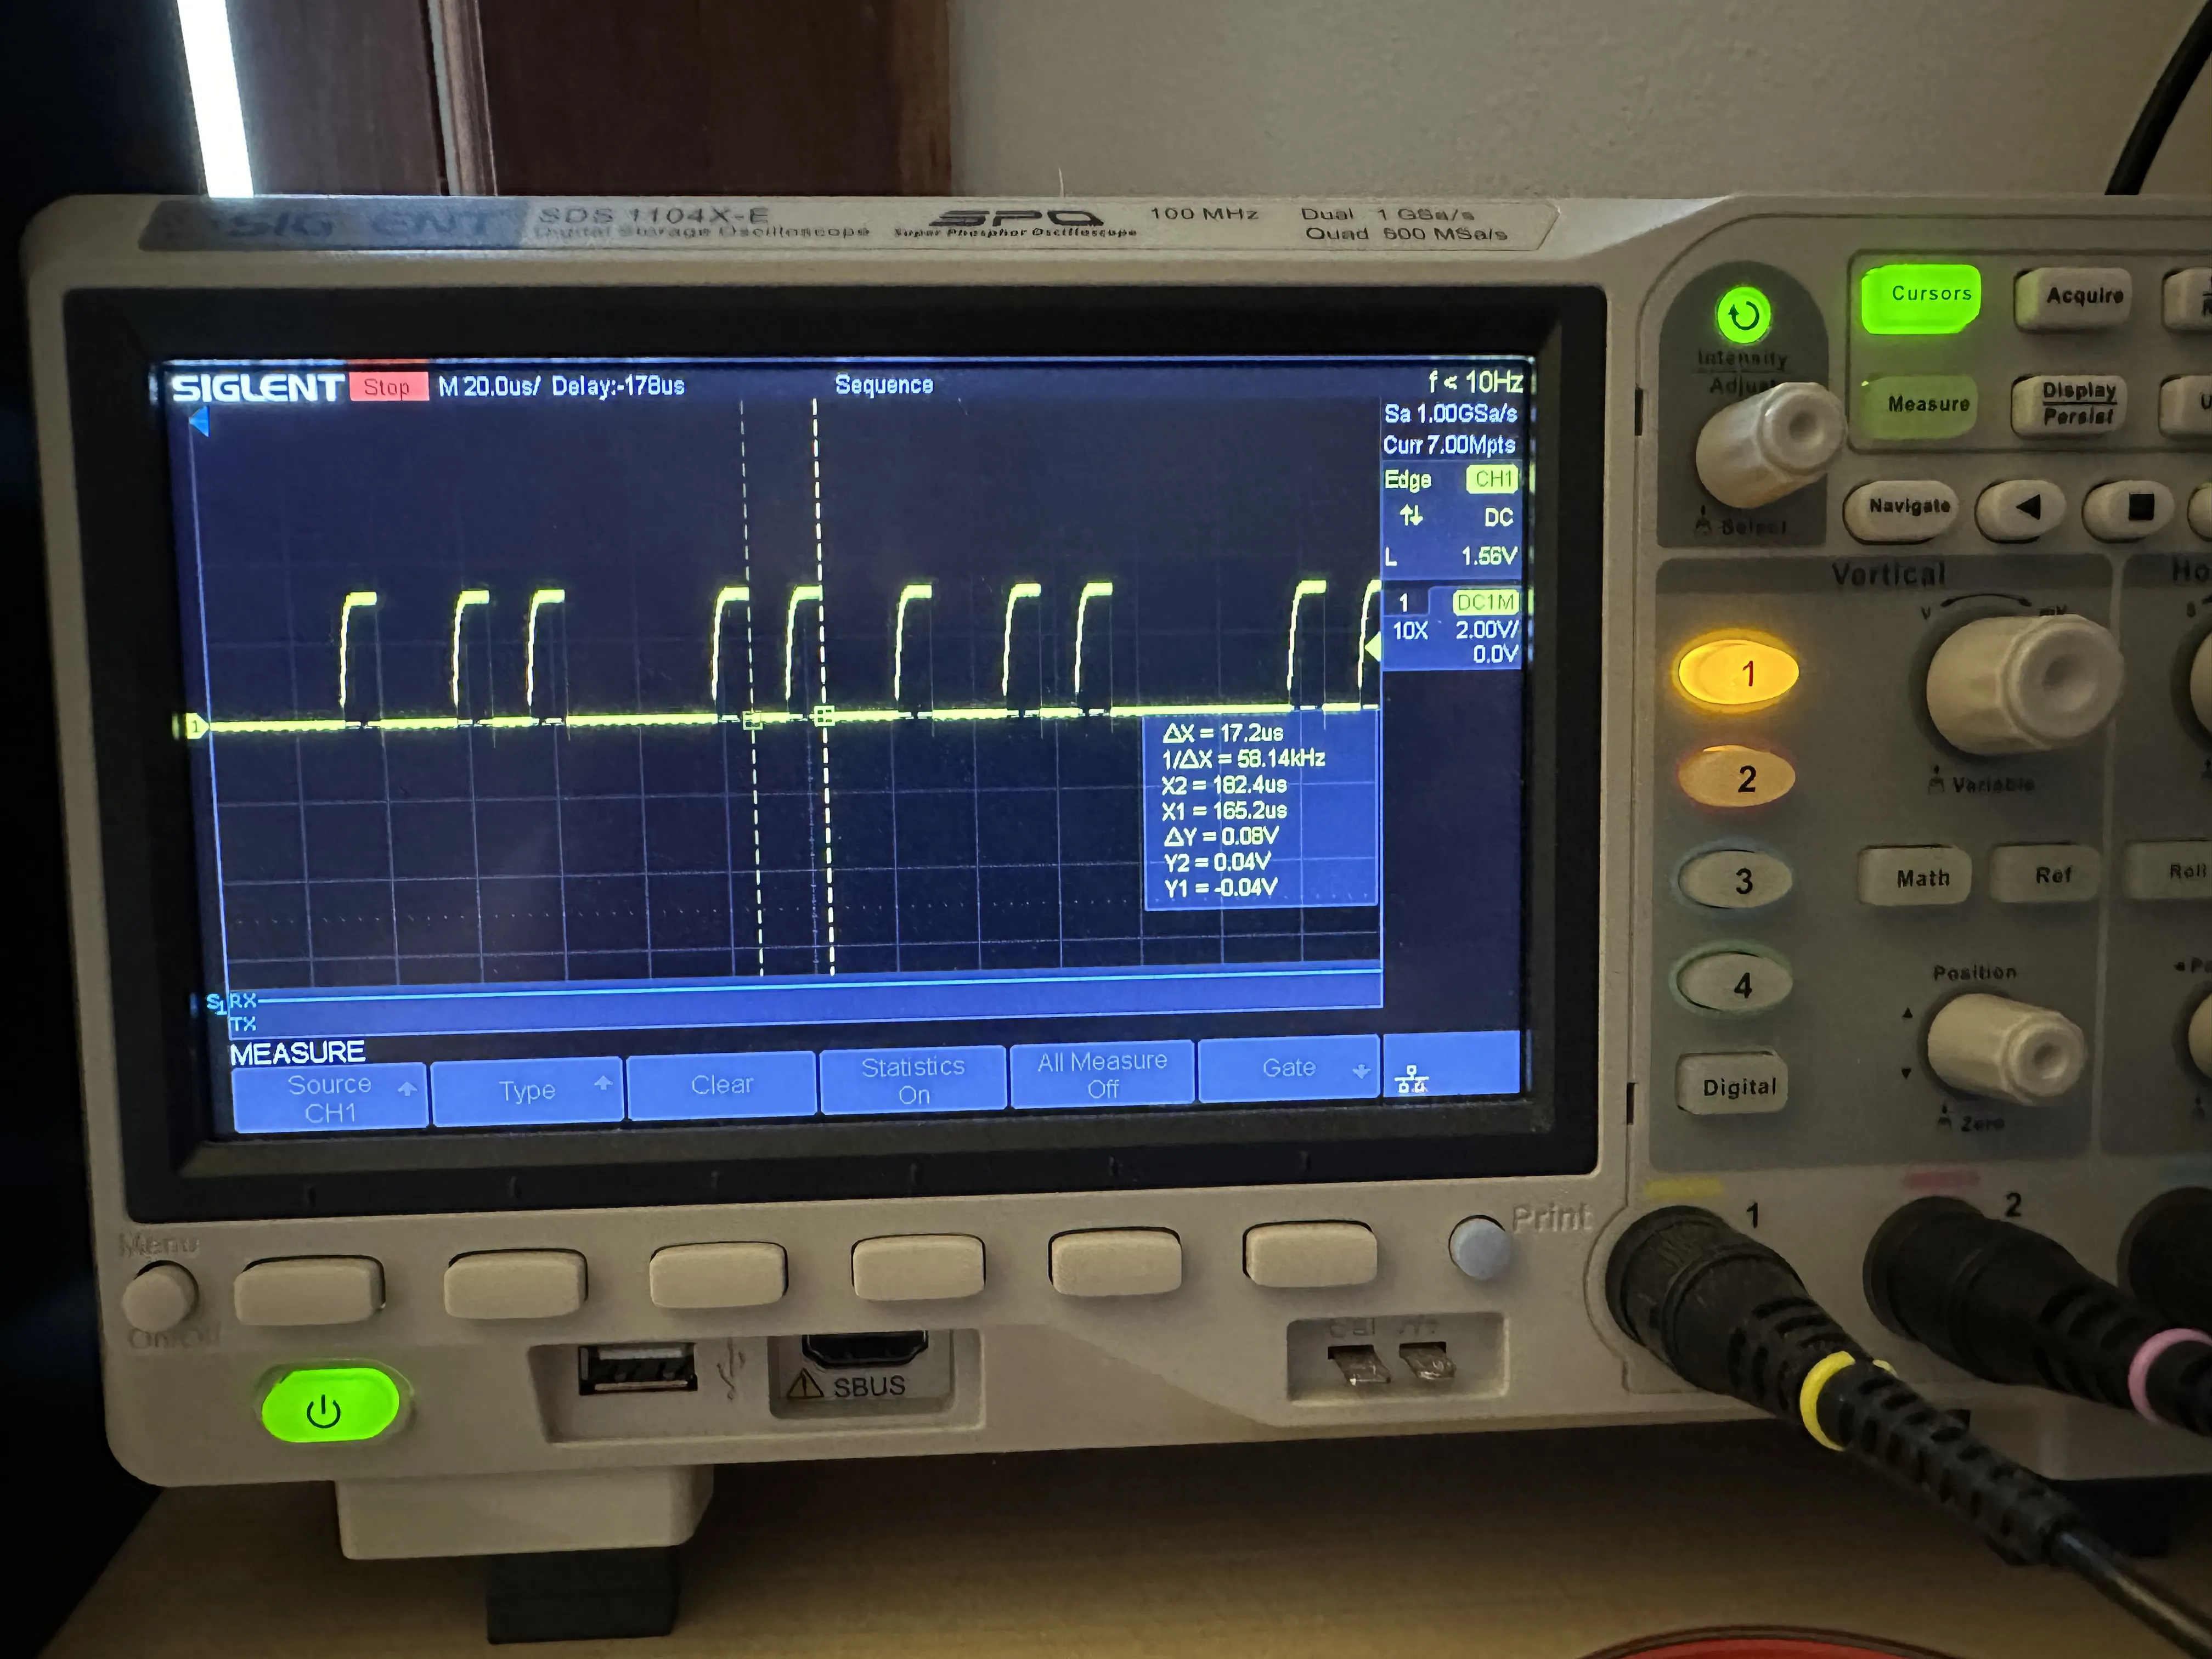
Figure 4
I didn’t have a test rig with pogo pin contacts, so I decided to solder some wires to the test pads (Figure 5).
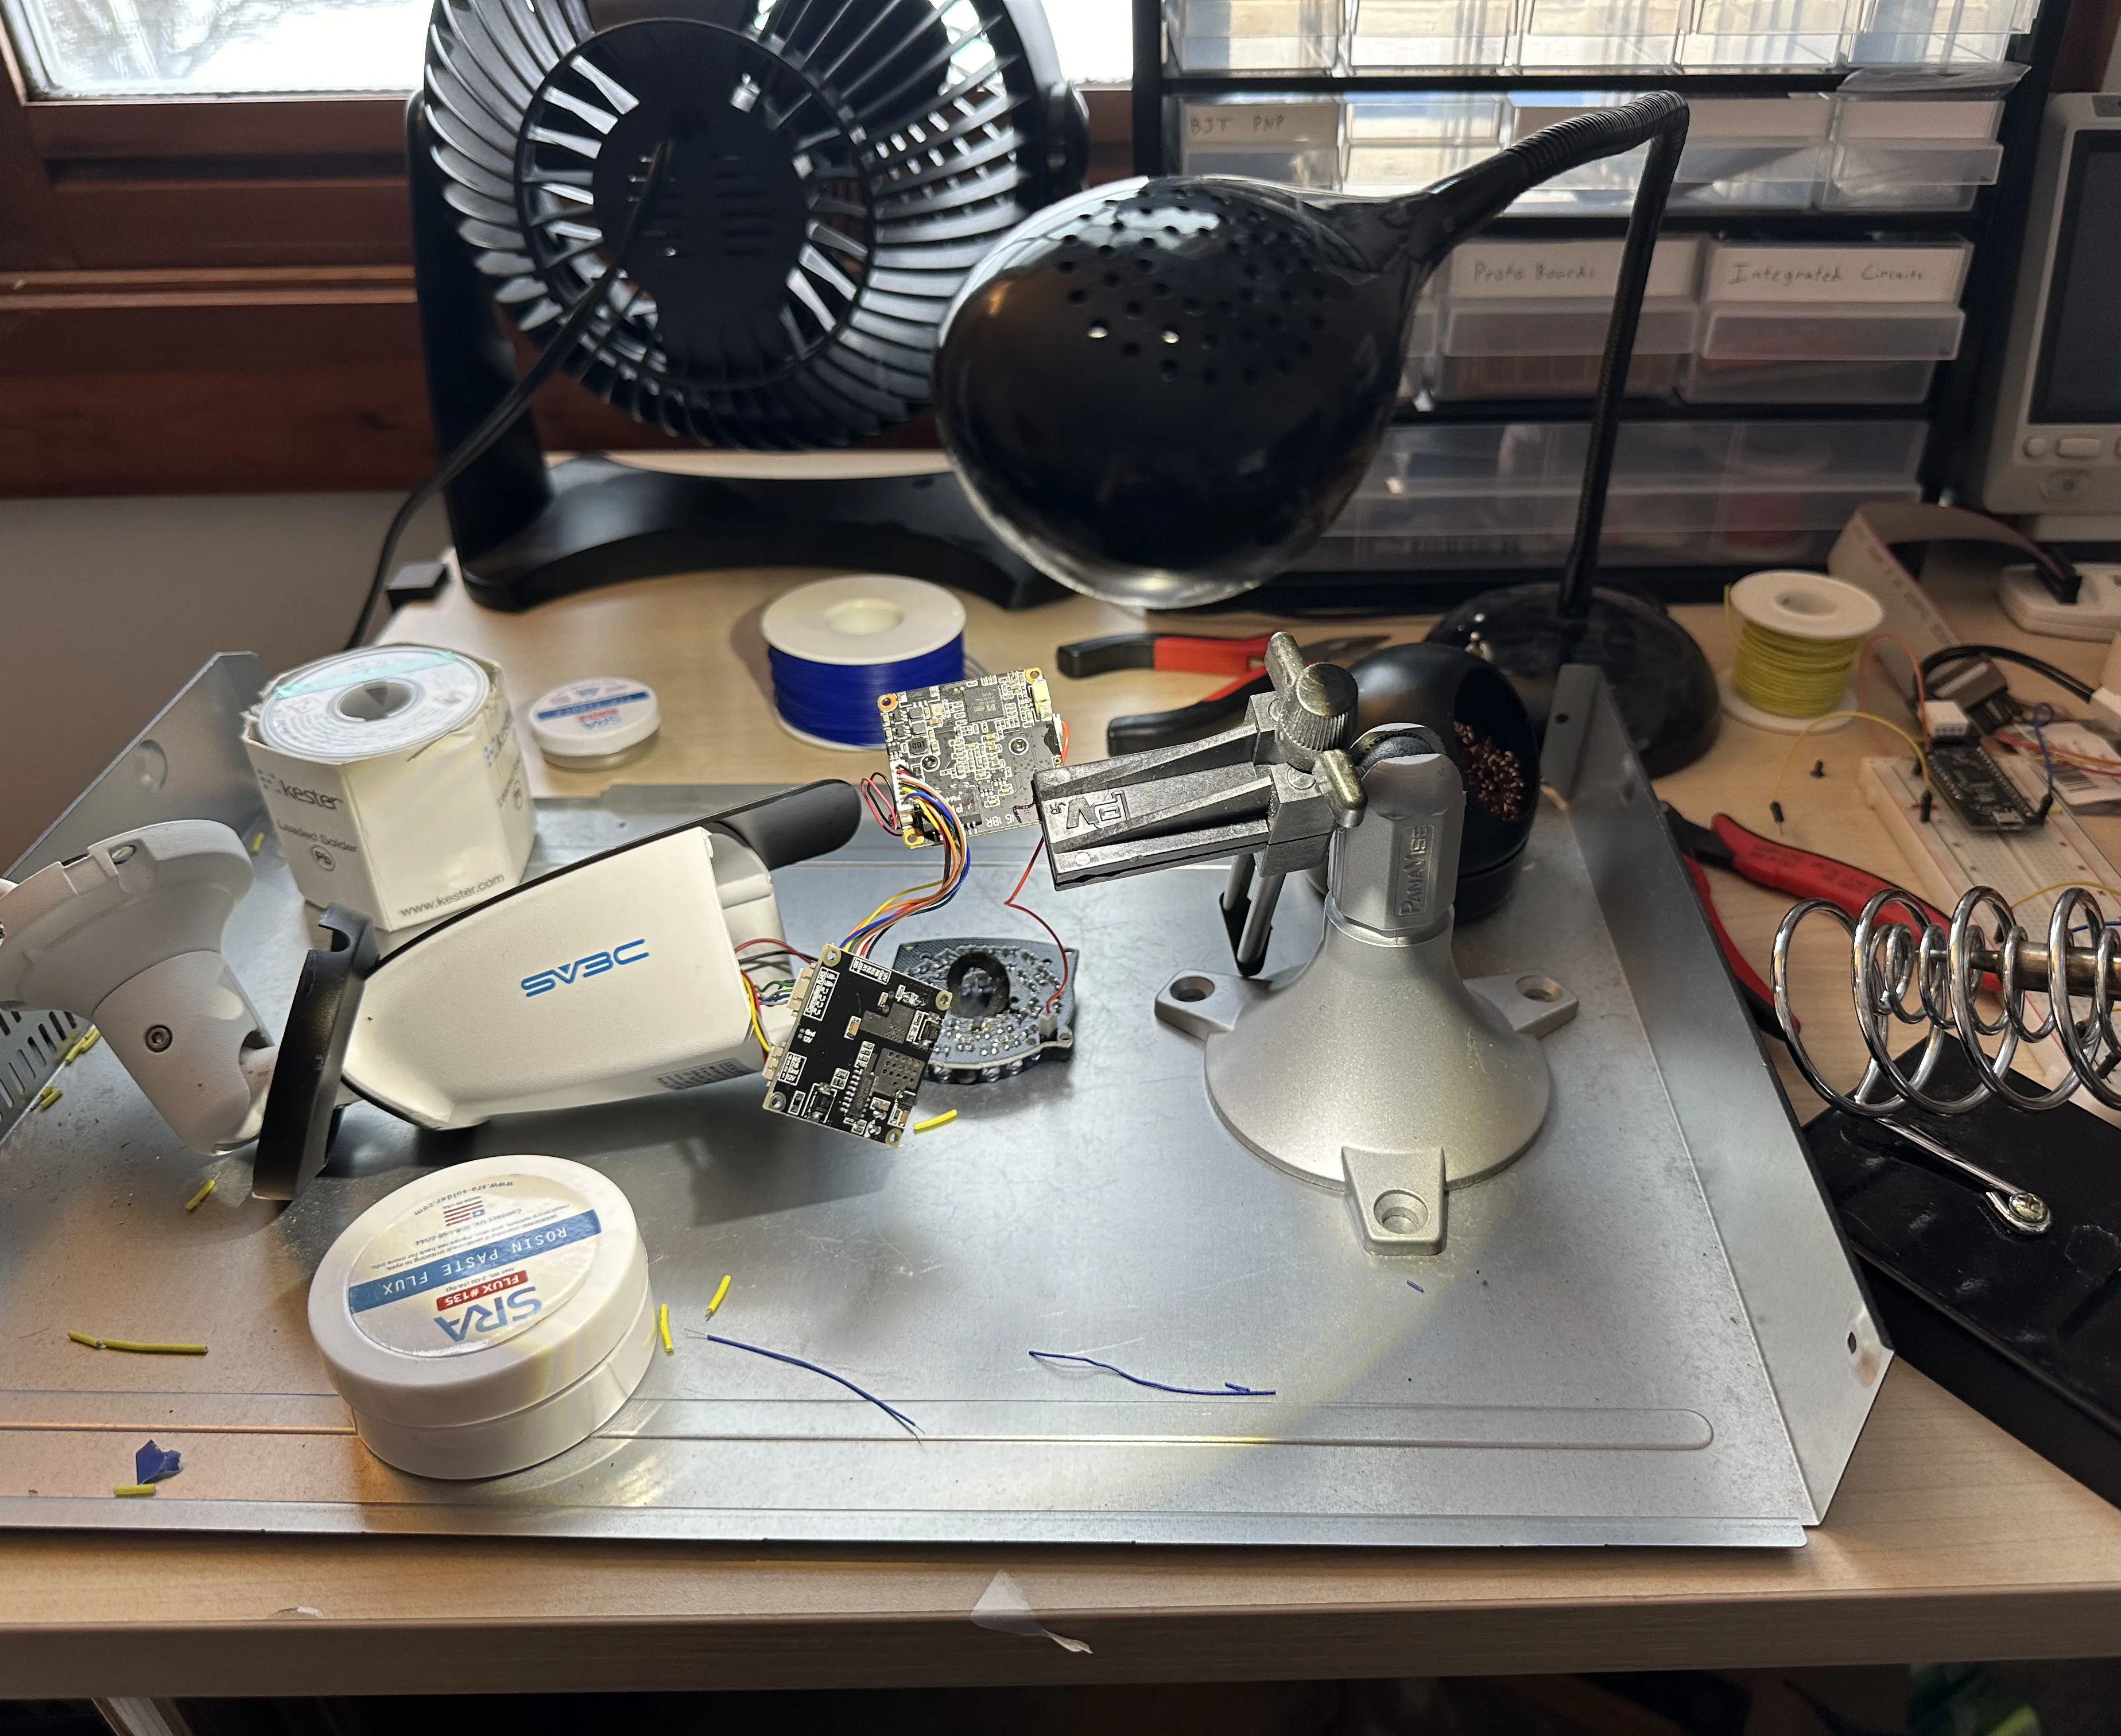
Figure 5
You can see my handiwork better in Figures 6 and 7. I soldered some very high gauge wires onto the pads, then some lower gauge wires onto those wires, which then slot into female Dupont connectors (I didn’t have a set of IC test clips at the time). The wires are just barely soldered on. I didn’t manage to properly heat up the pads and flow the solder around the wire because they are so small. I just melted some solder paste on the pads, then melted the solder and pushed the wires in, so the connection is extremely fragile.
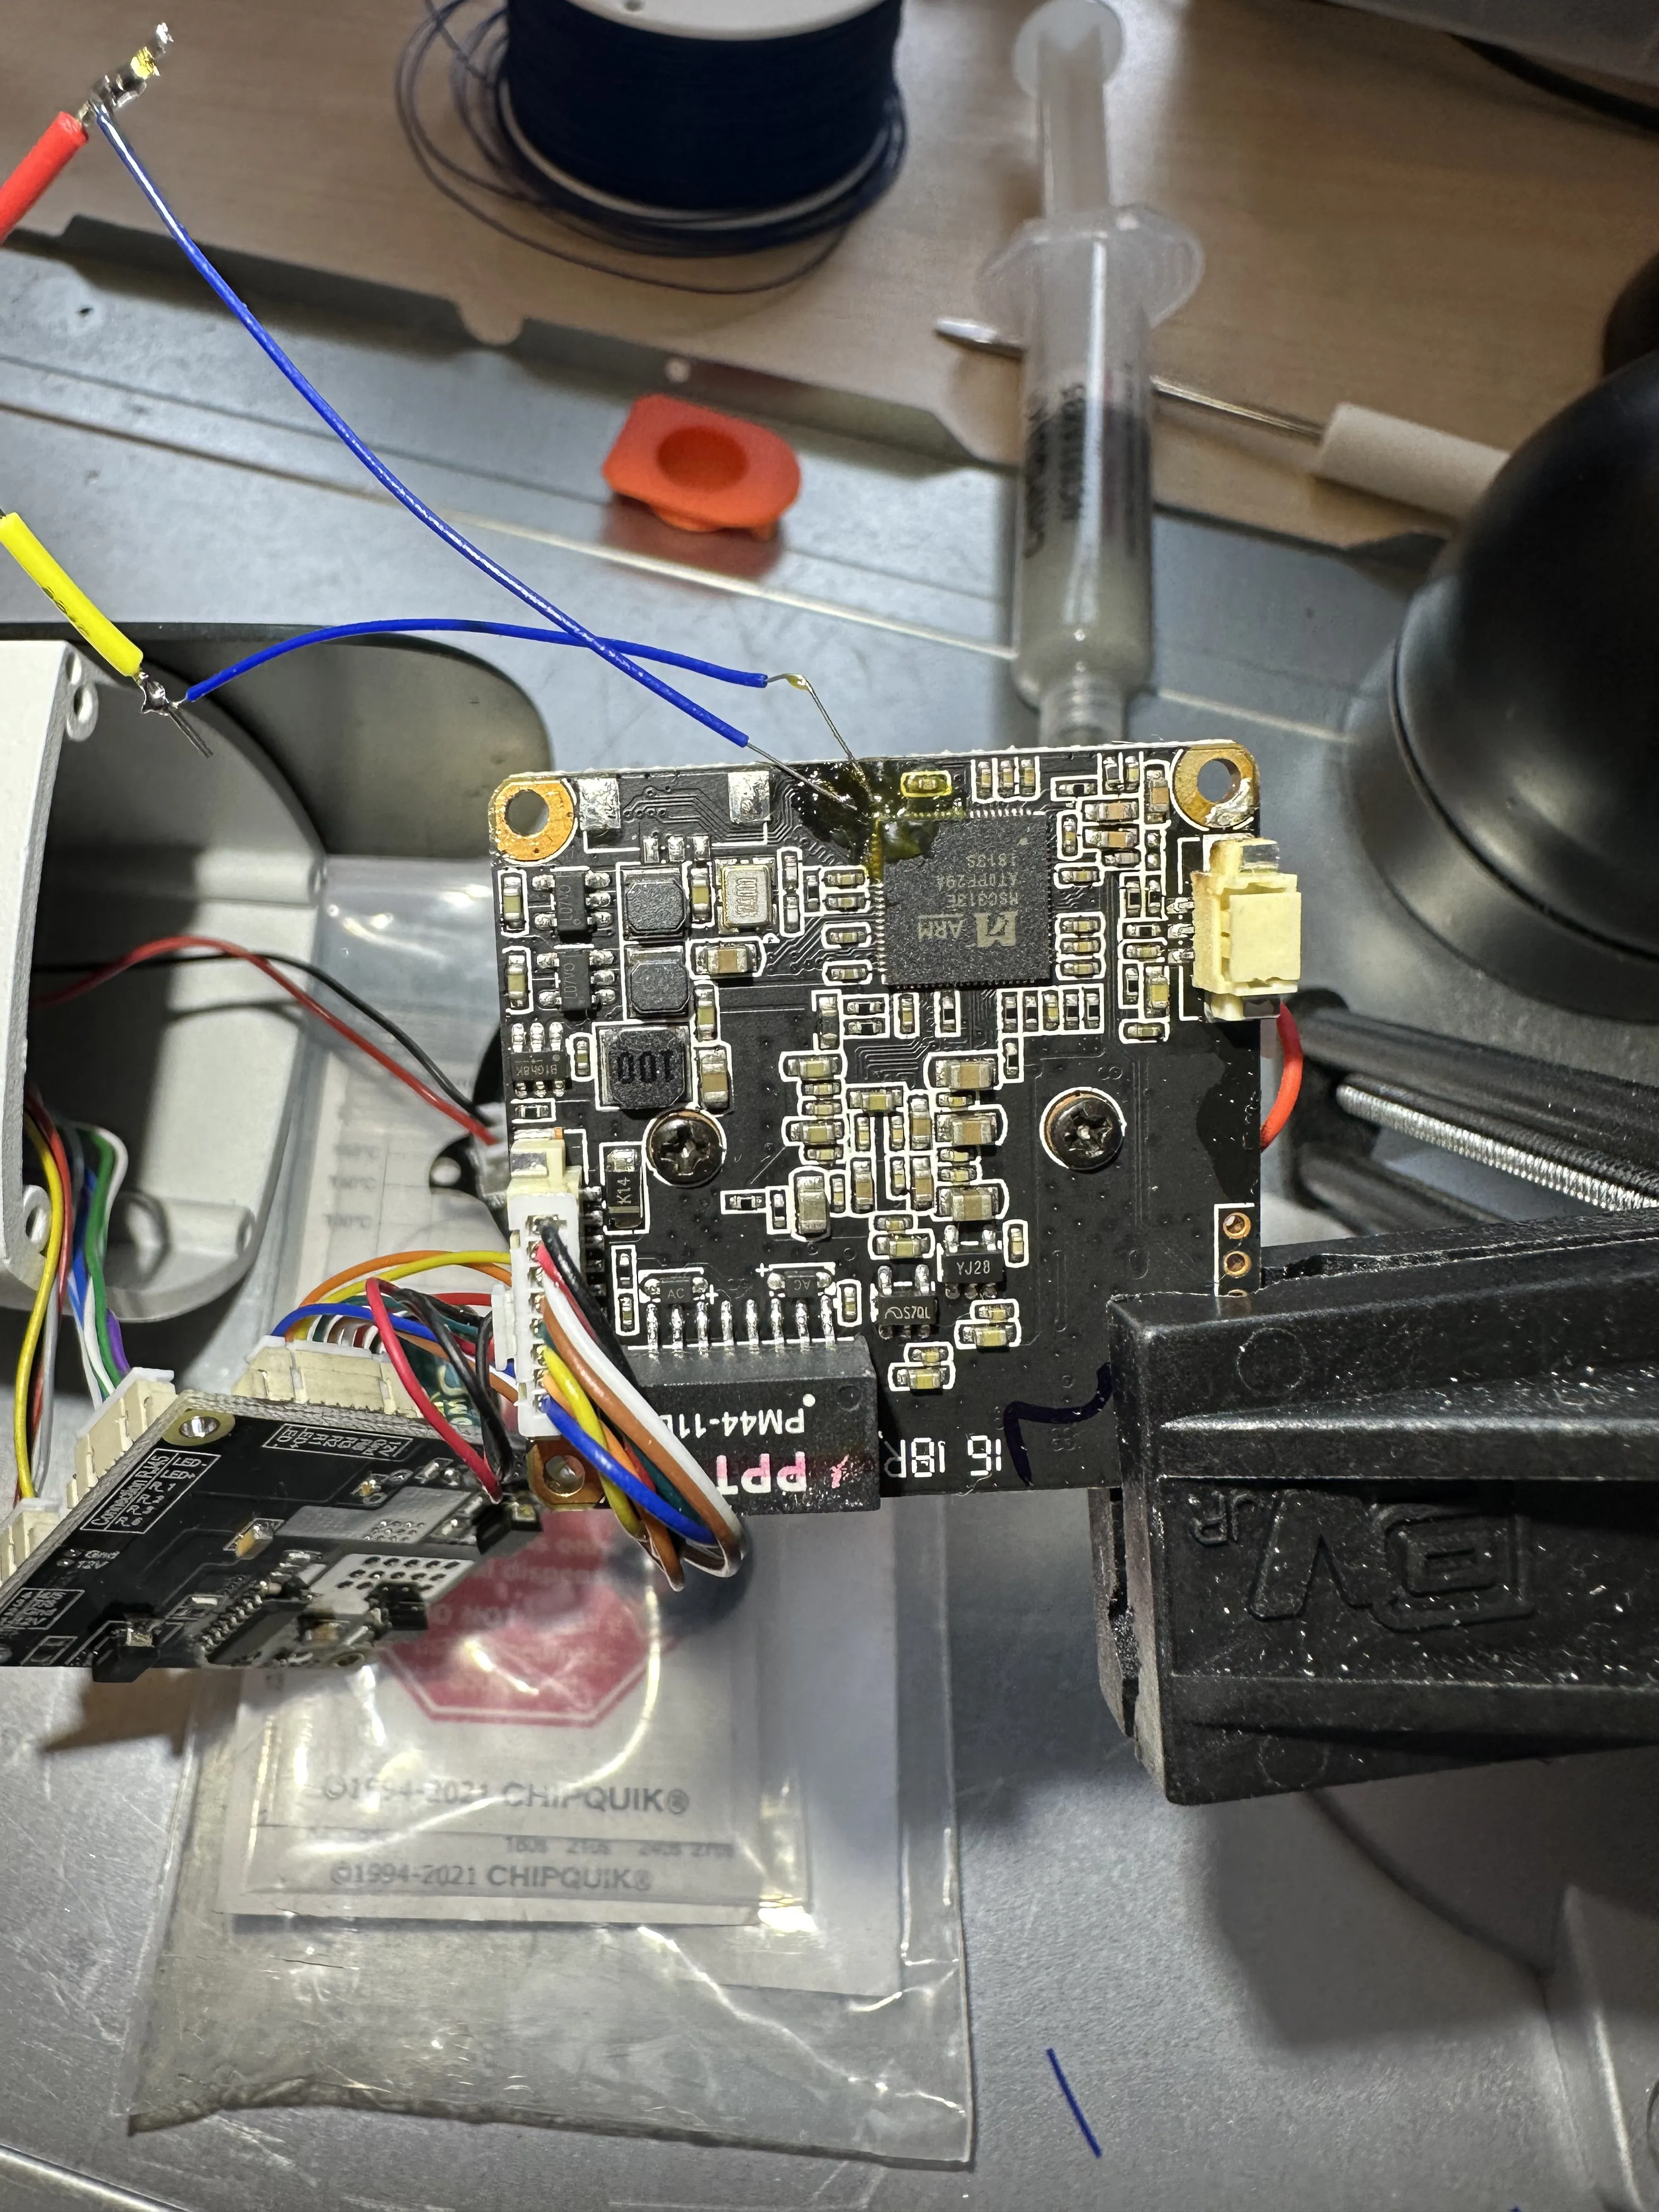
Figure 6
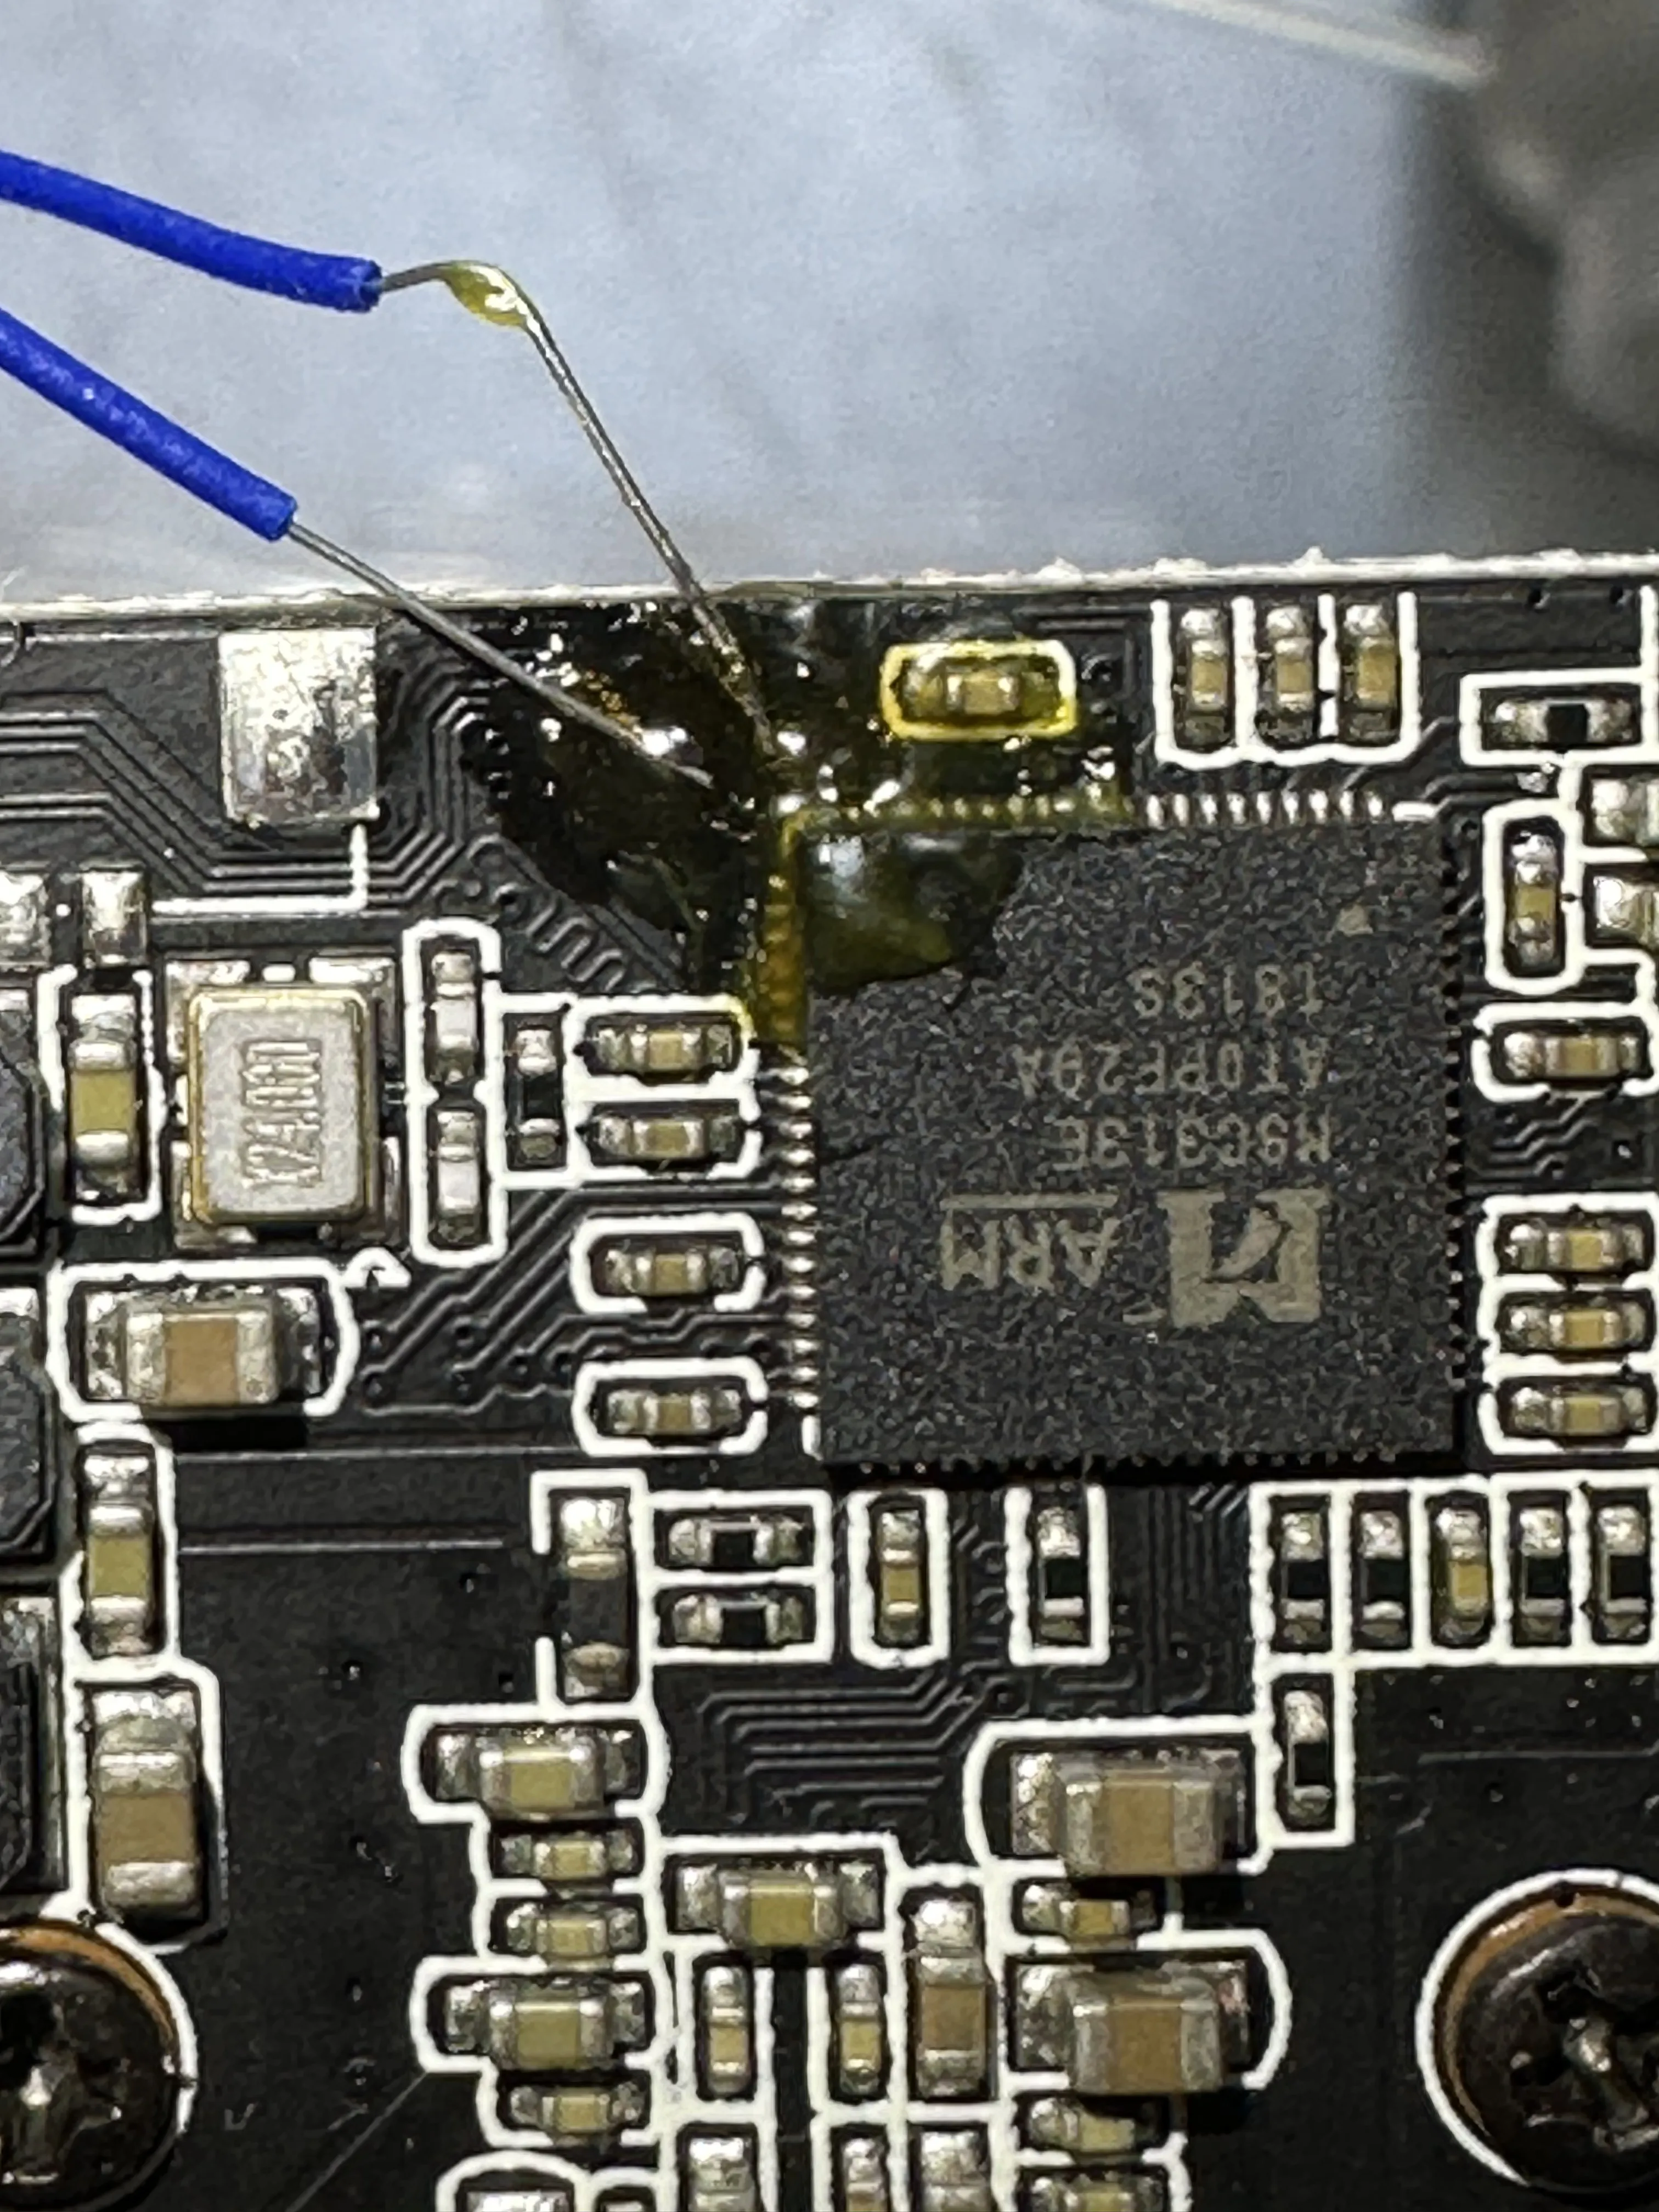
Figure 7
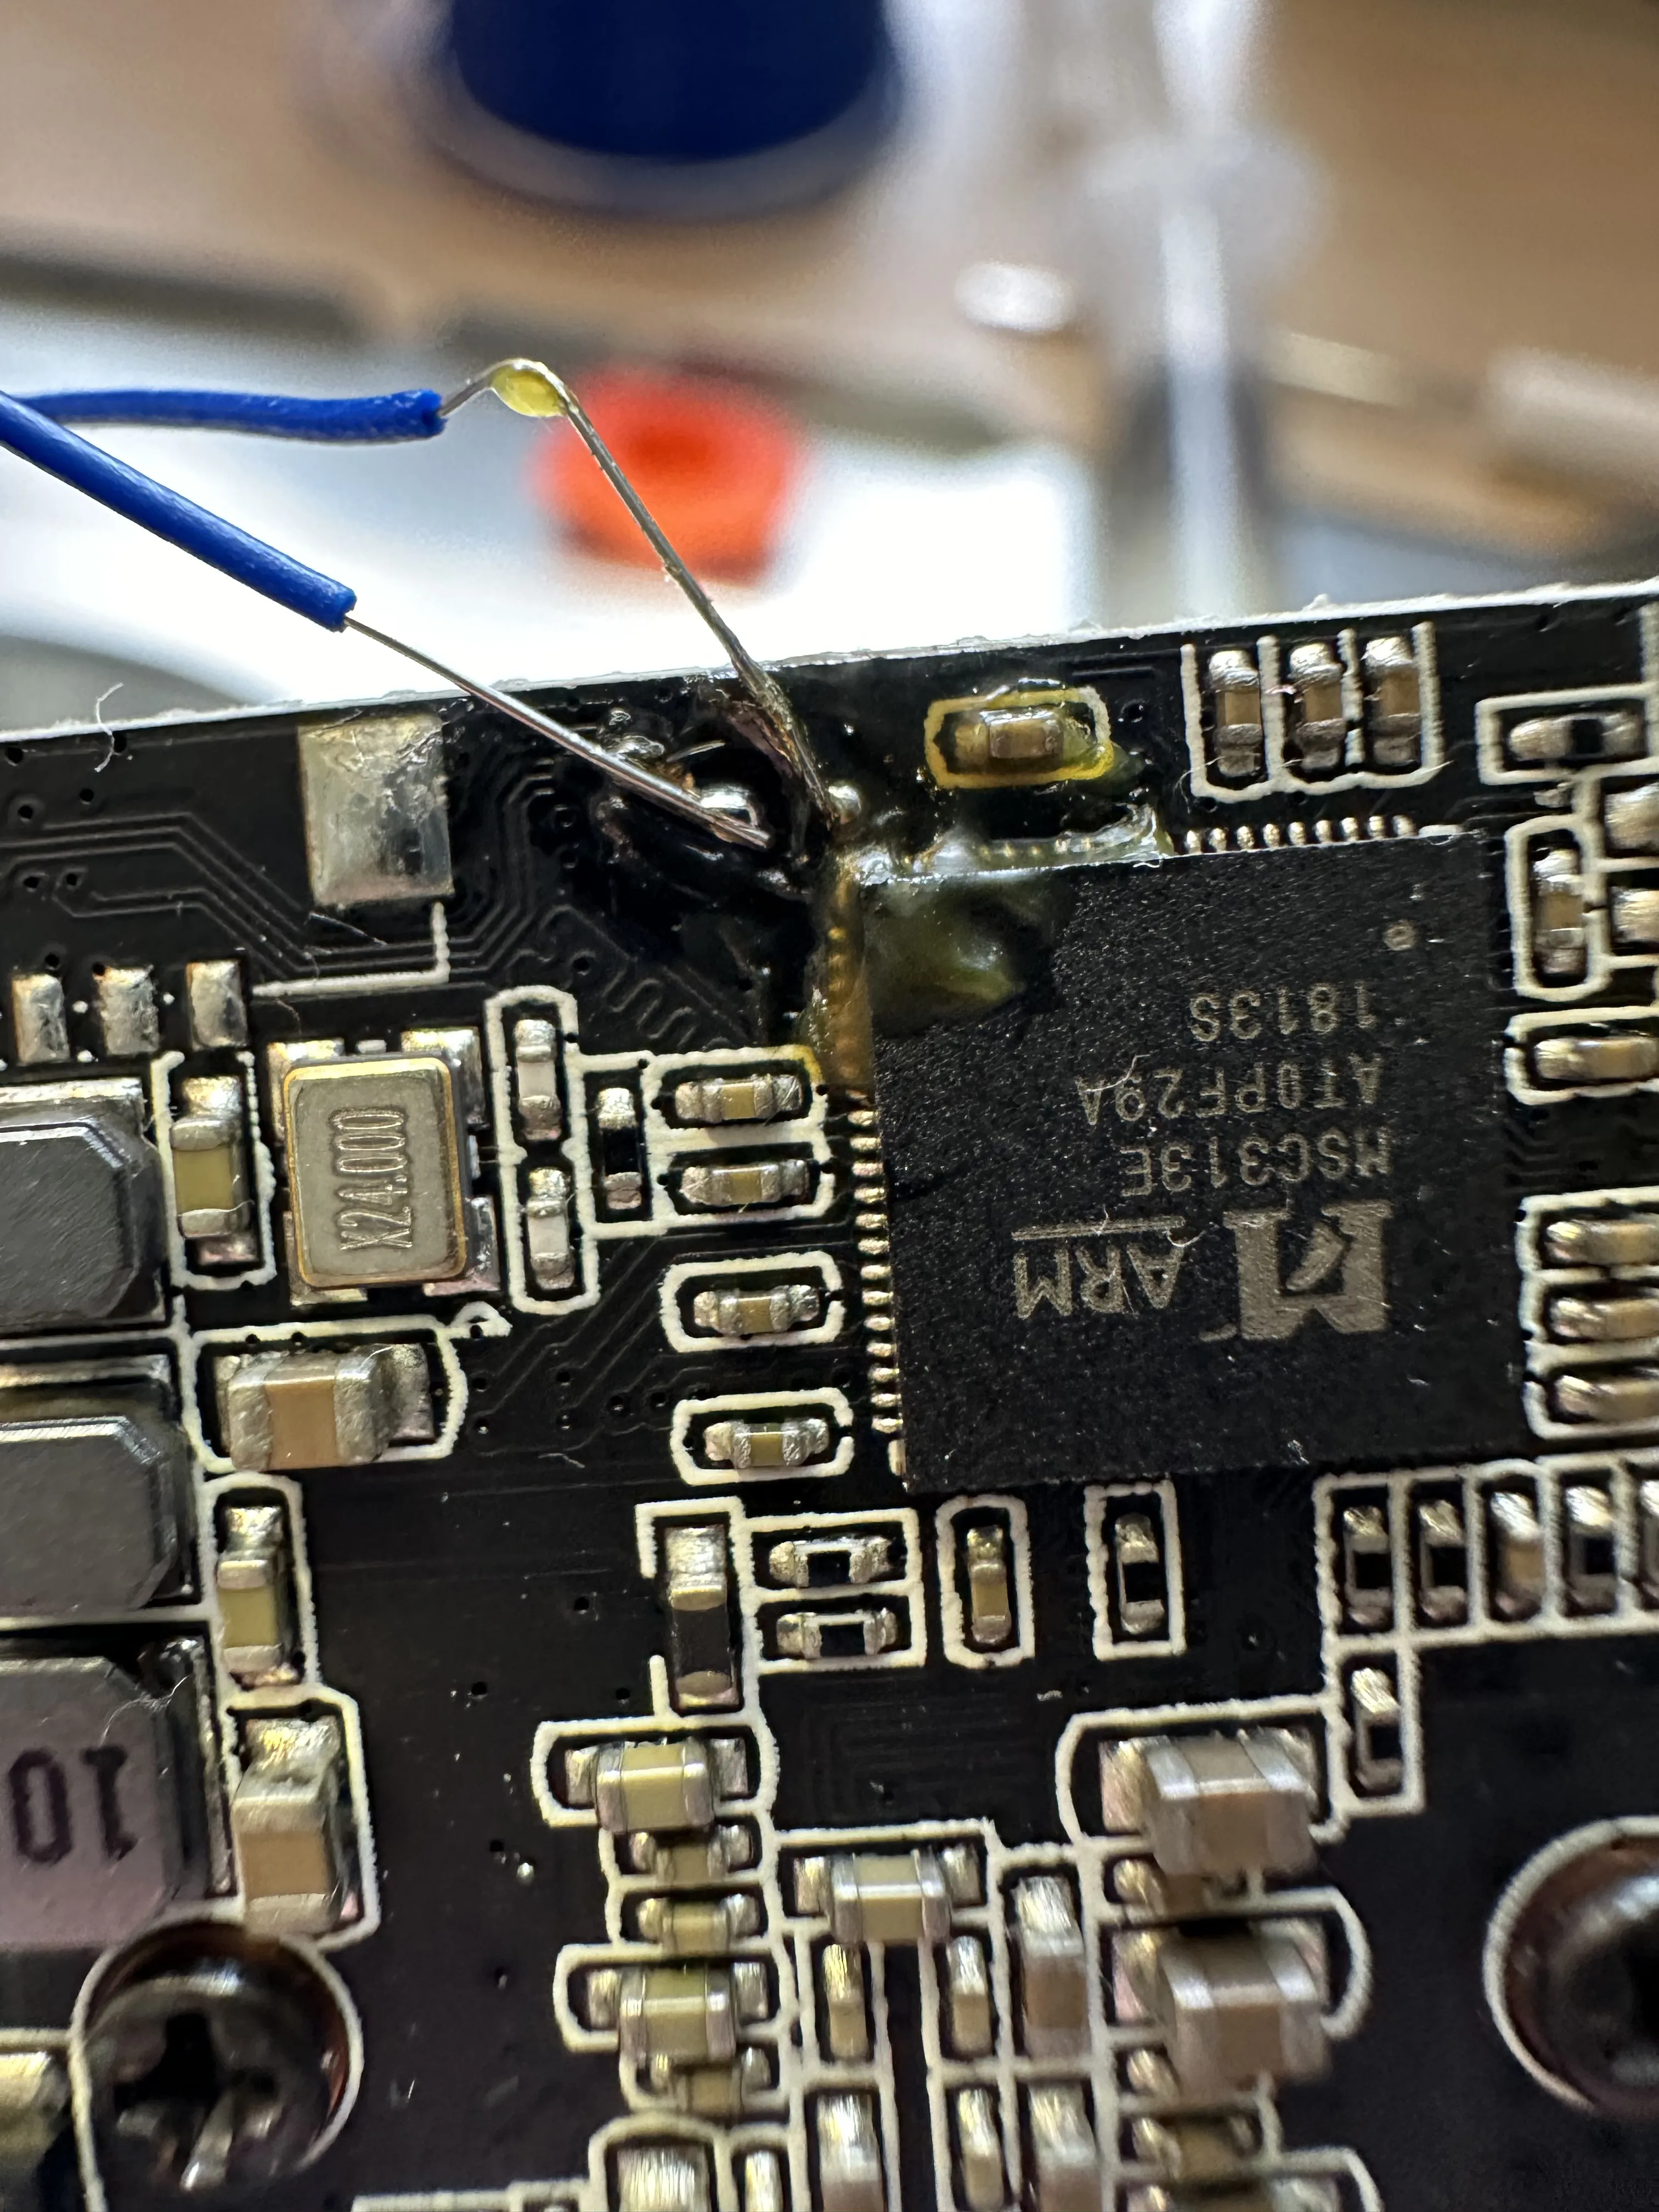
Figure 7-2
I connected the Tx and Rx line to my first gen Raspberry Pi to get a console, which partially worked. As seen in Figure 8, I could see lines being printed, but many of them were strangely corrupted. It took me a while, but I figured out that I was not grounding the device properly. (Something to do with USB being grounded, while the device was somehow floating because it was plugged into a wall wart switching power supply, I don’t even know.)
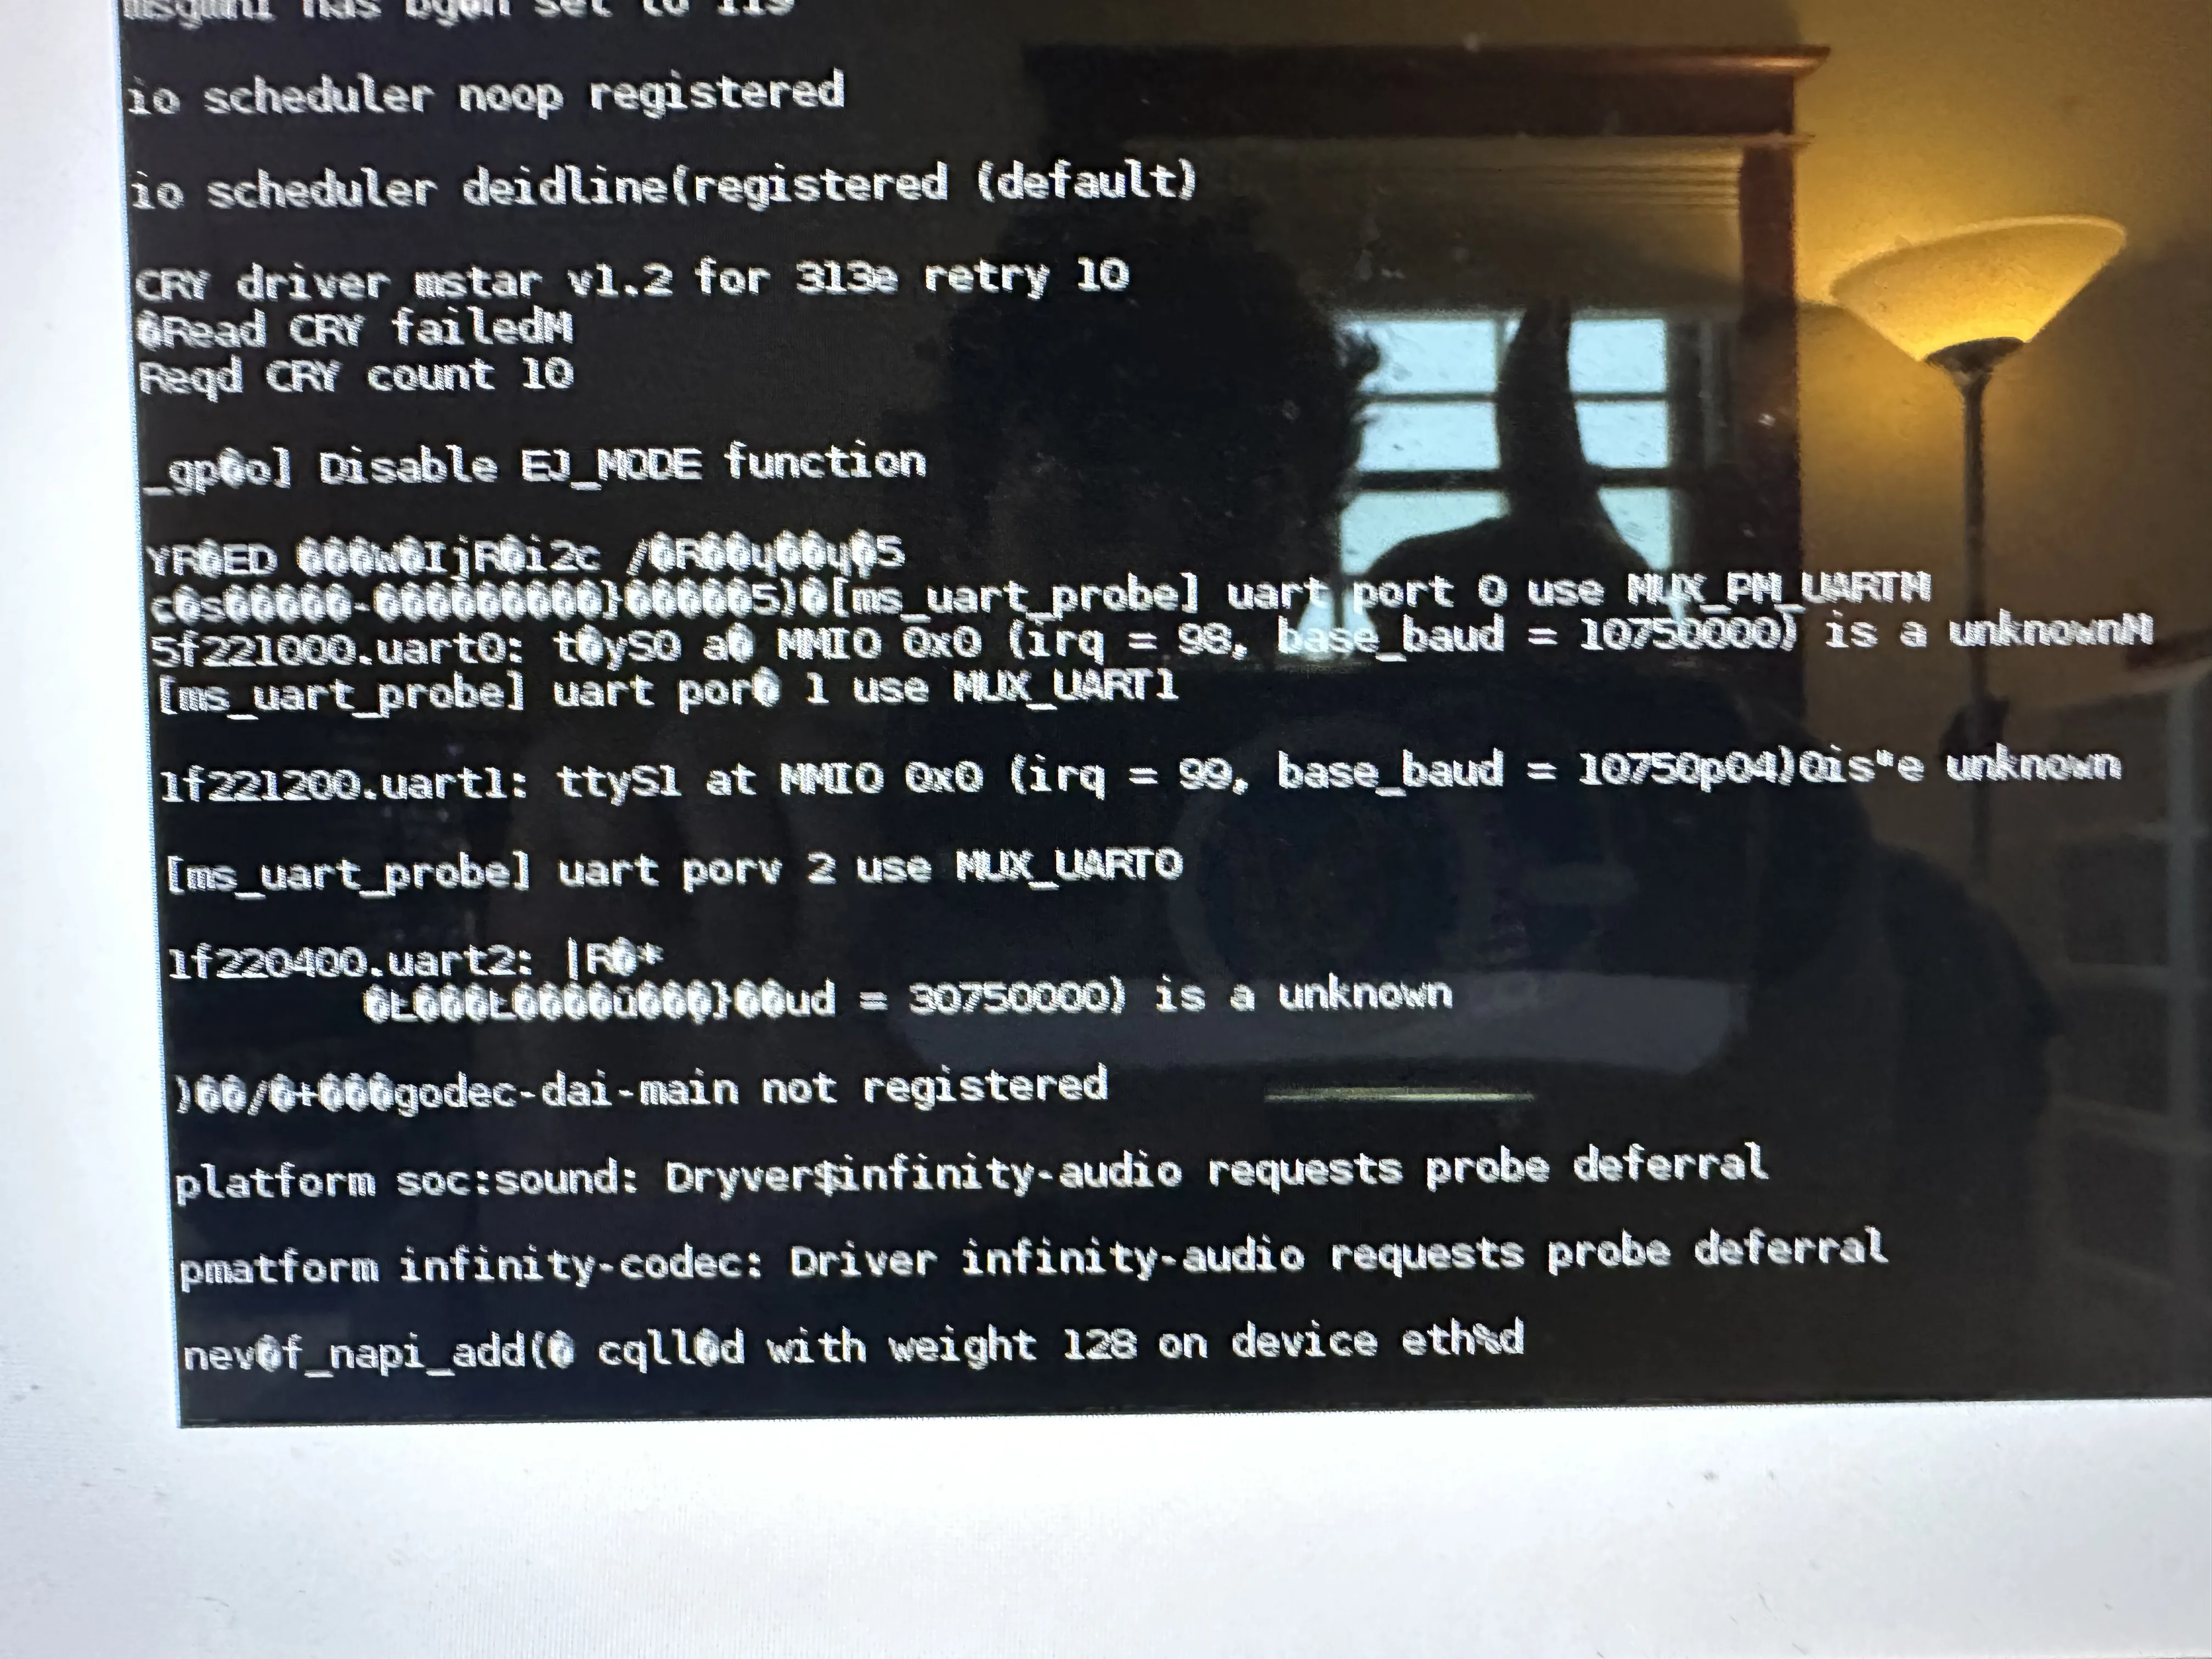
Figure 8
Therefore, I fixed the issue by connecting some ground wire up somehow, and you can see the kernel boot log in Figure 9.
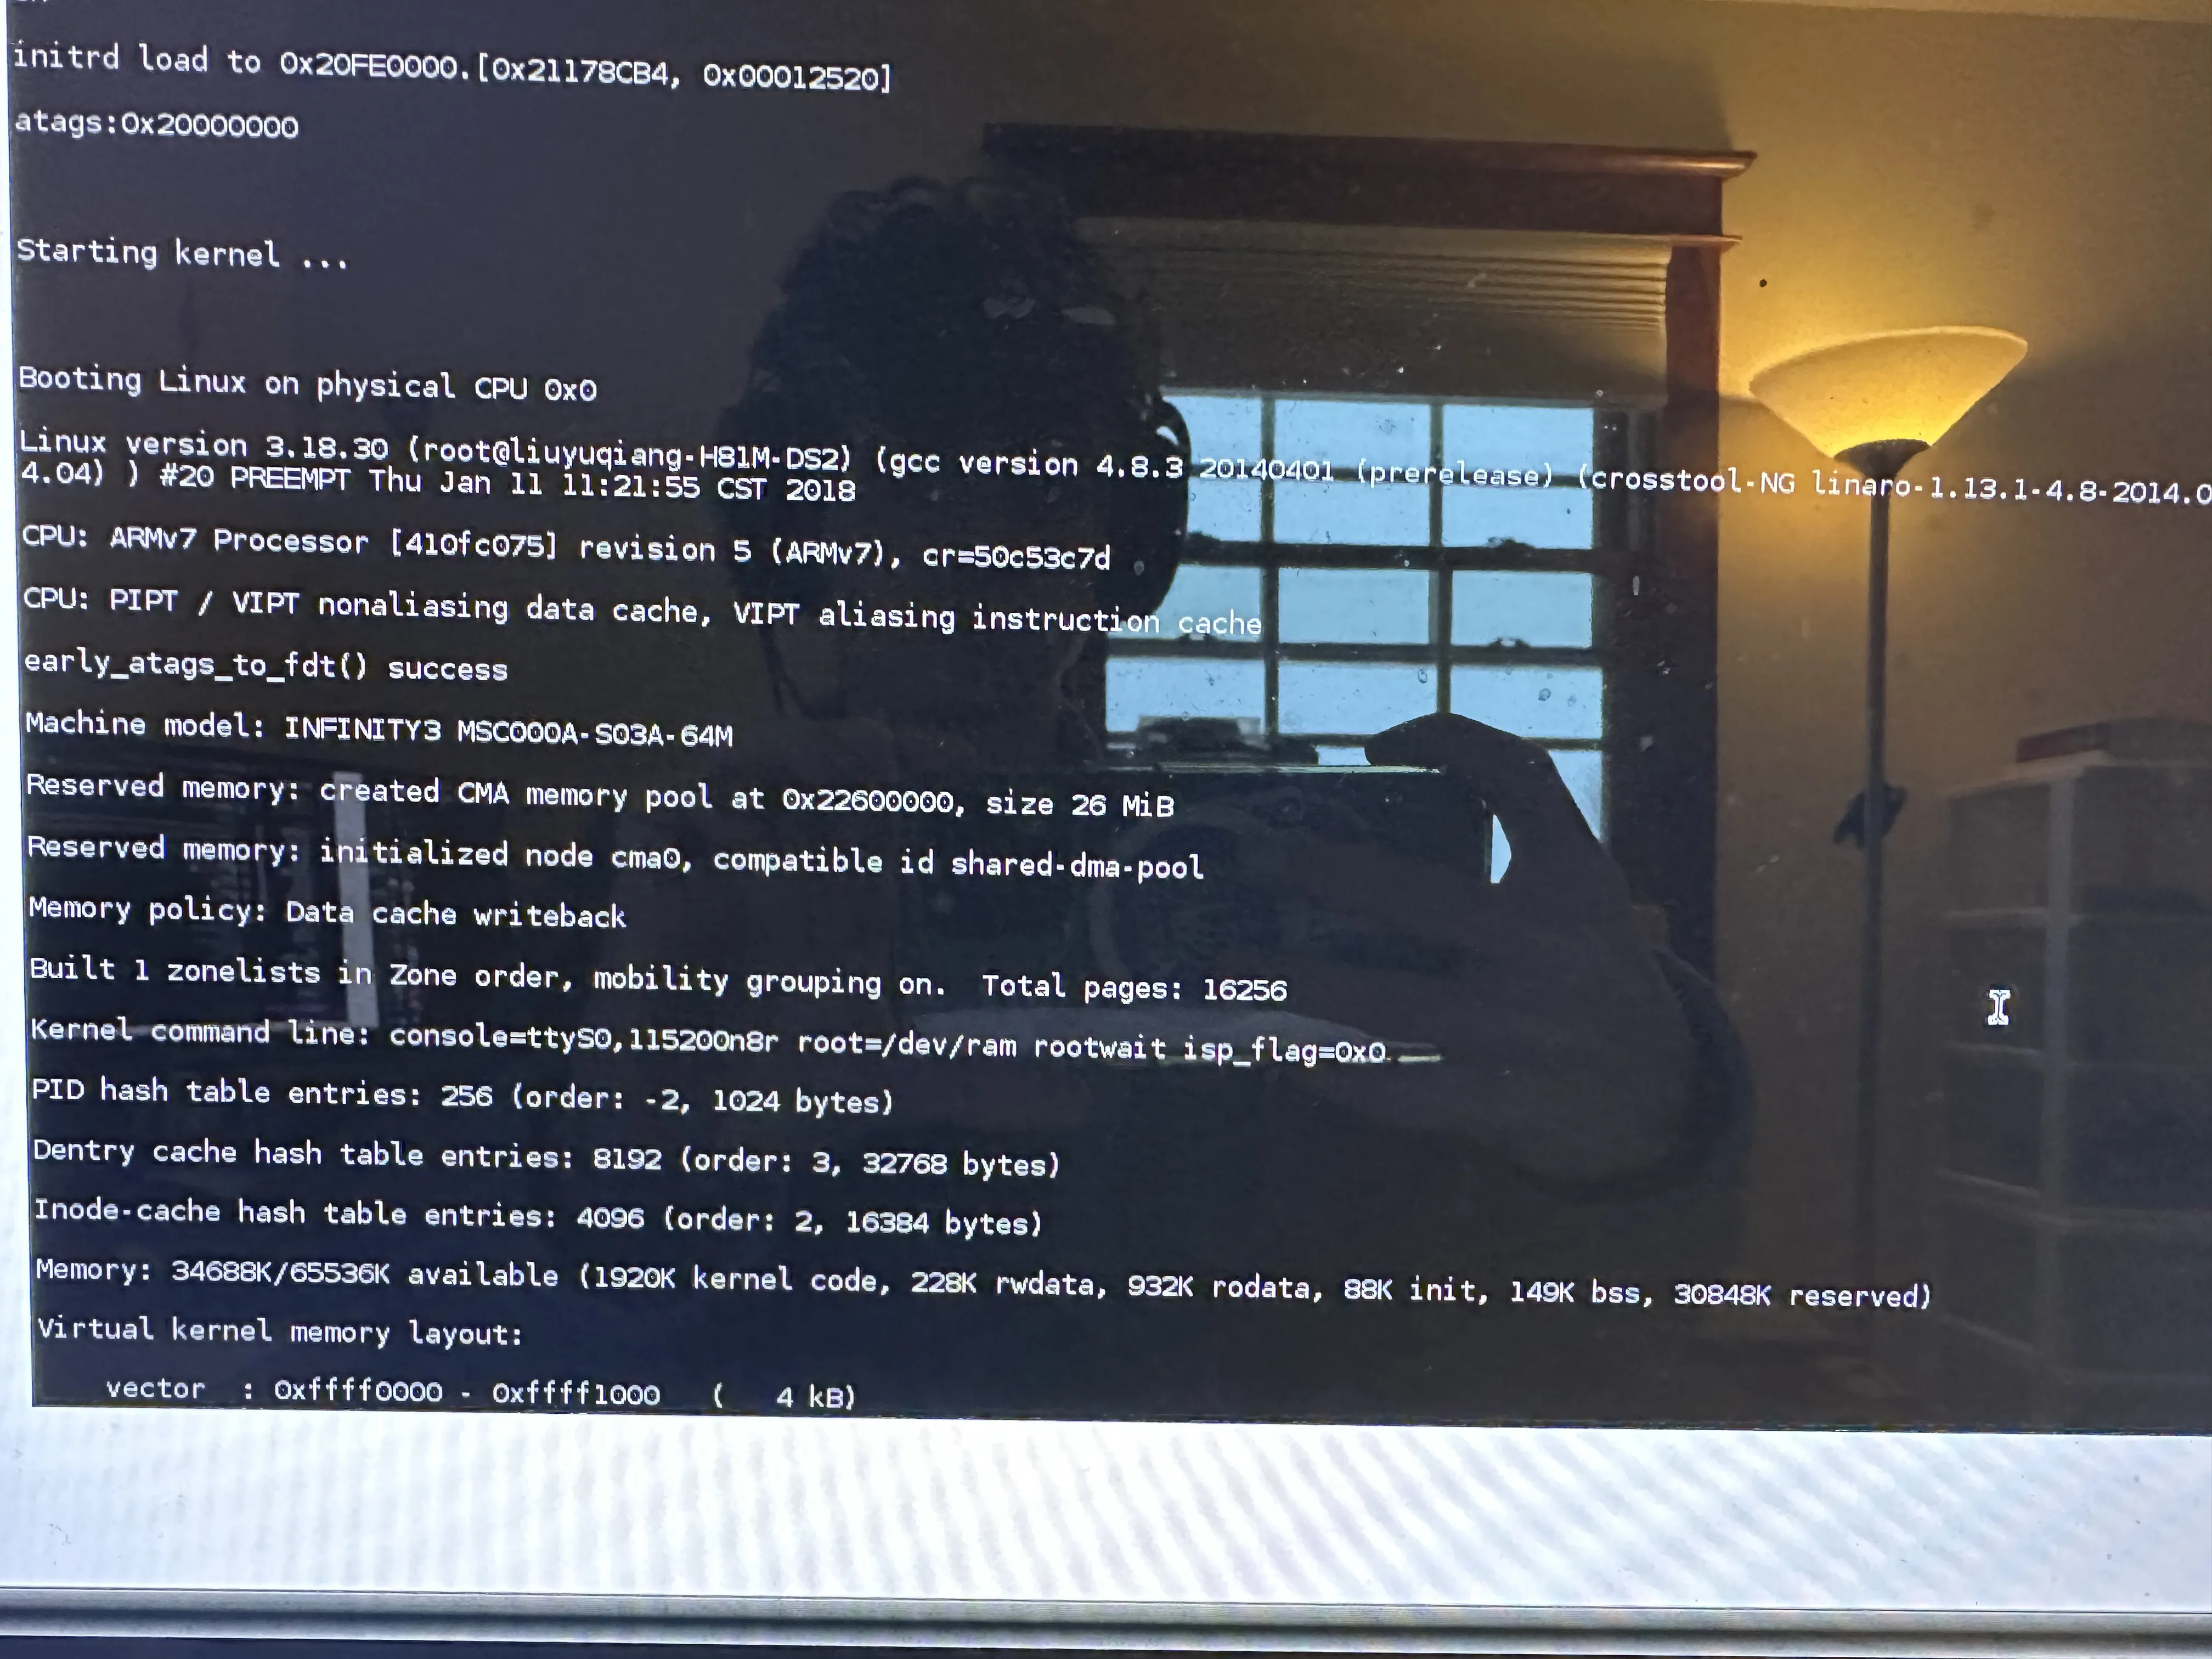
Figure 9
Figure 10 shows my insanely jank setup. In Figure 11, you can see how I needed to relocate my oscilloscope to try and diagnose the grounding issue.
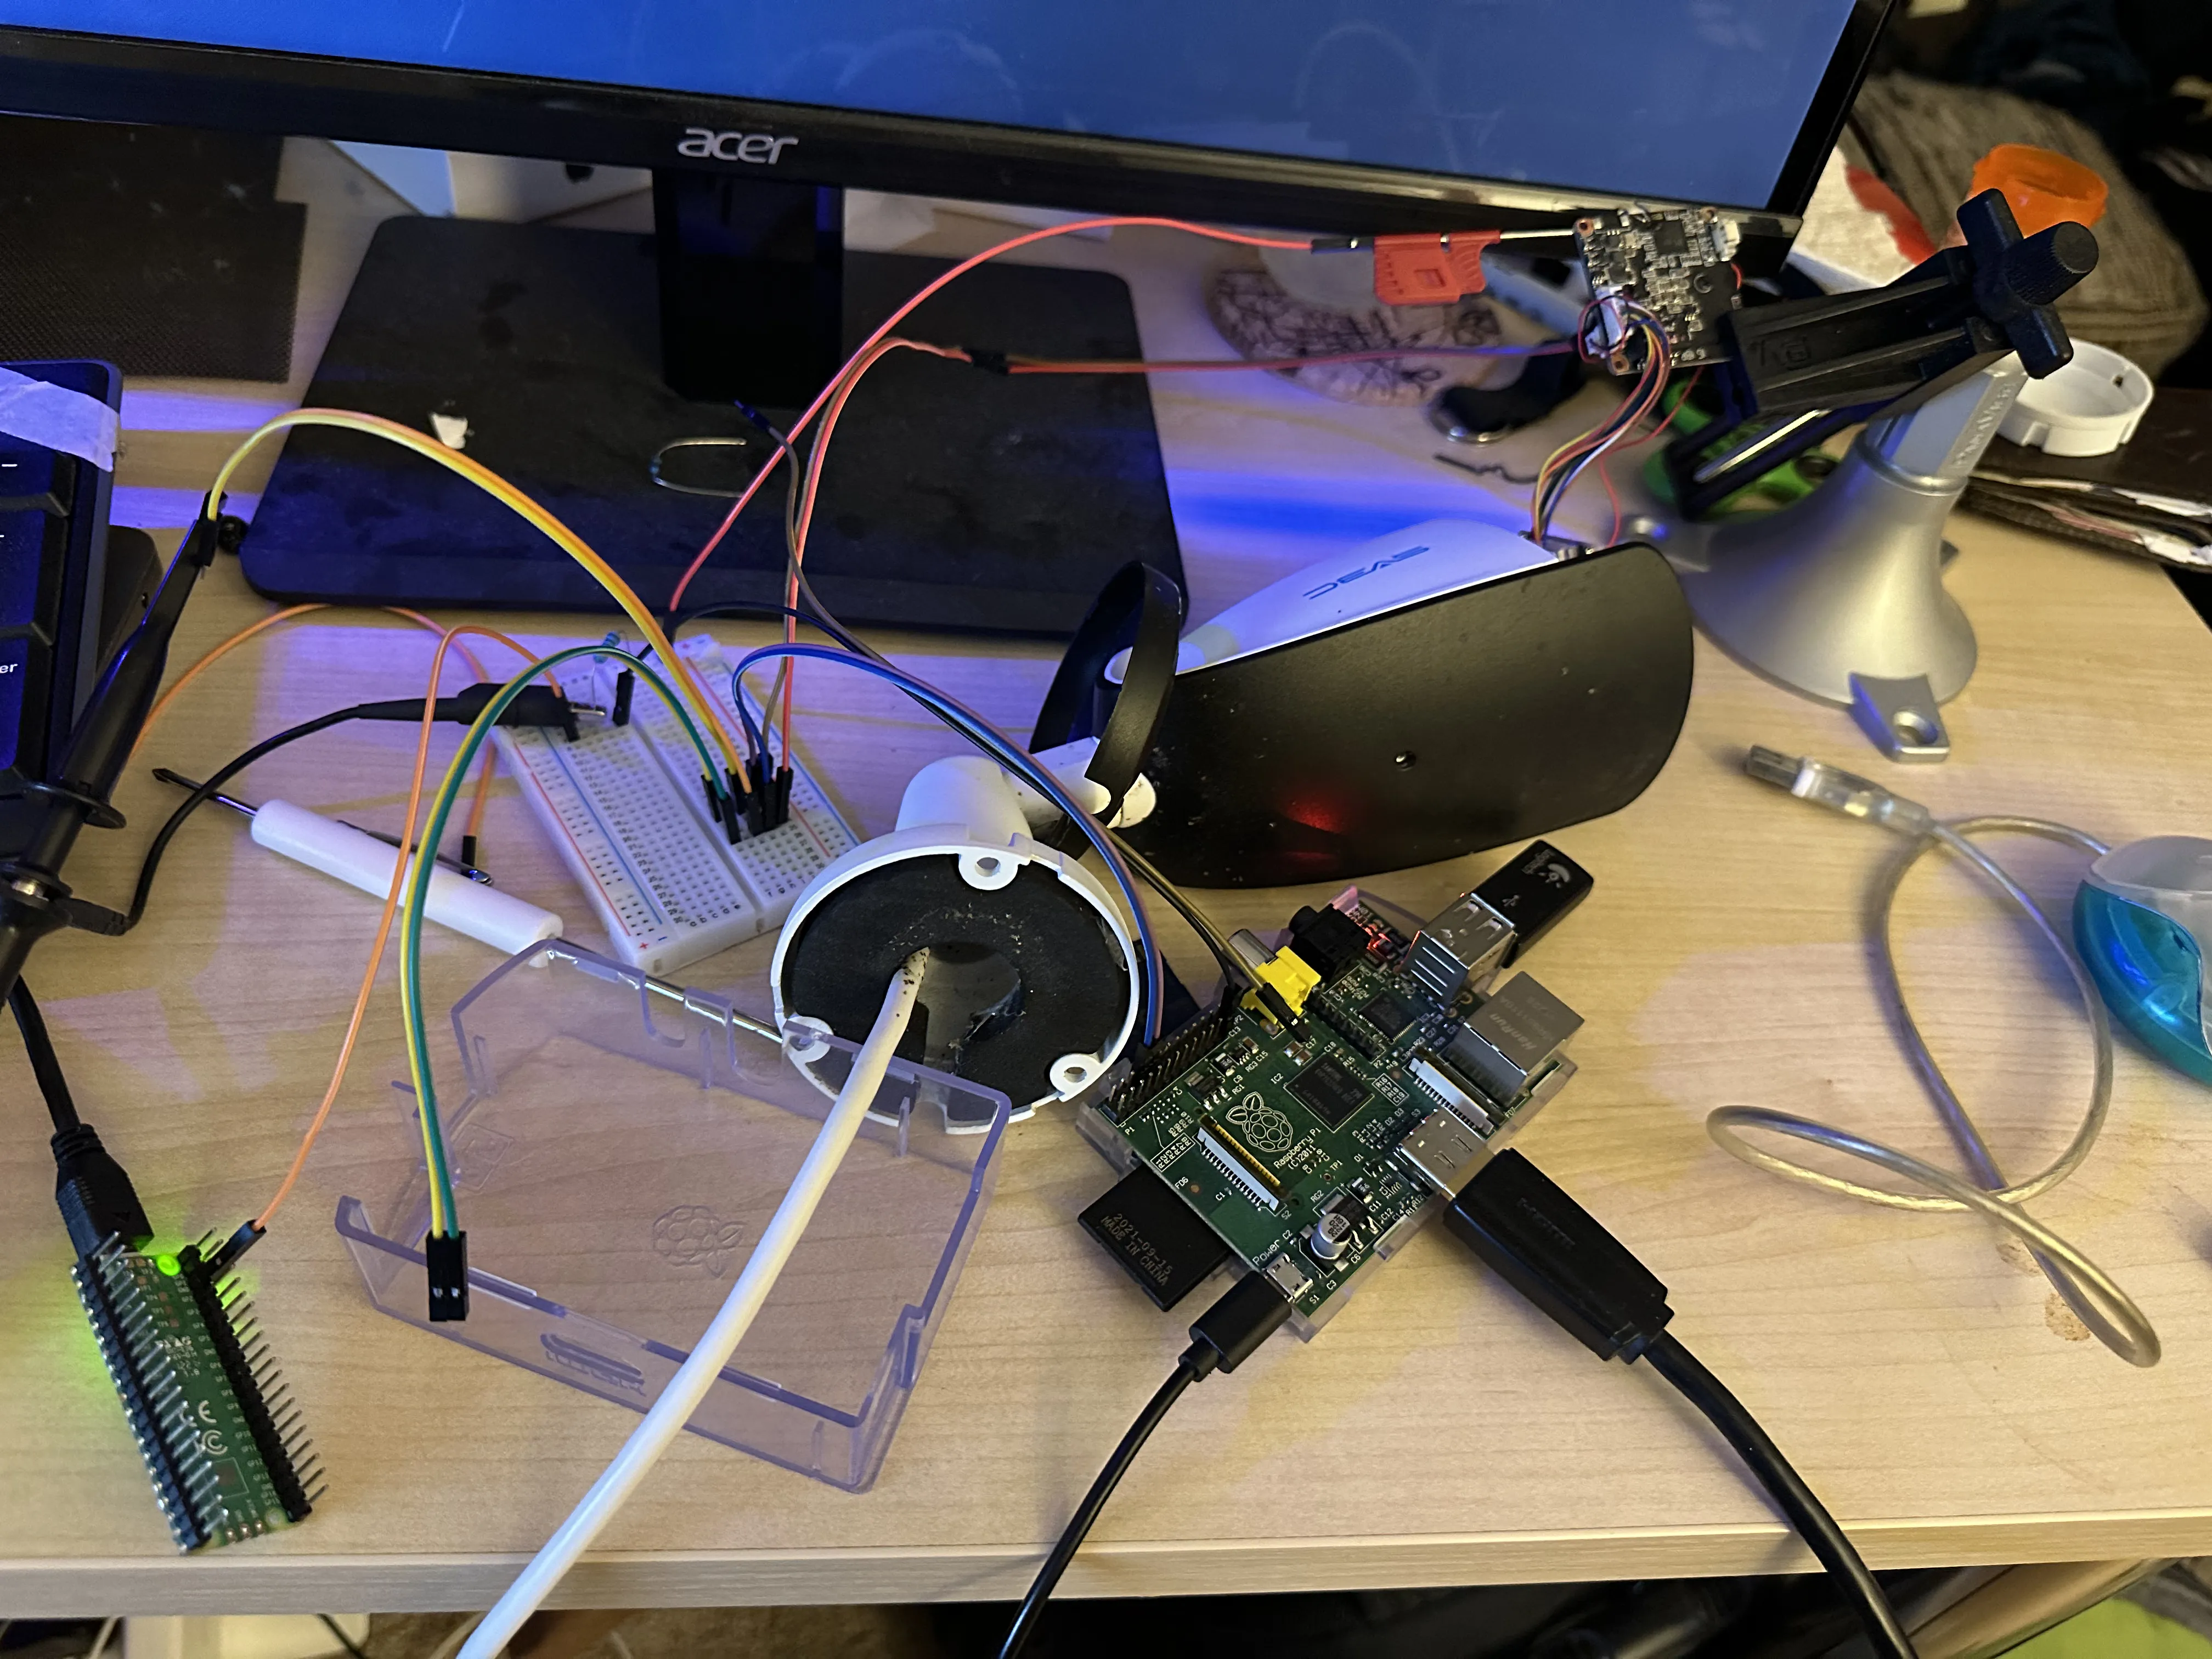
Figure 10
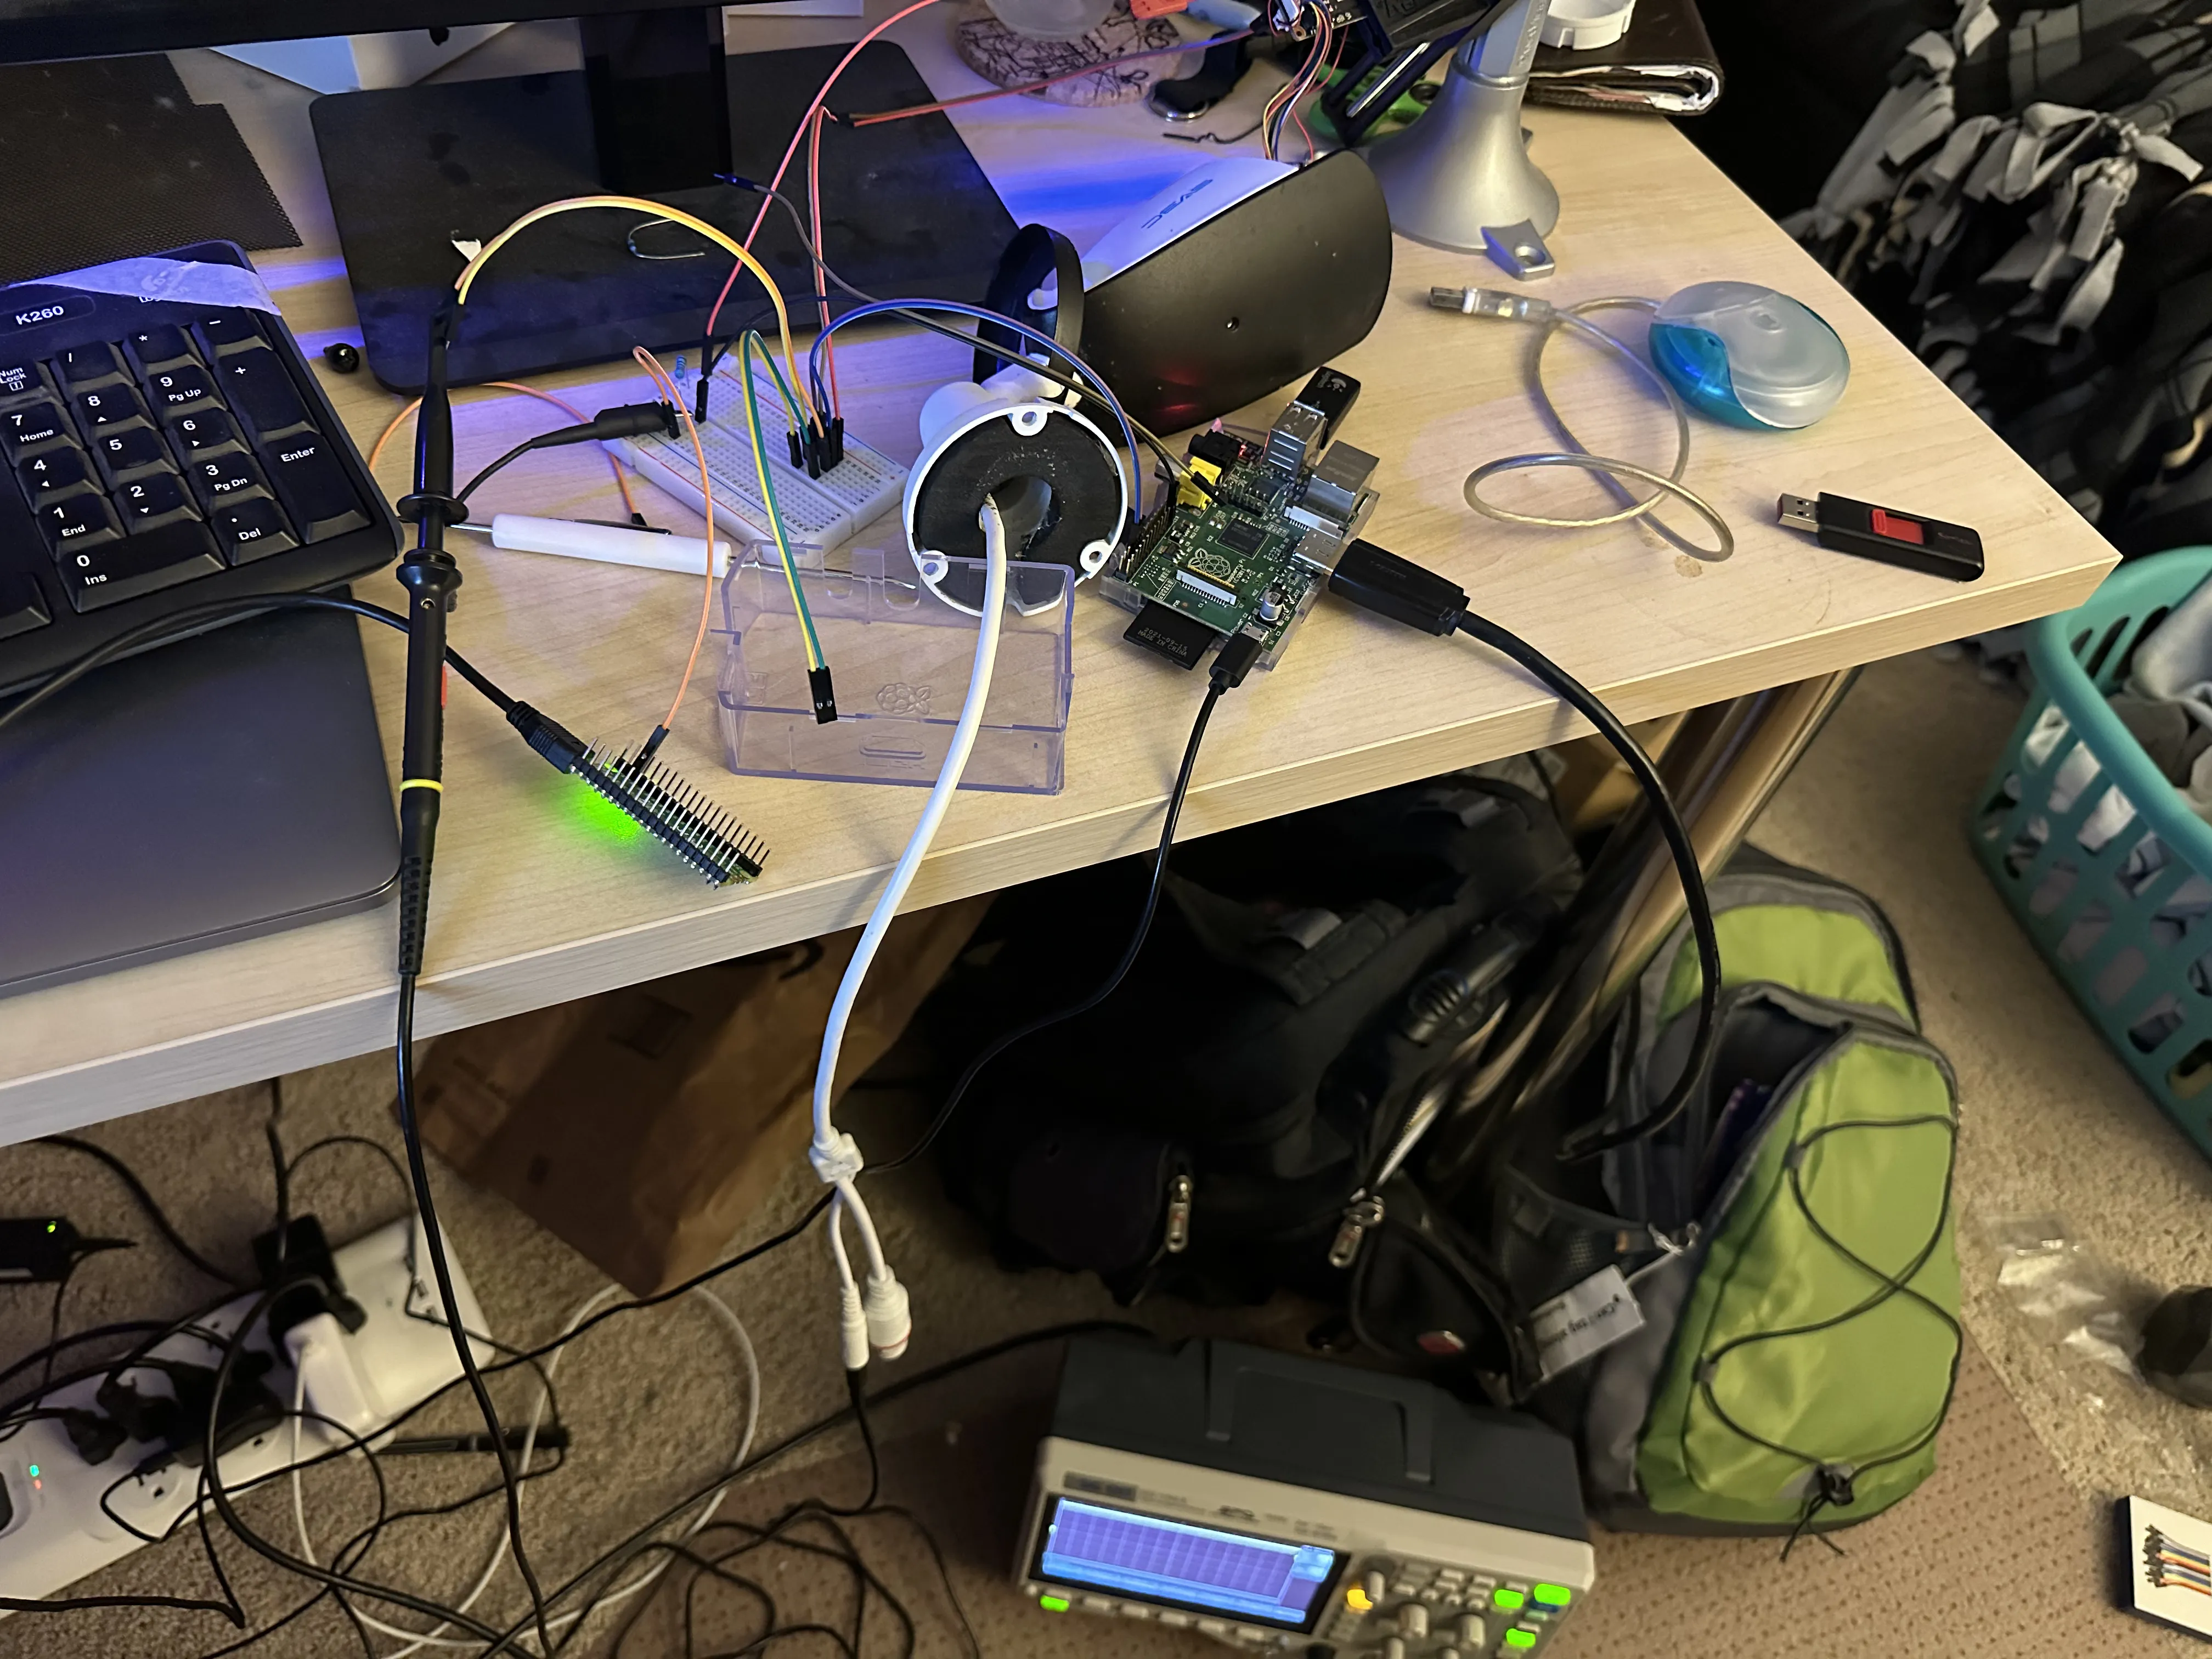
Figure 11
The kernel boot log shows interesting information about the kernel memory layout, I’m not sure if this indicates that there is or is not KASLR. I wouldn’t be surprised if it was disabled on this embedded implementation. There are a lot of strings that start with "aj", which presumably means "Anjvision", a Chinese IP camera company.
I figured out that you need to hold Shift+Enter before the kernel is loaded to enter the U-Boot prompt. You can see that I have entered the U-Boot prompt, and also performed a printenv to print the environment variables in Figure 12 and Figure 13. The variable bootcmd has a value of sf probe 0;sf read 0x21000000 0x00040000 0x00190000;bootm 0x21000000. This command copies a boot image from the SPI flash chip at chip select 0, from an offset of 0x00040000 into the flash, to an offset of 0x21000000 in memory. This image is 0x00190000 bytes (1638400 in decimal), or about 1.6 megabytes. Then it boots with bootm 0x21000000. The other environment variables pertain to various networking things.
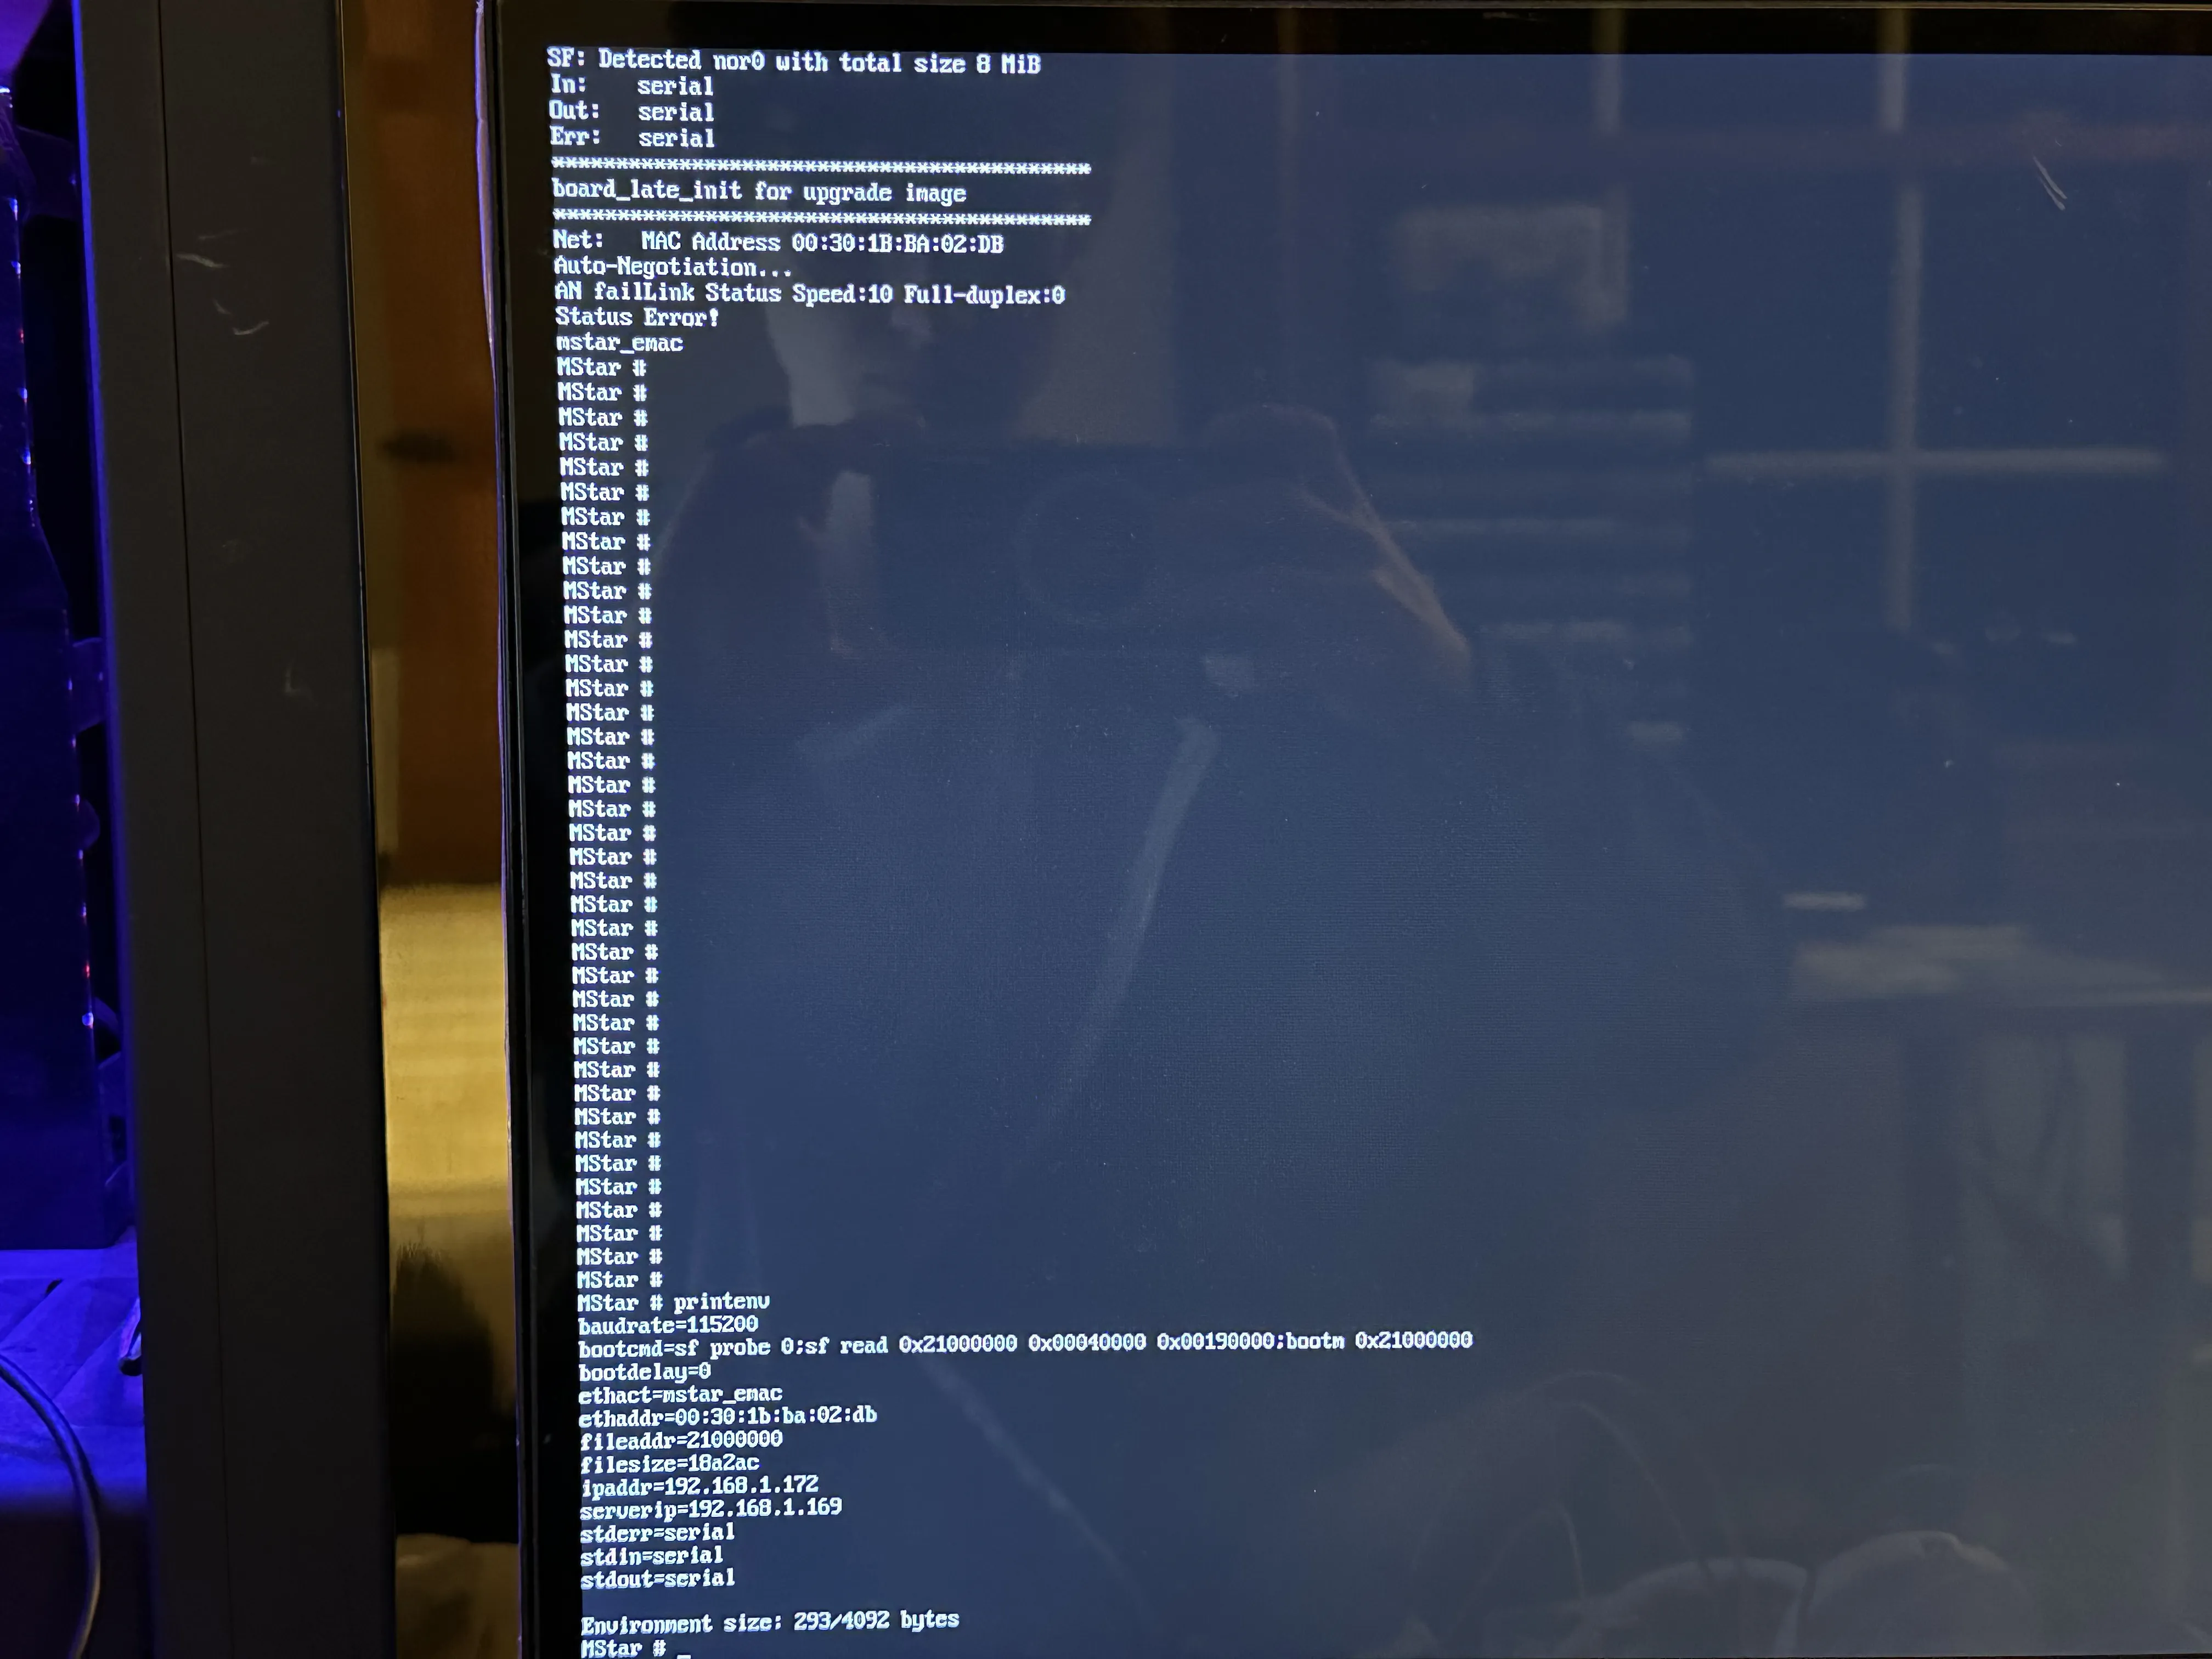
Figure 12

Figure 13
If you manage to get a U-Boot prompt, and it is not secured (e.g. you can use the read memory commands) you essentially have a free shot at the firmware on the flash chip. I decided to use an application named depthcharge to read out the memory to the console. depthcharge parses the console output and uses it to create a binary file (Figure 14).
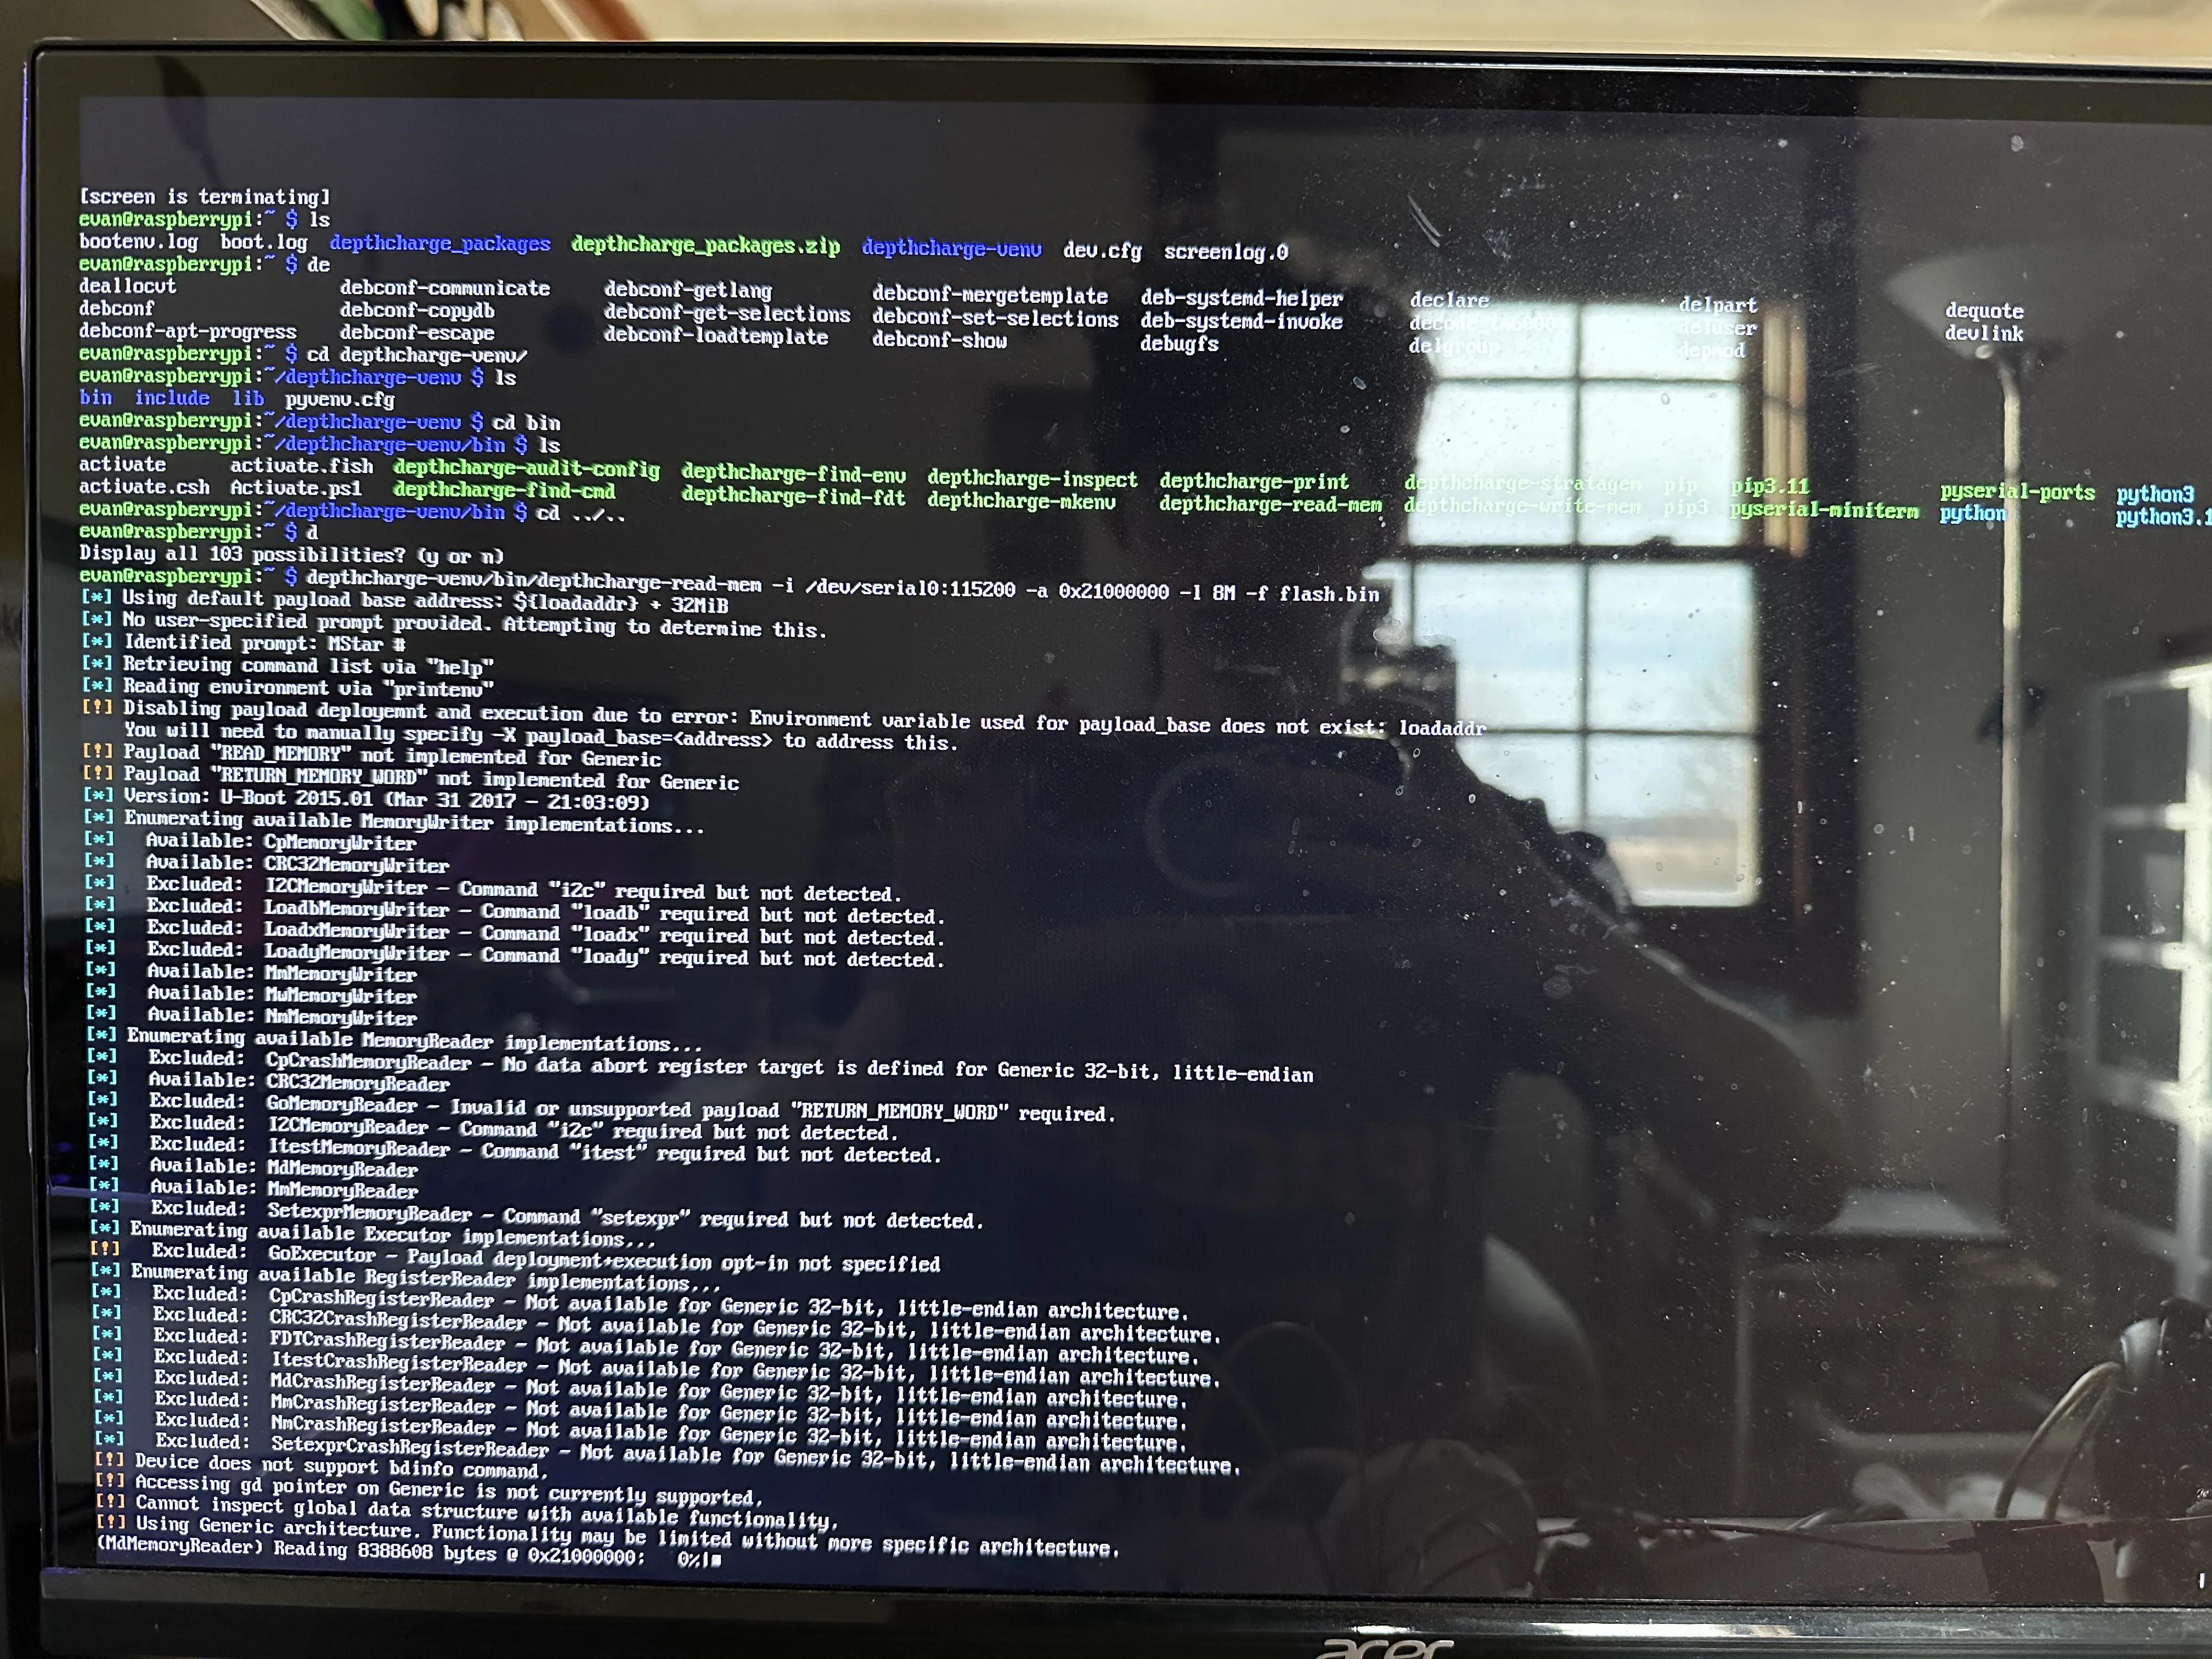
Figure 14
Even at a relatively fast serial baud rate of 115200, depthcharge was extracting the firmware at 190 B/s ! (Figure 15)

Figure 15
This is extremely slow, but I was willing to wait and work on other things in the meantime. Once it was complete, I transferred the file to my main computer and tried to extract some files. I couldn’t really get anything out of it, so I surmised that the file was probably corrupted. This is not that surprising, because the serial console does not have any Reliability features. At this point, I could have tried to dump the flash the same way again, and hope that it was a reliable transmission, or I could take a different approach.
Upon some further digging in the U-Boot console, I found a command to dump the flash through TFTP, which I did. The camera dumped it very quickly this way, and the result was not corrupt as far as I could tell.
I extracted the resultant binary file with binwalk -e. This yielded a large amount of files, all of which I can’t go over. There are many many custom binaries, I’ll just list out the more interesting ones:
libtools.so: This is the main, all-encompassing library file included in almost all of the custom binaries. It include many utility function and function for inter-process communicationmainctrl: sets up and runs some of the other binaries based on configuration filesdbg_server: presumably, this binary is some kind of remote command processor that functions over the network. I have barely reverse engineered it at all.web_server: This appears to be the application that serves the accessible web interface, I have reversed it a moderate amountdanale_server: this might be related to some kind of mobile app for viewing IP cameras. Could be a good target for further investigation, but probably requires dynamic REhik_server: I’m not quite sure what this is, but it seems like another general control program for the camera. PTZ (Pan Tilt Zoom is mention, RTSP streams are mentioned). This could just be the main control software. I’m not sure what “hik” means, unless it is a reference to the IP camera company Hikvision. I don’t know how these companies are associated.record_server: Seems to pertain to recording video, motion detection, and timed recording eventsupnp_port: Something to do with UPnP and various ports, could be an attack surfacemedia_server: has a ton of functionalities, have not reverse engineered extensivelycomm_server: this is some kind of XML API processing binary, inside of which I may have found a memory corruption vulnerability
Inside many of these binaries, there is a debug print function which prints the name of the file and line number. Most functions in these binaries also do not have names, so I wrote a simple Ghidra script to take instances of these prints and rename the functions:
Going back the the vulnerability that I may have found in comm_server, there is a function called proc_userauth_msg, which looks like it parses a username and password in XML. Well, there is a call to strcpy in this function when it is trying to print the VendorId. It appears to copy a string from the parsed XML to a buffer with a size of 256 bytes with strcpy, thus very likely creating a buffer overflow:
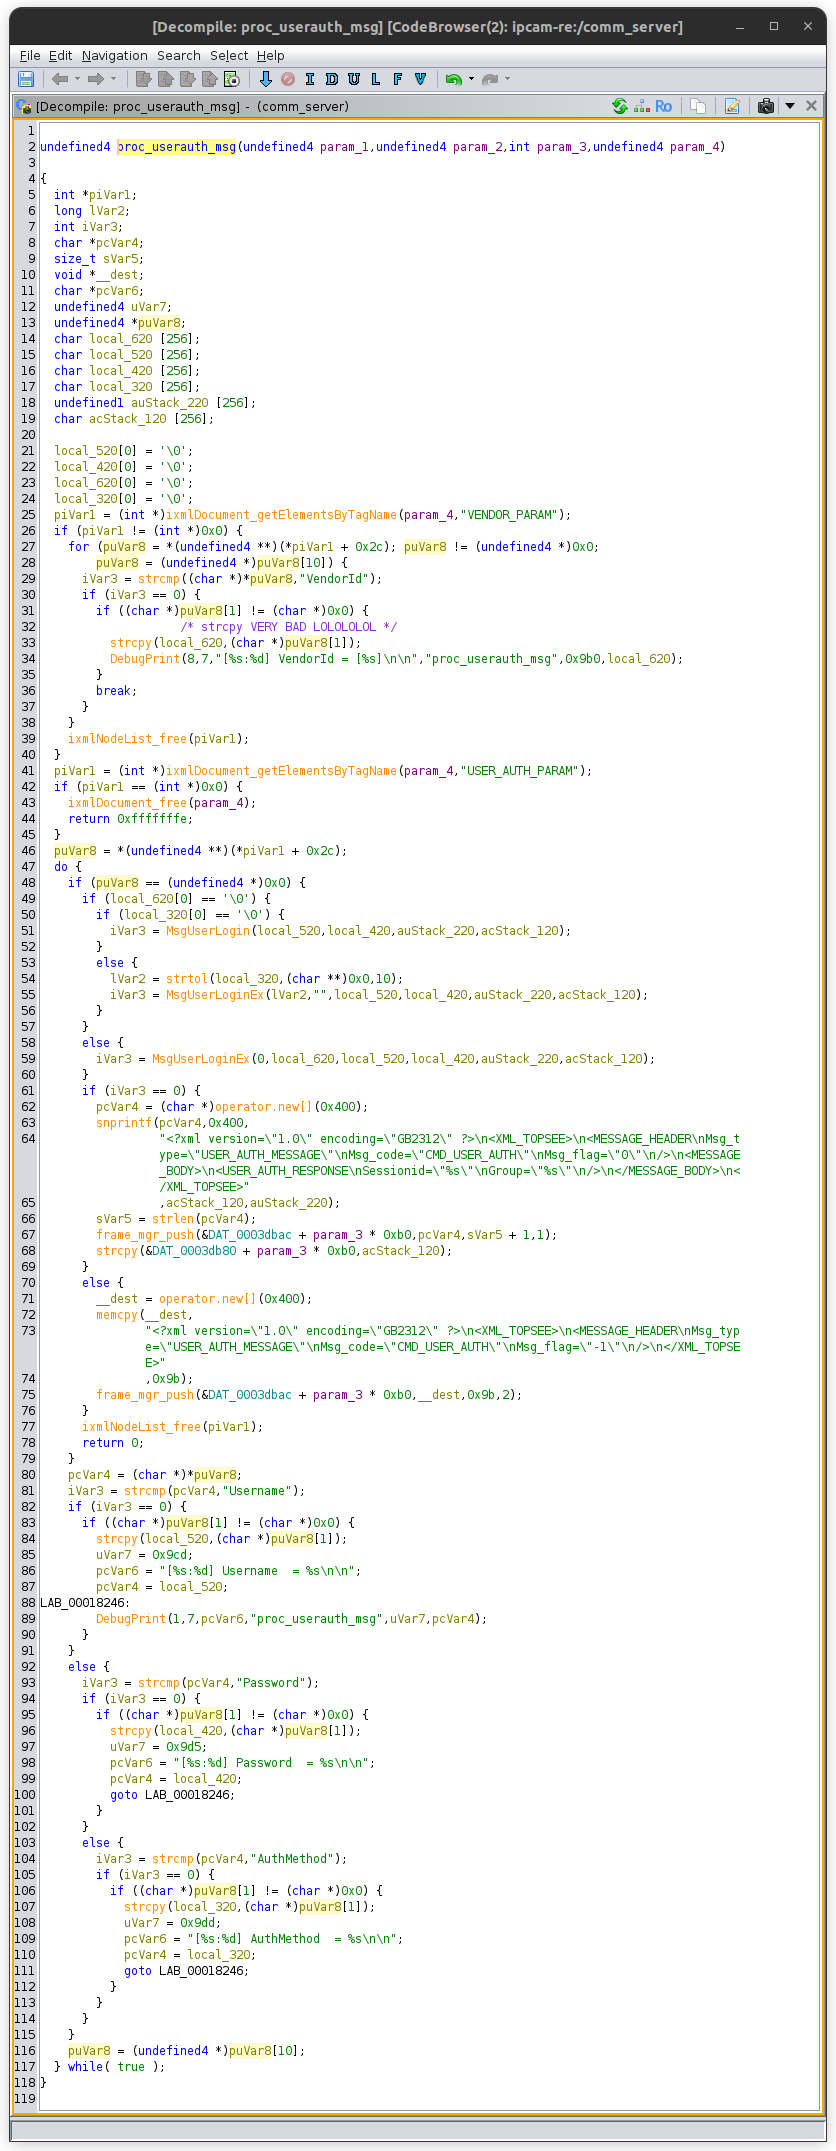
I have reverse engineered the surrounding code, and as far as I can tell, there is nothing to prevent this vulnerability from working. However, I have not actually tried to exploit the vulnerability, nor have I even confirmed that the comm_server binary is running by default on the camera. It is entirely possible that the binary is an optional API service.
This project is ongoing. Look for updates soonTM!
Update February 24, 2026
I would like to be able to get a root shell on the device before developing the hack so I don’t have to do it blind. Here is how I did it. (there are no 'figure' labels this time, I might add them later)
If you do not hold enter at boot, the kernel continues its boot log, then a service called ajlogin is started. We have a file called ajlogin in _flash.bin.extracted/squashfs-root/etc/init.d/:
This basically starts a terminal session on ttyS0 using the getty binary, with terminal settings of 115200 baud and a VT100 terminal emulation.
If you type after the kernel boot log, you will realize you are in a login prompt, asking for a user and a password.
We have a file named passwd_sys as part of the dump:
The password for root is unfortunately hashed, however it is hashed with a method of $1 which seems to mean MD5-crypt. This is a legacy method of login, which basically just runs 1000 iterations of MD5 internally. Still brute forceable depending on the search space. It is also salted, so no rainbow tables today :(
If you type in the user as any one of these other users, you aren’t even prompted for a password, just denied access. That means we need to search our flash dump for some clues on what the root password could be.
The most obvious clue I found was the presence of the 0-byte file flag.set.passwd in squashfs-root/opt/ch/. There are a lot of relevant binaries in this same directory, so that’s a good sign. If we grep for the string “flag.set.passwd”, we get a single match: the binary mainctrl.
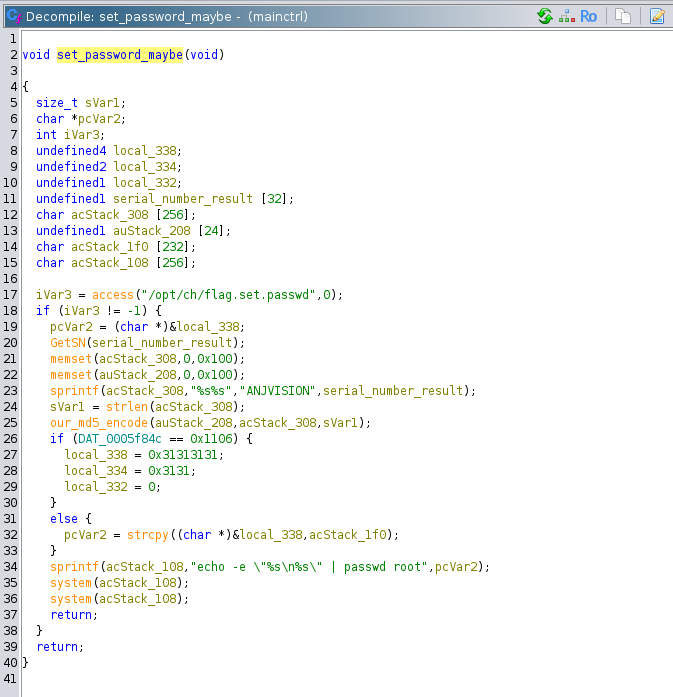
Loading the mainctrl binary up in Ghidra and searching for this string brings us to this function I named set_password_maybe:
This function is called directly in the body of the mainctrl main function:
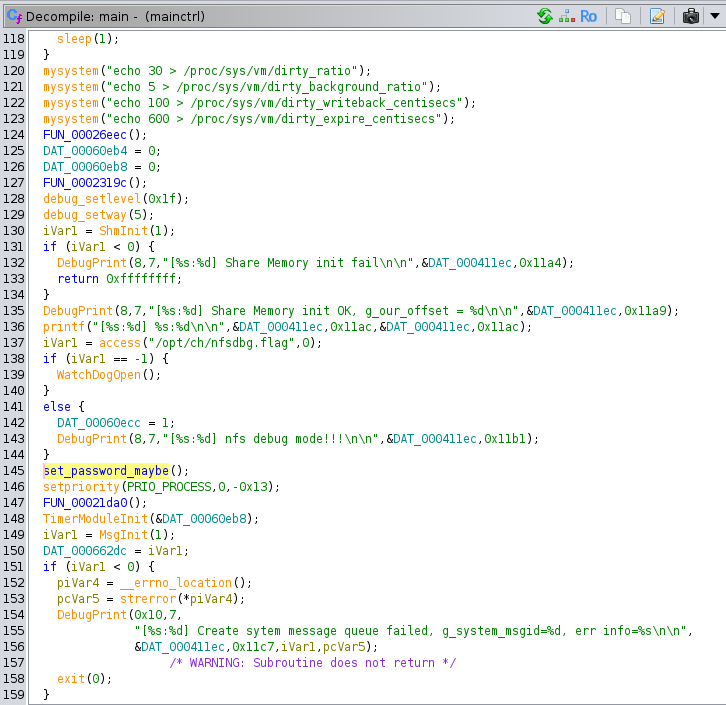
There are no loops or conditional statements that could block this function from running (unless some major system component failed like shared memory). So if mainctrl is running, then we know that this function gets called, apparently every time the system turns on.
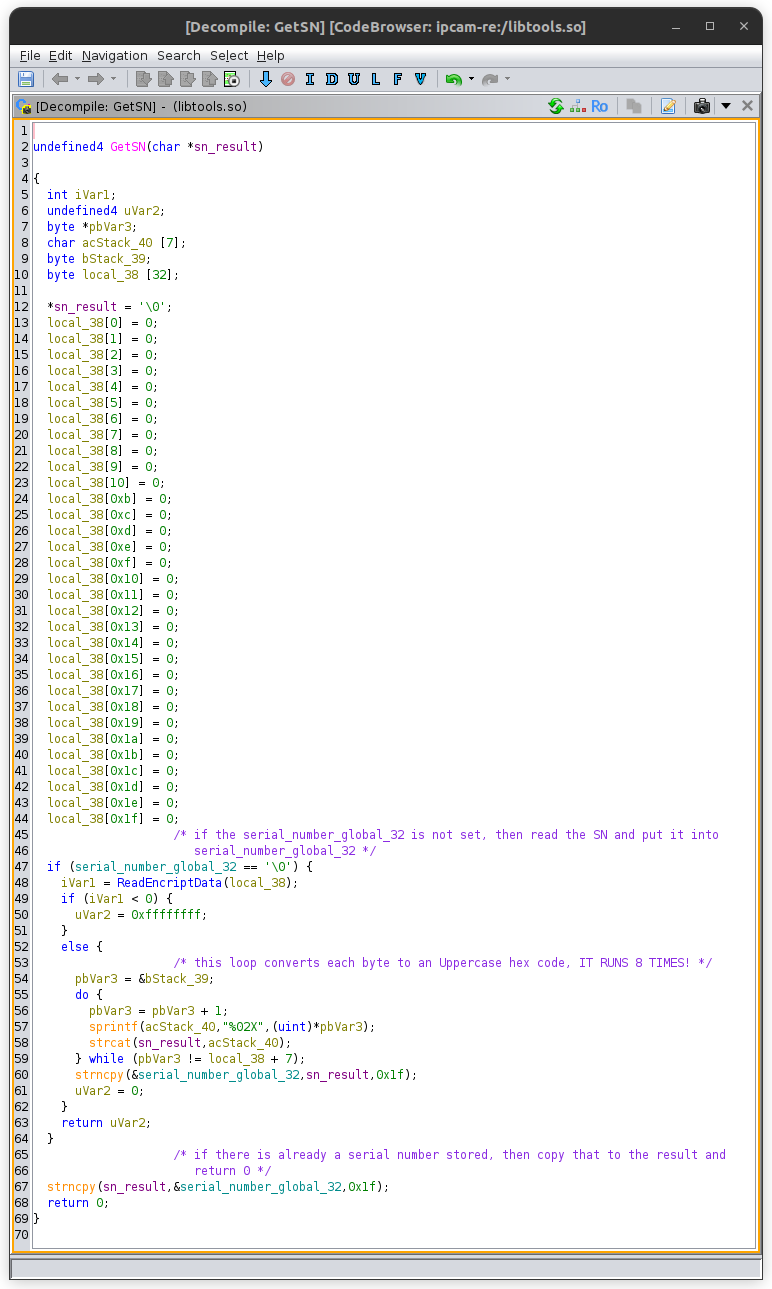
Going back to set_password_maybe, if the flag.set.passwd file exists, then the function calls GetSN (presumably standing for GetSerialNumber), and puts the results in a buffer. This buffer is concatenated on to the end of the string “ANJVISION” (the company that manufactures the board and programs the firmware), and MD5 hashes this string to get the password. This seems pretty straightforward, we just have to get the serial number.
The GetSN function is part of libtools.so. This function starts out by checking if the first byte of the global variable serial_number_global_32 (my own name) is null. If it is, it needs to read the serial number from elsewhere. If it has been set, then copy that to the destination buffer and return. To read the serial number, it calls the function ReadEncriptData [sic]. ReadEncriptData is passed a 32-byte buffer local_38, into which the serial number is probably written. GetSN takes this and loops through the first 8 bytes, formatting each byte as two uppercase hex digits, concatenating them together, and writing them into the result buffer. At the end, this buffer is copied into the serial_number_global_32 for faster future use.
The ReadEncriptData function is a bit more complicated. This function is a mess of different ways to get the serial number, from ReadEncriptDataFromEncript, to ReadEncriptDataFromSoft to getting the product type to just generating it randomly and saving it to a file through GenRandomEncriptData. The first function called ReadEncriptDataFromEncript does some product type checks, then tries to initialize a character device at /dev/cry and read some data from it. There were some lines in the kernel boot log about a CRY device:
Based off of these log lines, it is likely that it failed to read from /dev/cry. It’s not quite clear what this device is, but based off its name and the context, its probably some kind of on-chip cryptographic storage area. The next fallback to get the serial number is ReadEncriptDataFromSoft:
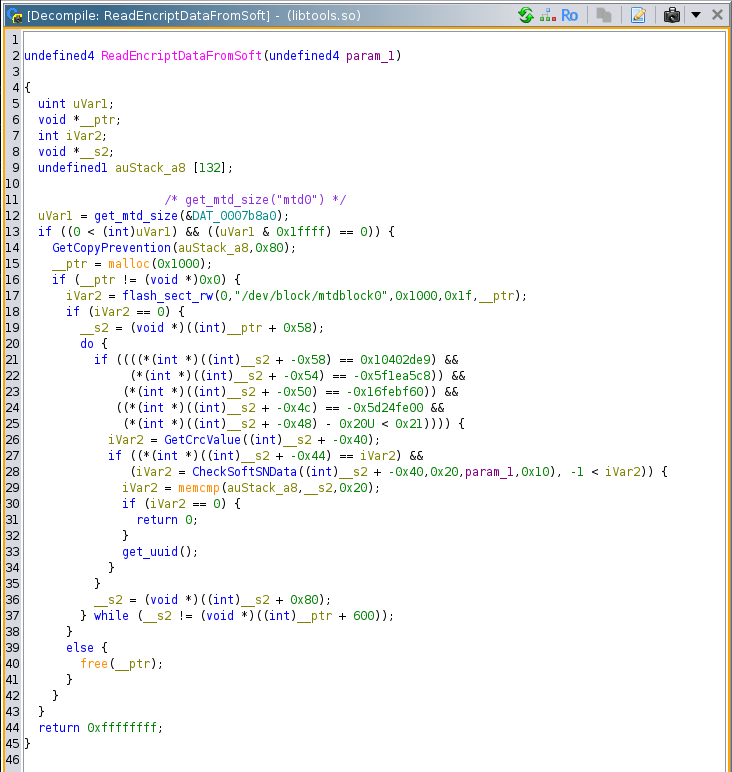
This function does a lot, but it is primarily reading from /dev/block/mtdblock0 and doing some additional processing. The mtdblock is a legacy linux device that emulates a block device on top of raw flash memory. We probably have the capability to debug/emulate this function and provide the block data from the flash image somehow, but that would be a lot.
The last fallback for GetSN to get the serial number is through GenRandomEncriptData:
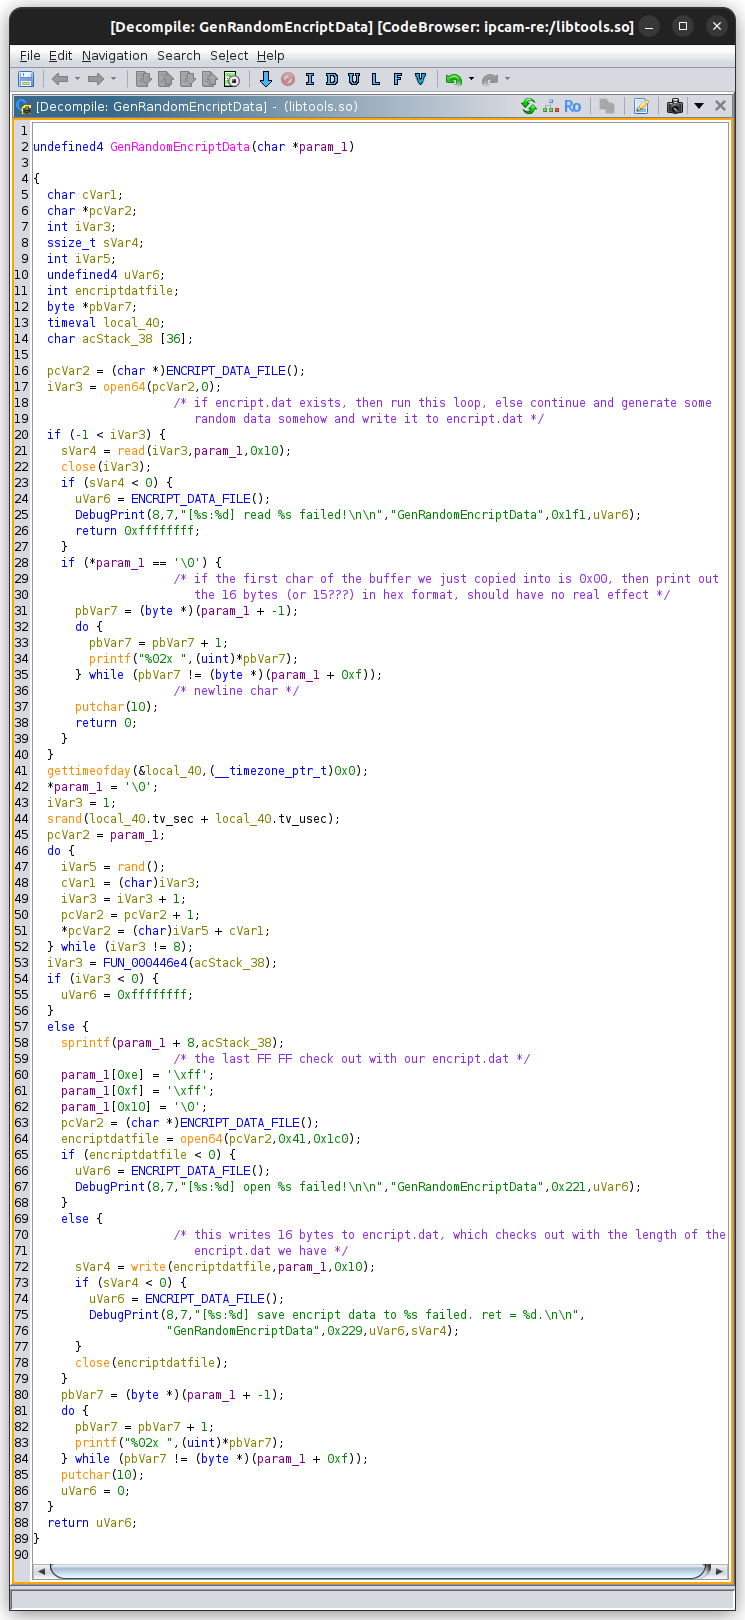
This function tries the open the file /mnt/nand/encript.dat (the string provided by ENCRIPT_DATA_FILE) and read it into the output buffer. If the file cannot be read from, it creates a new one and populates is with some random data from rand seeded with the time of day in seconds plus the time of day in microseconds. The first character of this 16-byte file is to be 0x00 and the last two bytes are 0xFF. We actually have this file in our flash dump:

You can see the first byte 0x00 and the last two 0xFF correspond to the creation logic. Bytes 1 through 7 are random, while the next 6 bytes being a string derived from some kind of product type table. The product type is evidently HC200A. [maybe do some research on this board number?] If this was just generated, then this function writes it to the /mnt/nand/encript.dat file. Finally, it prints the output and returns.
Now, theoretically, we should have sufficient information to get the password being set inside set_password_maybe. But I wasn’t quite satisfied by encript.dat. That file could have been written at any time, and the password is being set every restart. If the serial number is successfully retrieved from ReadEncriptDataFromSoft, then that would override the encript.dat contents. At this point, I decided to see if GetSN was called in any other files. It is in fact called in a few, most notably inside the web_server binary:
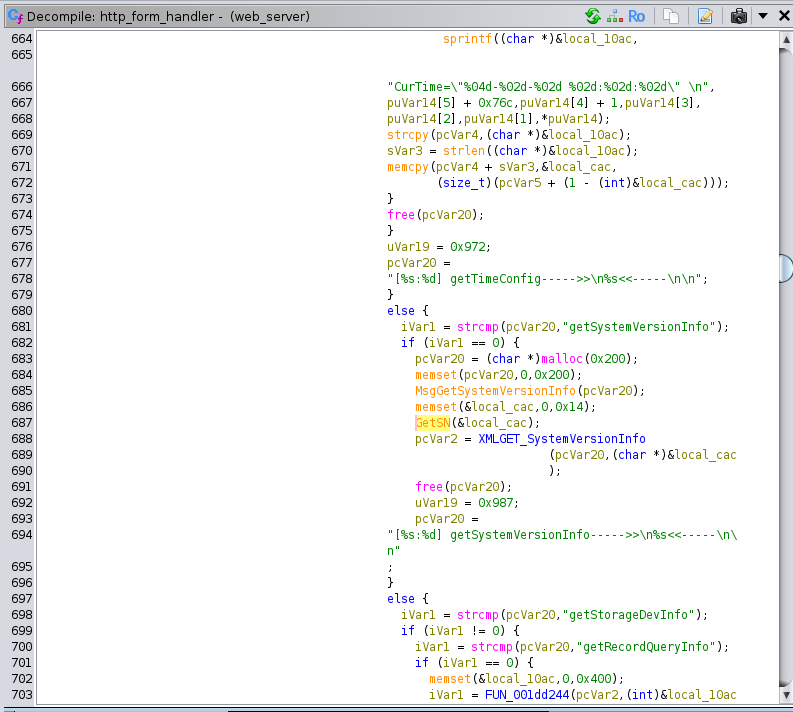
GetSN is called inside of http_form_handler which is an enormous function that processes XML SOAP requests inside of HTML forms. These requests are sent with asynchronous JavaScript from the web interface, which means that there should be some way to get the serial number through the web interface, or from constructing our own SOAP request. This particular request appears to be getSystemVersionInfo.
Logging in to the web interface, we can immediately see the serial number in the configuration page.

If we look under the hood a little bit in the Network tab of the page Inspector, we can see that our browser sent the getSystemVersionInfo request.

And here is the raw response:
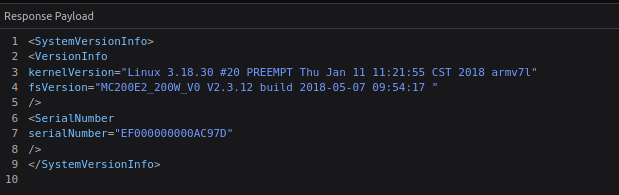
So the current serial number of the device is EF000000000AC97D. If mainctrl runs on every restart, then that is the string that will be used to create the password. I vibe-coded a small program to take a string, hash it with MD5, then take the result, combine it with the salt in passwd_sys to be put through MD5-crypt so we can compare it to the password hash: (this logic is incorrect as you’ll see in a minute)
I tried the data from encript.dat and the serial number that we just retrieved, and neither of these matched:
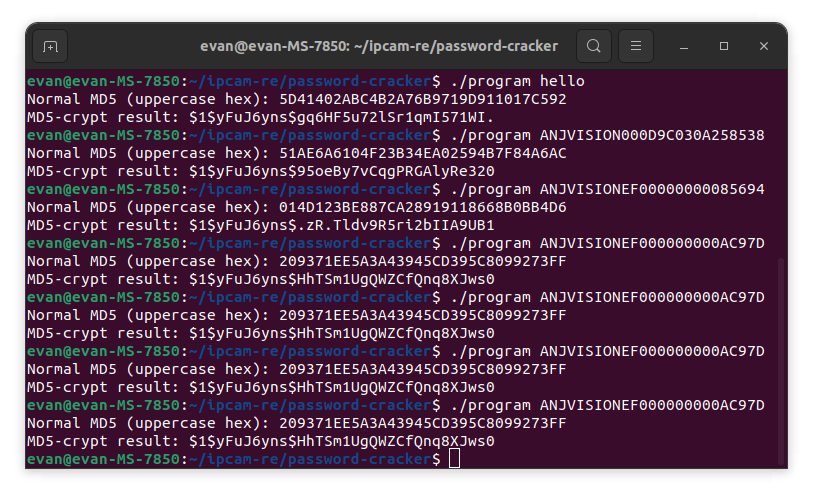
My main theory at this point as to why the hashes were not lining up was that the implementation of MD5 in the firmware (our_md5_encode) might be incorrect compared to a more established library’s implementation. That was a bit of a stretch, but I decided that I needed to actually run the code and see the output.
I first tried using the Ghidra Emulation functionality, but I couldn’t get it to call libraries for some reason. Then I moved on to dynamic analysis using qemu-arm connected to gdb-multiarch. This worked pretty well, although I couldn’t get Ghidra to recognize/decompile shared libraries that I had already analyzed with Ghidra. Thus I ended up skipping the call to GetSN entirely, and manually implanting the serial number hex codes directly into memory. As it turns out, I had initially overlooked some logic in set_password_maybe! The function does not actually use the entire MD5 hash result as the password. Instead it does a strcpy from acStack1f0, and uses the result pointer (which points to the terminating null byte of the copied string) as the input to change the password. Apparently, this only uses the last 8 bytes as the input to the format string:
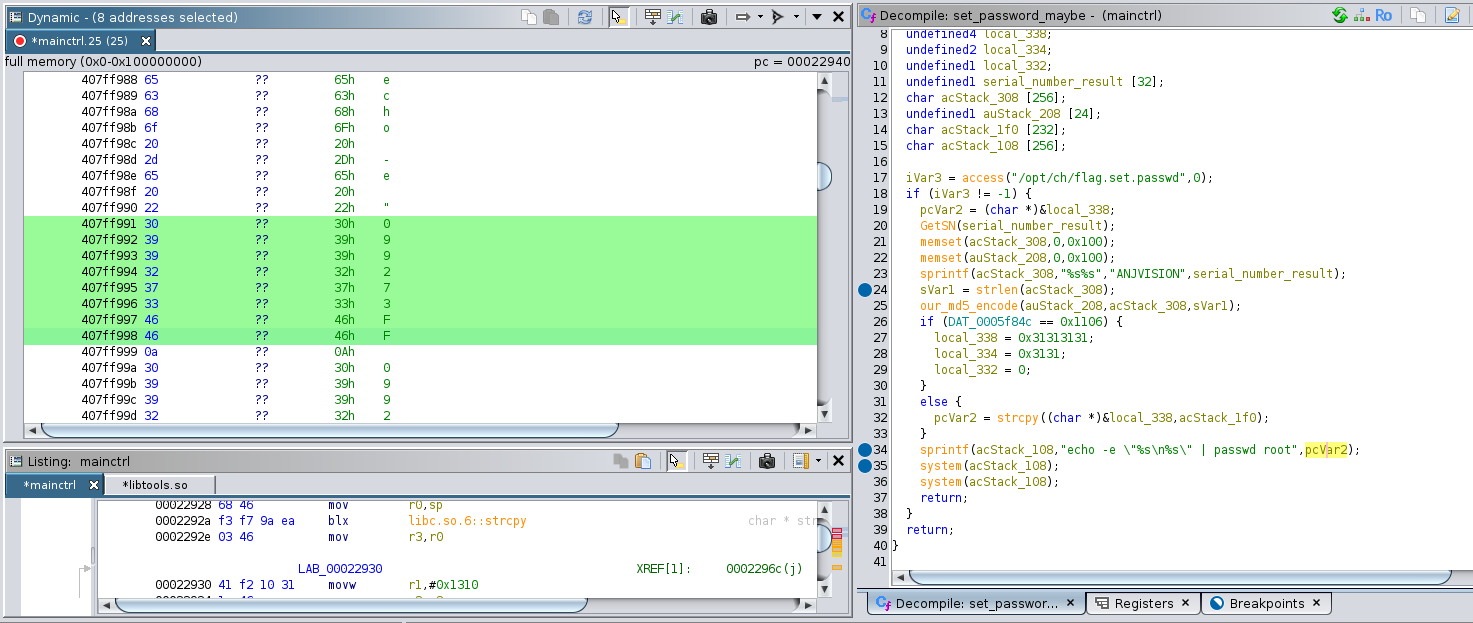
In this image, you can see that the formatted command is echo -e “099273FF\n099273FF” | passwd root”. The doubling of the password is to input it a second time when the passwd binary asks the user to confirm their new password. I’m not sure why they are calling system twice however.
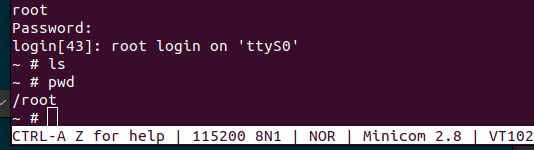
Inputting the password 099273FF results in a root shell!
I simply CANNOT BELIEVE how similar this real situation of finding the device’s root password was to a task from the NSA Codebreaker Challenge! This whole process could easily be Task 3 or Task 4 of a 7-task year.
The next step in this project is to probe the comm_server process, make sure it is running, and try to see if I can send a valid request to it. After that, the plan is to use my newly found root shell to install gdbserver to help with the development of the exploit. I am quite optimistic, because I have determined that port 8091 (the port that I believe comm_server is running on) is open. Also, none of the binaries have stack canaries and none of them are compiled with PIC so the odds of exploiting the previously discovered buffer overflow are pretty good.
See you soon!